Please make sure to review the following before conducting UAT(Validation).
-
For Sponsor/CROs that introduce CRScube Solution, CRScube solution is, in principle, classified as a commercial system.
-
For a commercial system, the original developer, CRScube, must develop and maintain the solution according to the development procedures (Software Development Process/Validation Process) and maintenance procedures (Maintenance or Change Control Process).
The user(Sponsor/CRO) confirms the appropriateness of this through Audit, etc. -
In addition, a process to verify whether each company's required functions are satisfied may be added. Through the so-called UAT(User Acceptance Test) process, it is determined whether it can be applied to actual work.
-
The content below is UAT material prepared for users who perform work using cubeLMS, and the Evidence or Test Result for each item has been organized.
-
Detailed information on functions and settings can be found in the manual or tutorial.
Manual: https://manual.crscube.io/emlms/cubelms_emanual_kor
Tutorial: https://manual.crscube.io/emlms/cubelms-tutorial-for-study-user-trainee
ADMIN
[USER MANAGEMENT]
A User with Admin privileges can configure the Group and Job title to assign to a User and create a User.
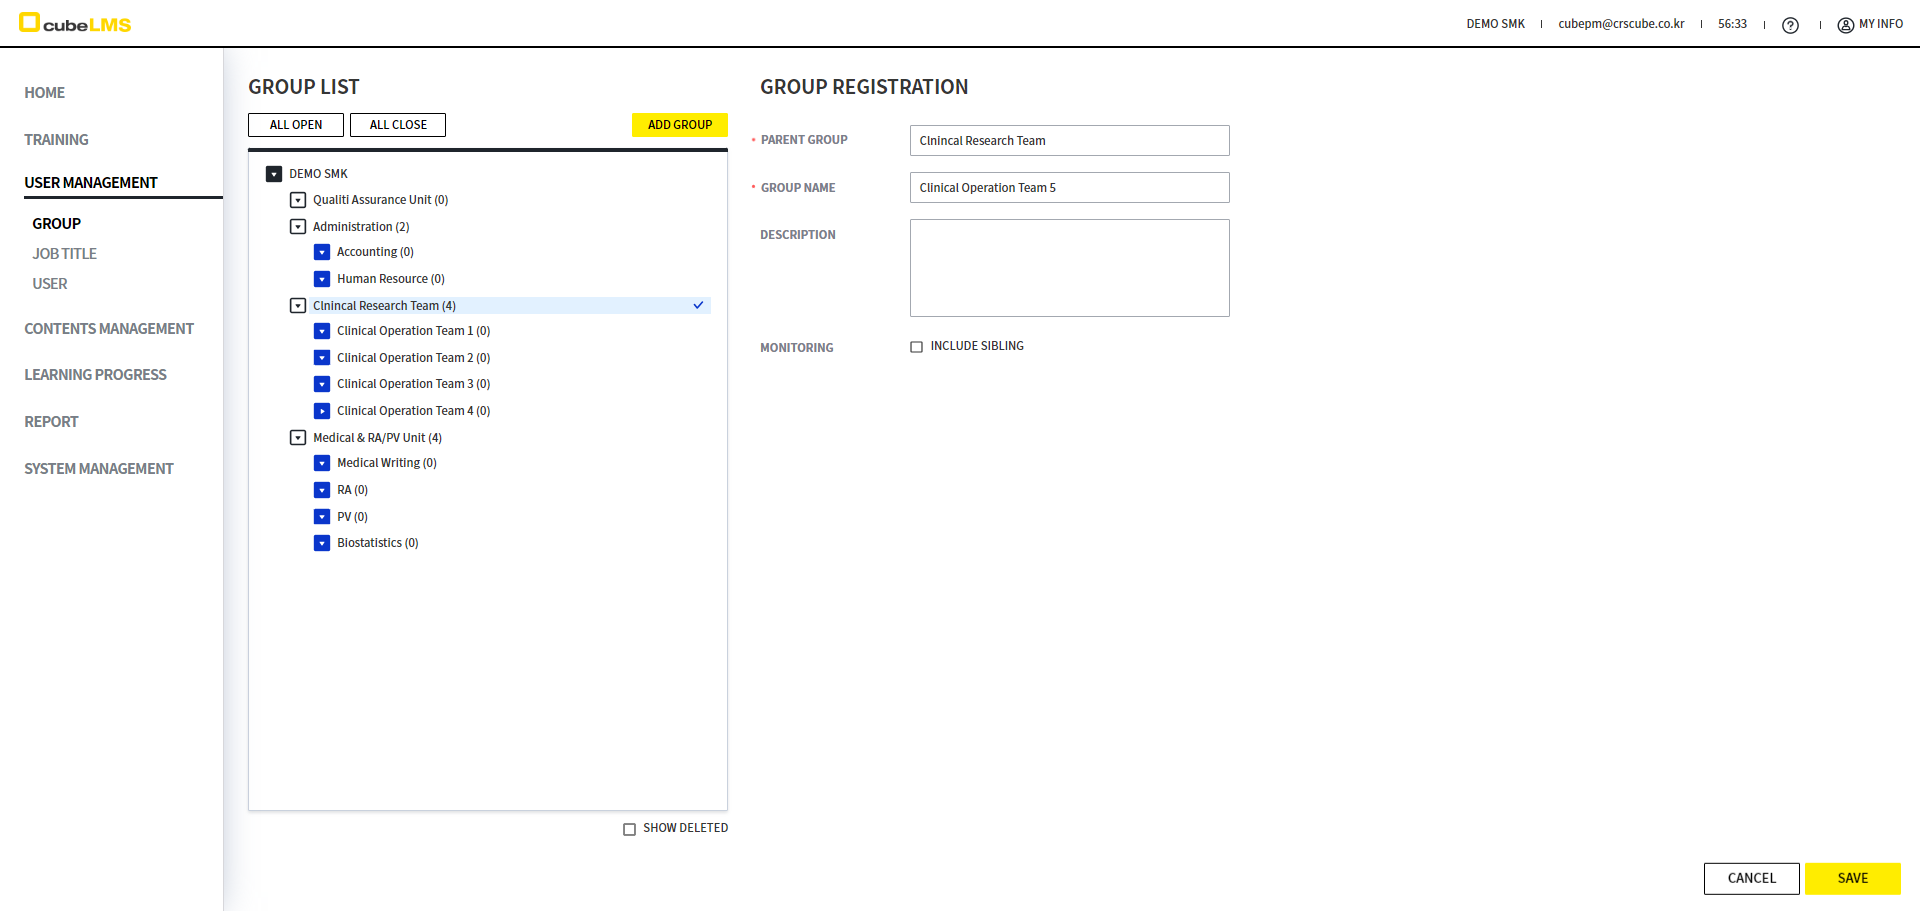
GROUP
You can directly configure the Group to assign to the User.
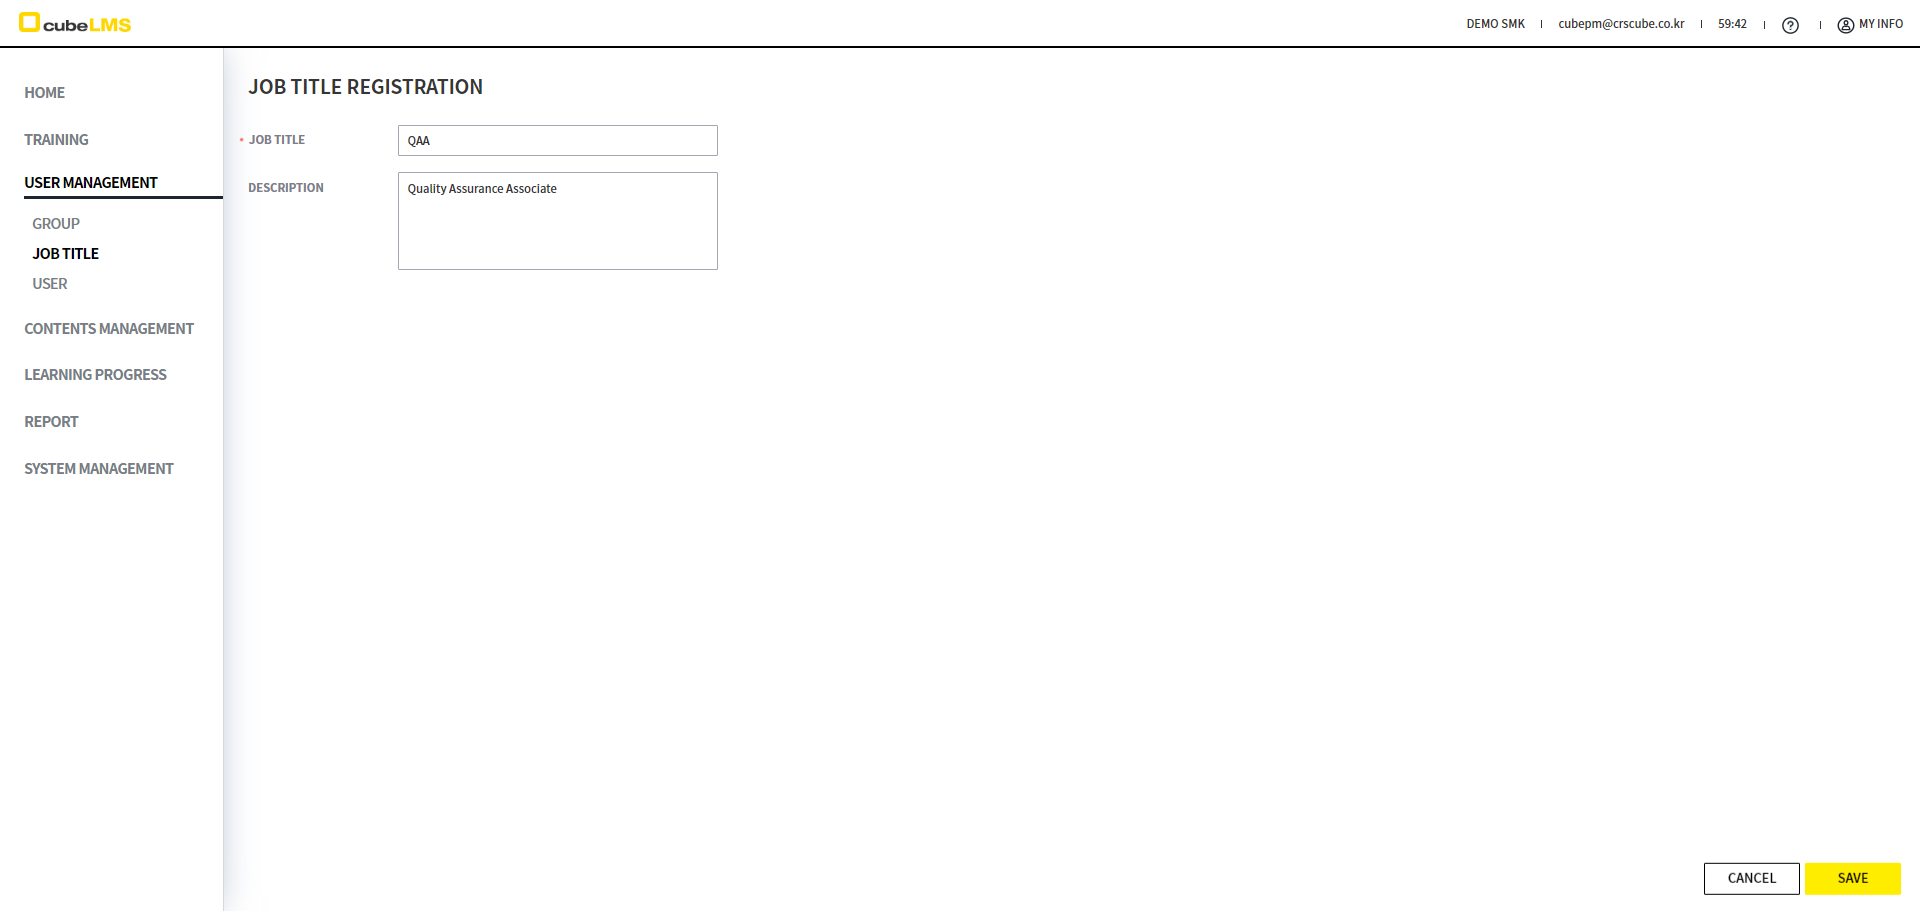
JOB TITLE
You can configure the Job title assigned to a User directly.
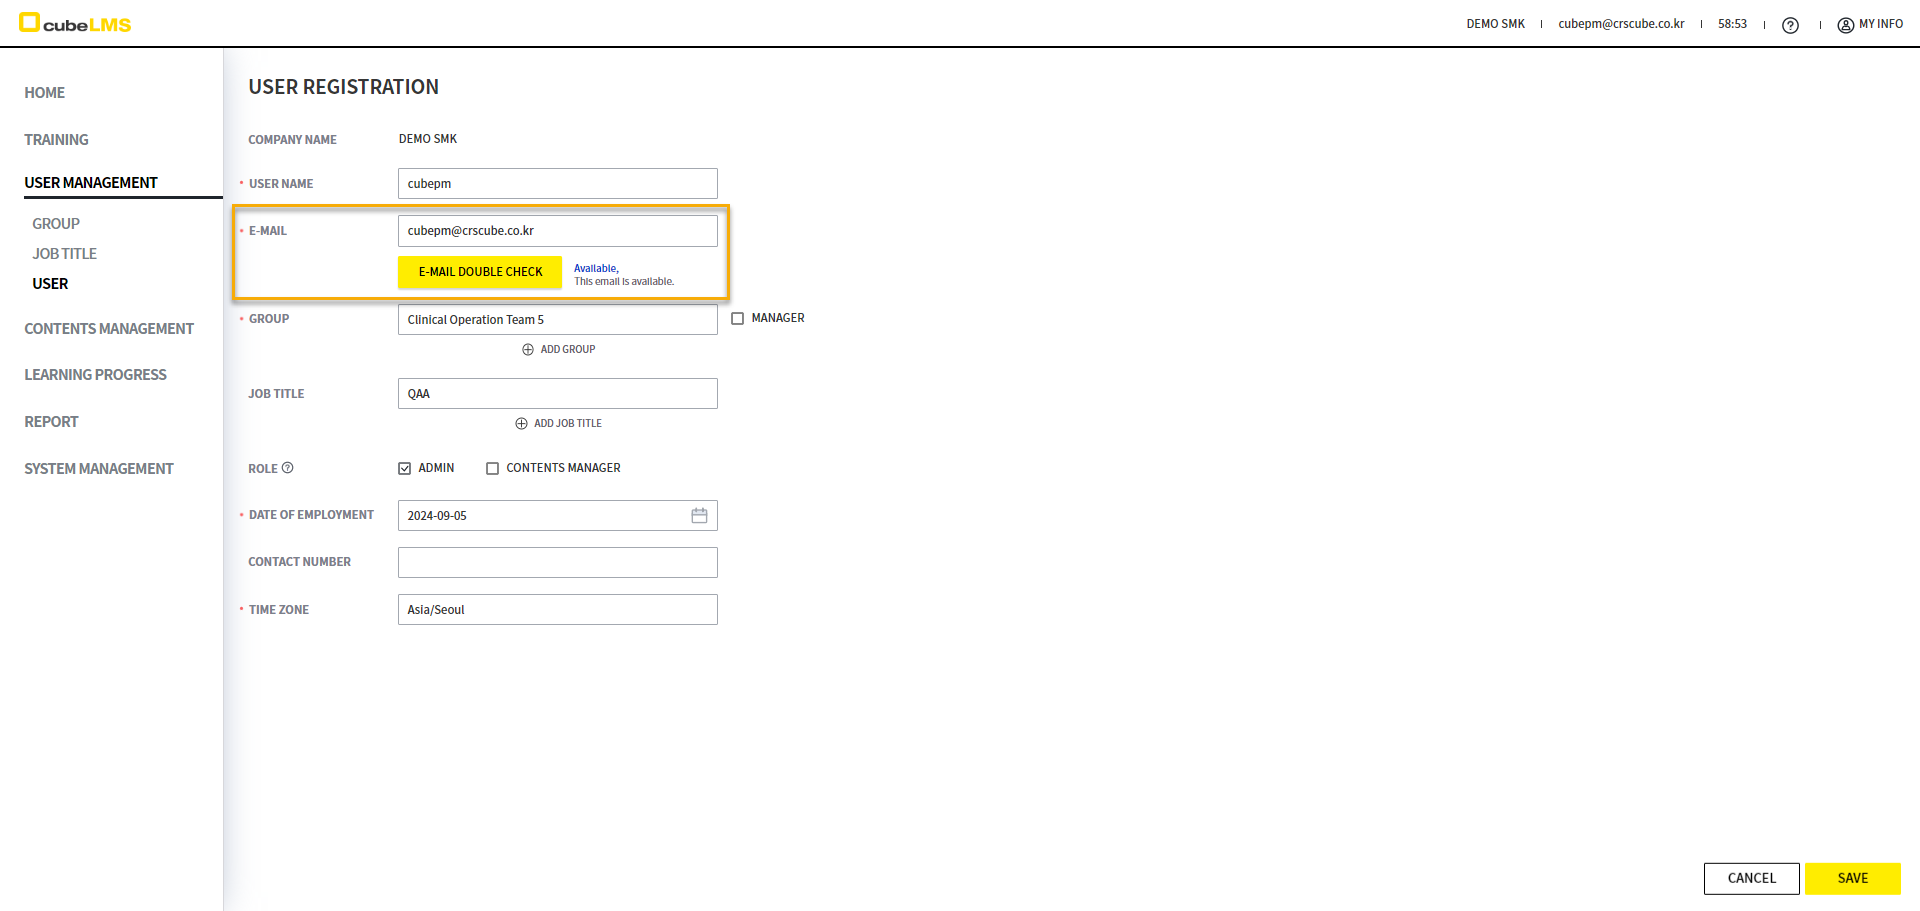
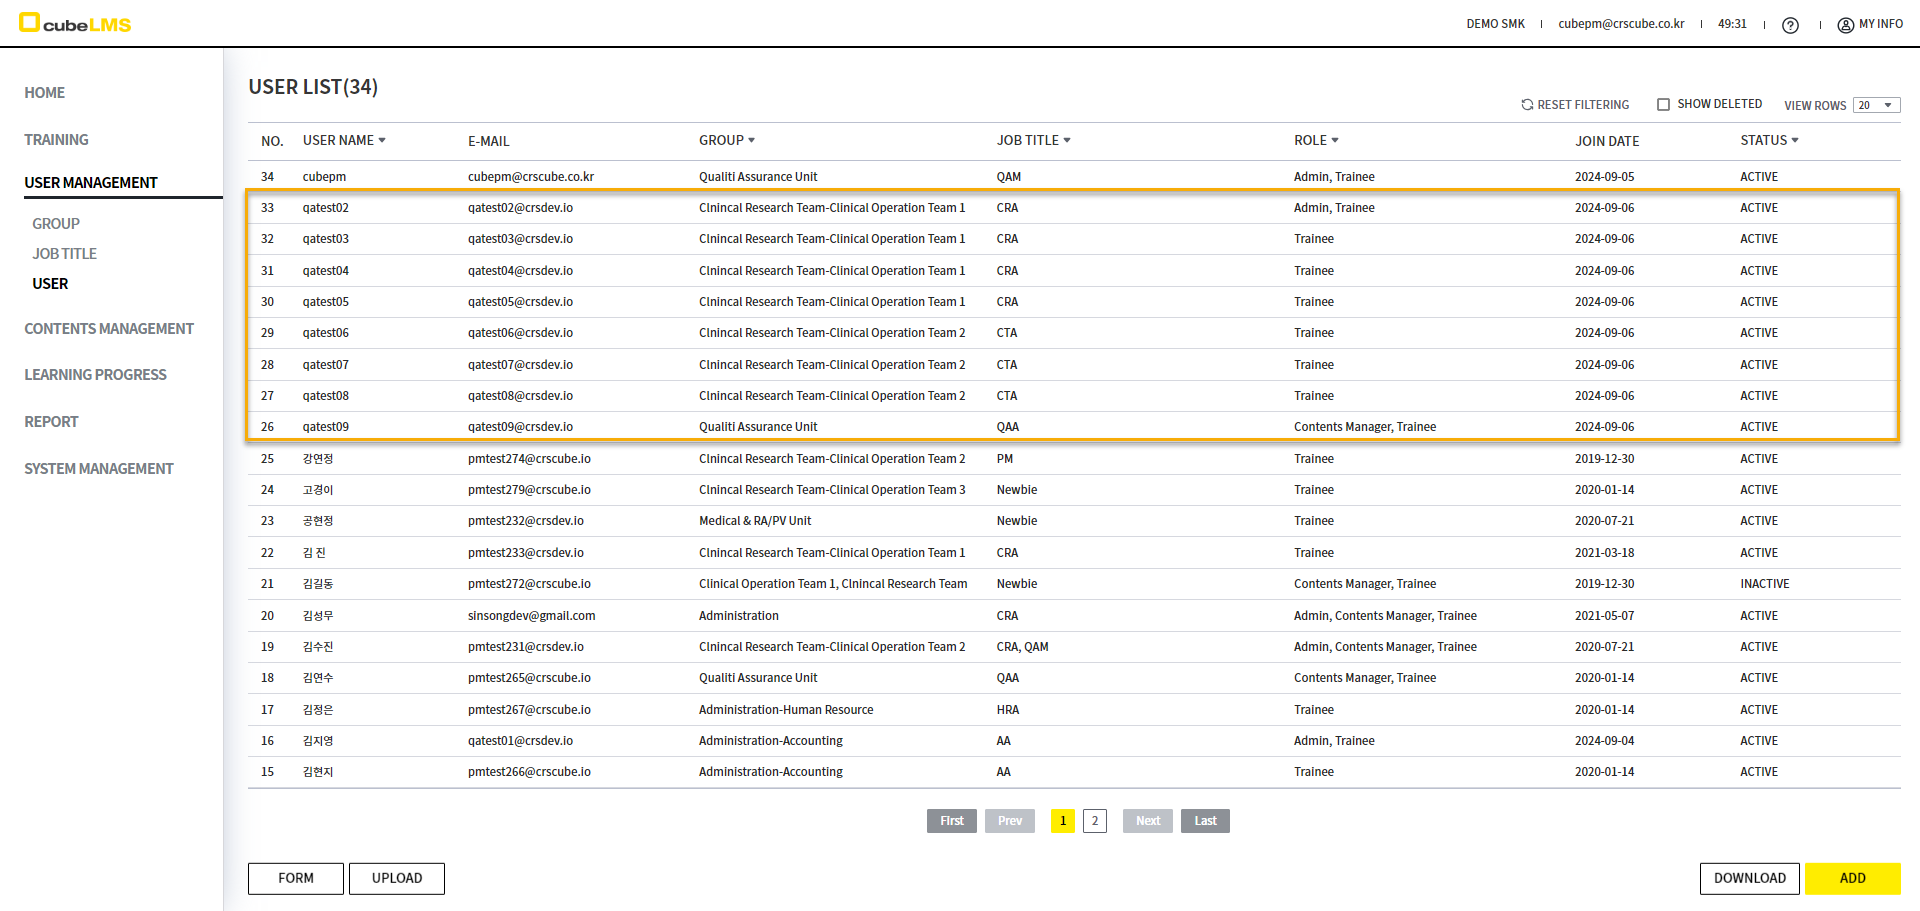
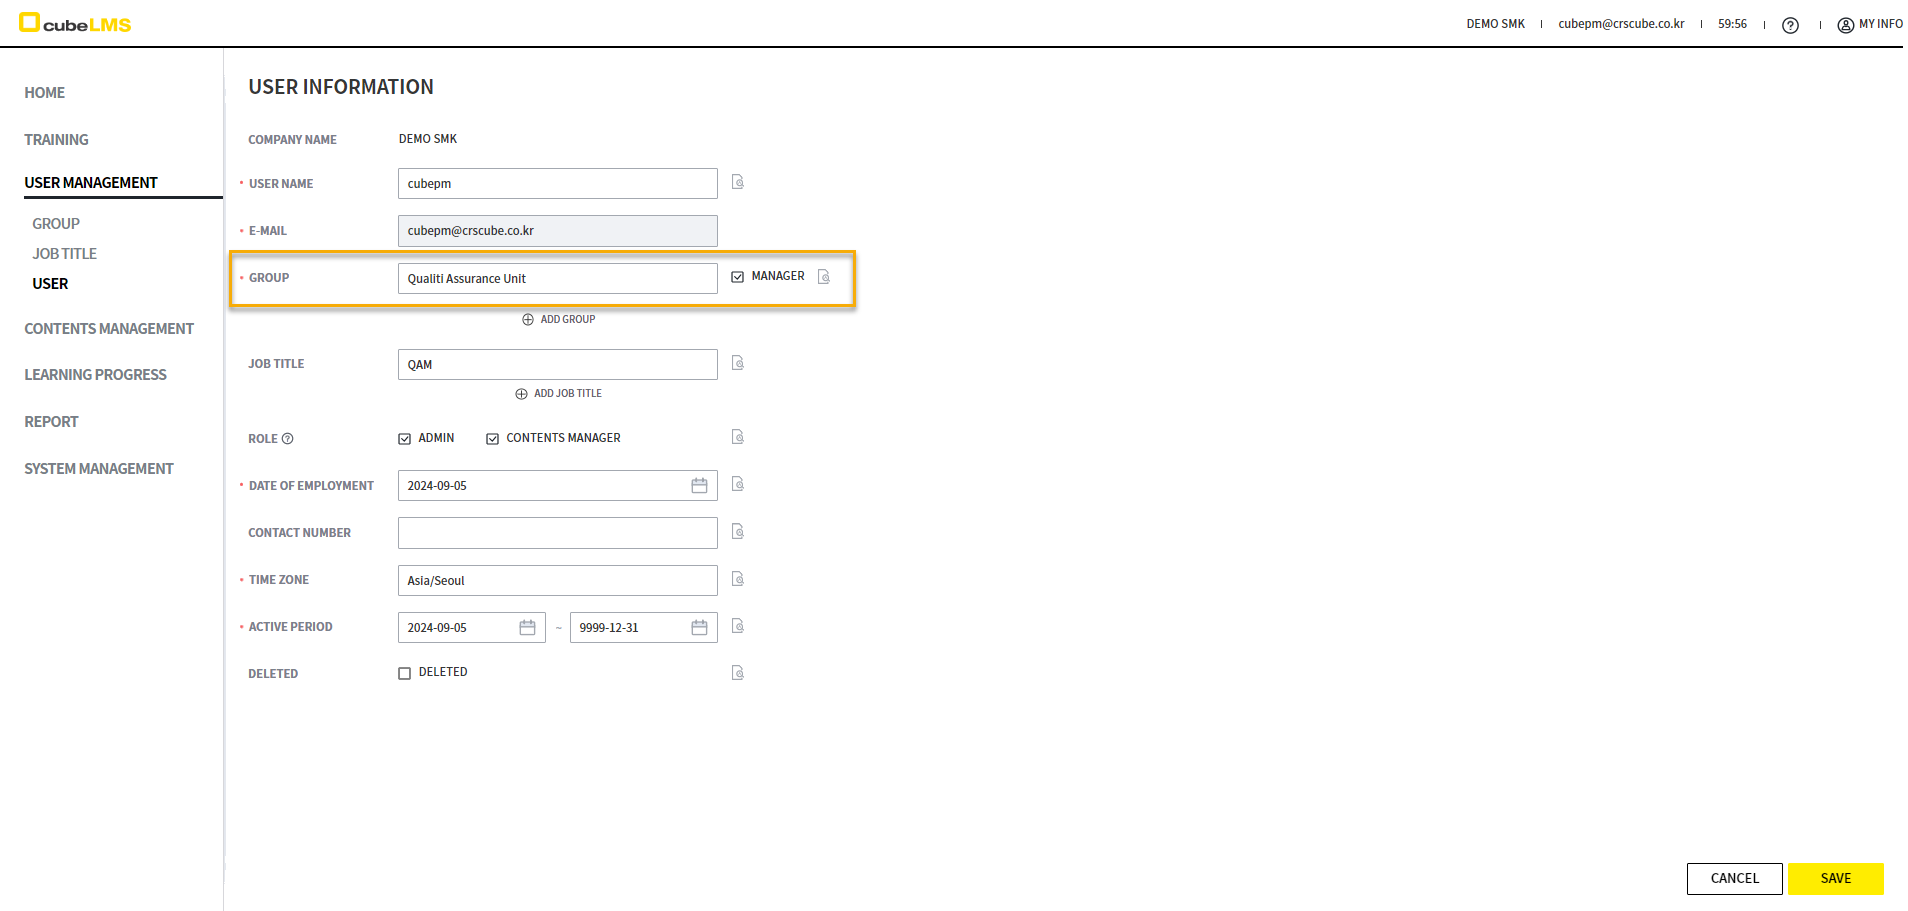
USER
You can assign Group and Job title to a User and grant a Role.
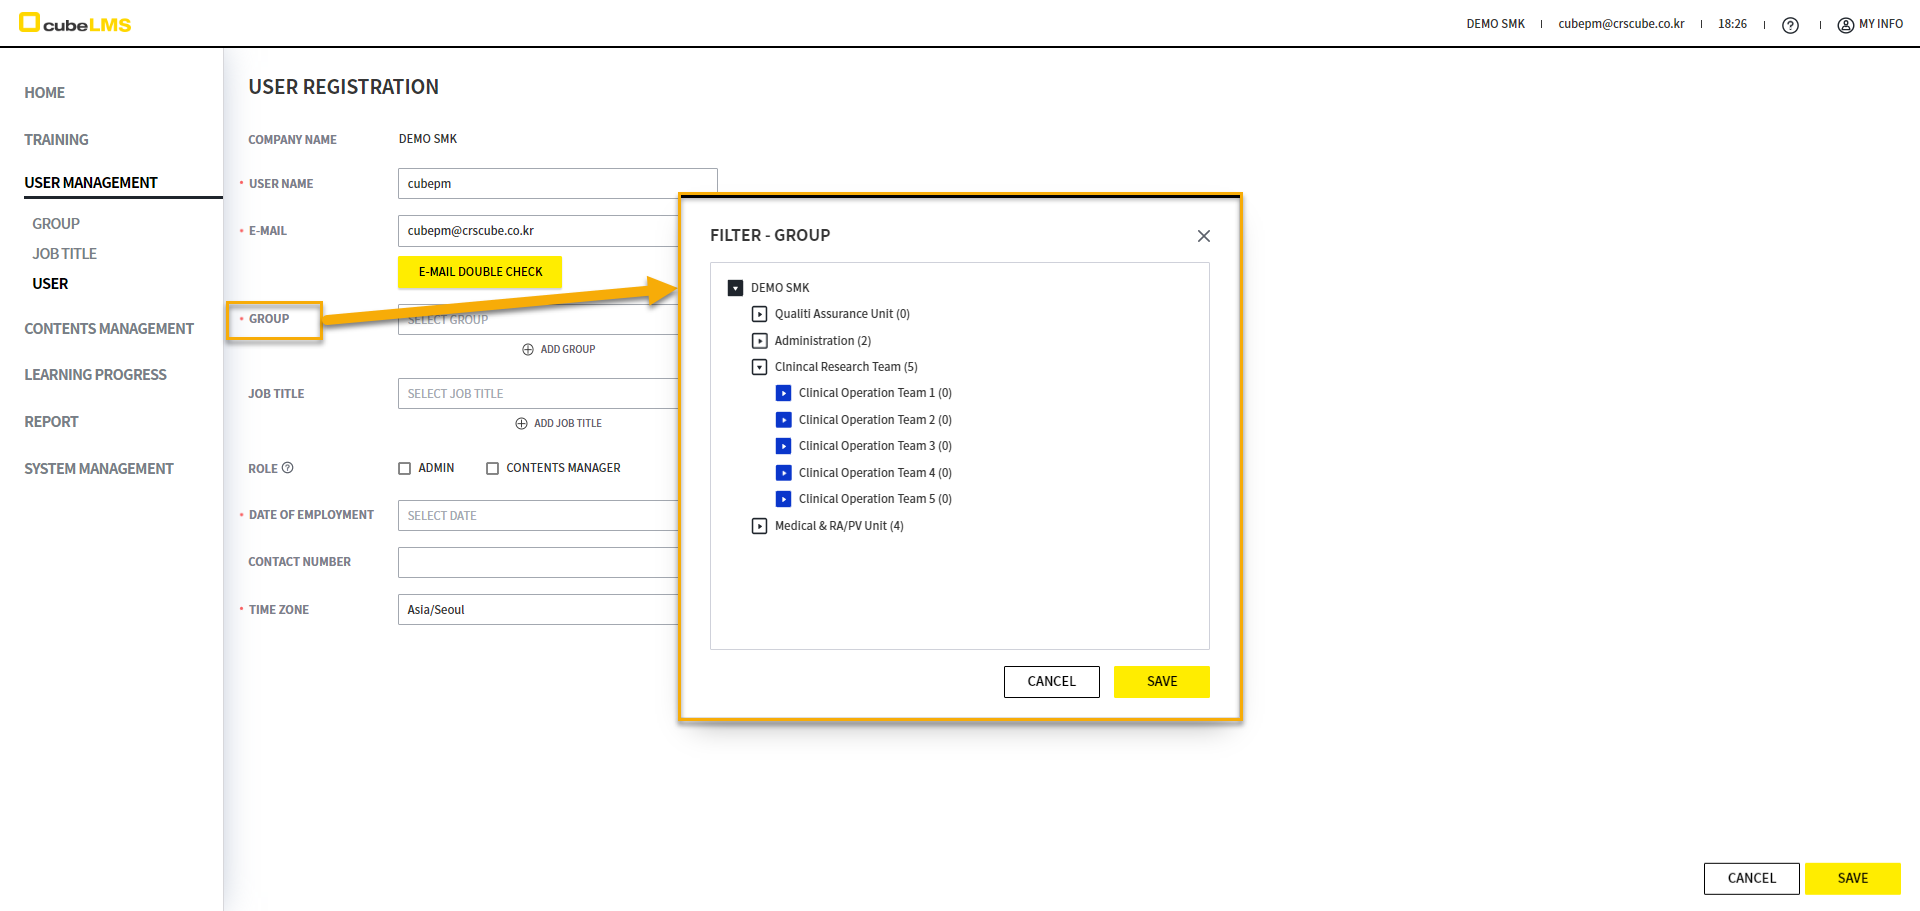

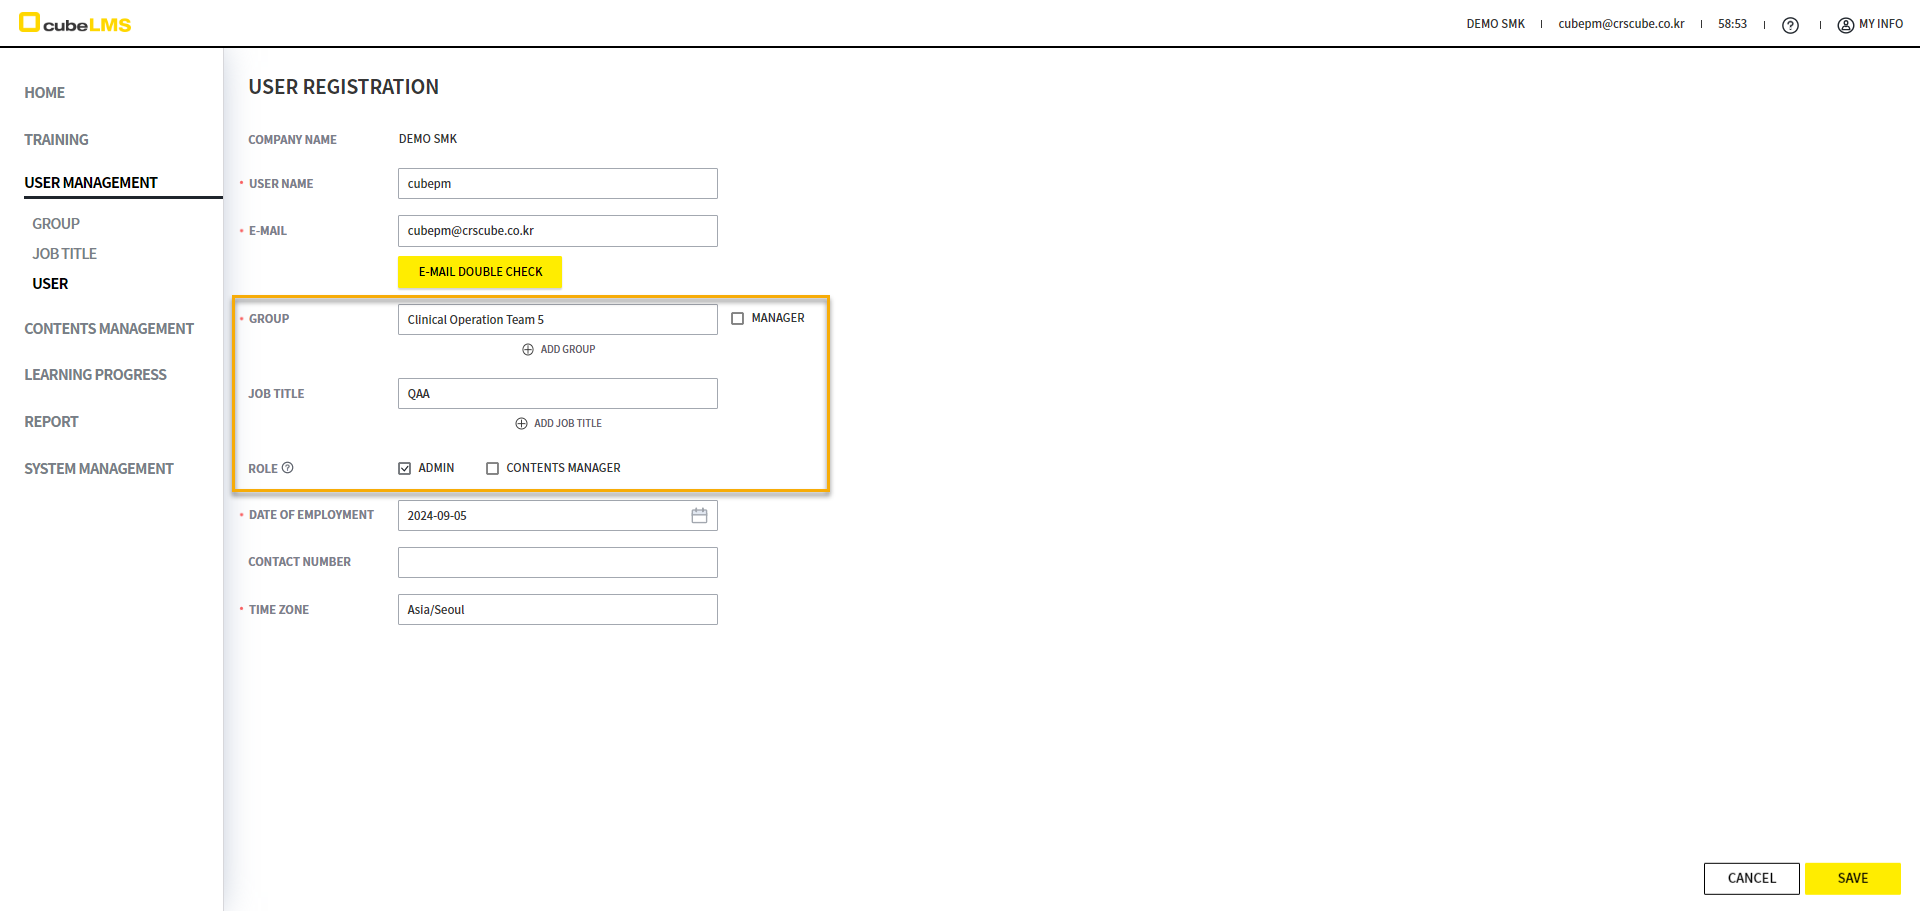
This system uses E-MAIL as the ID. You can register only if it is not duplicated within the Company by clicking the E-MAIL DOUBLE CHECK button. The created User can access cubeLMS through the Registration mail.
Disposable email domains are likely to be blocked and fail to be delivered due to uncontrollable external factors. Please use a valid official email address to ensure smooth receipt of system notifications.
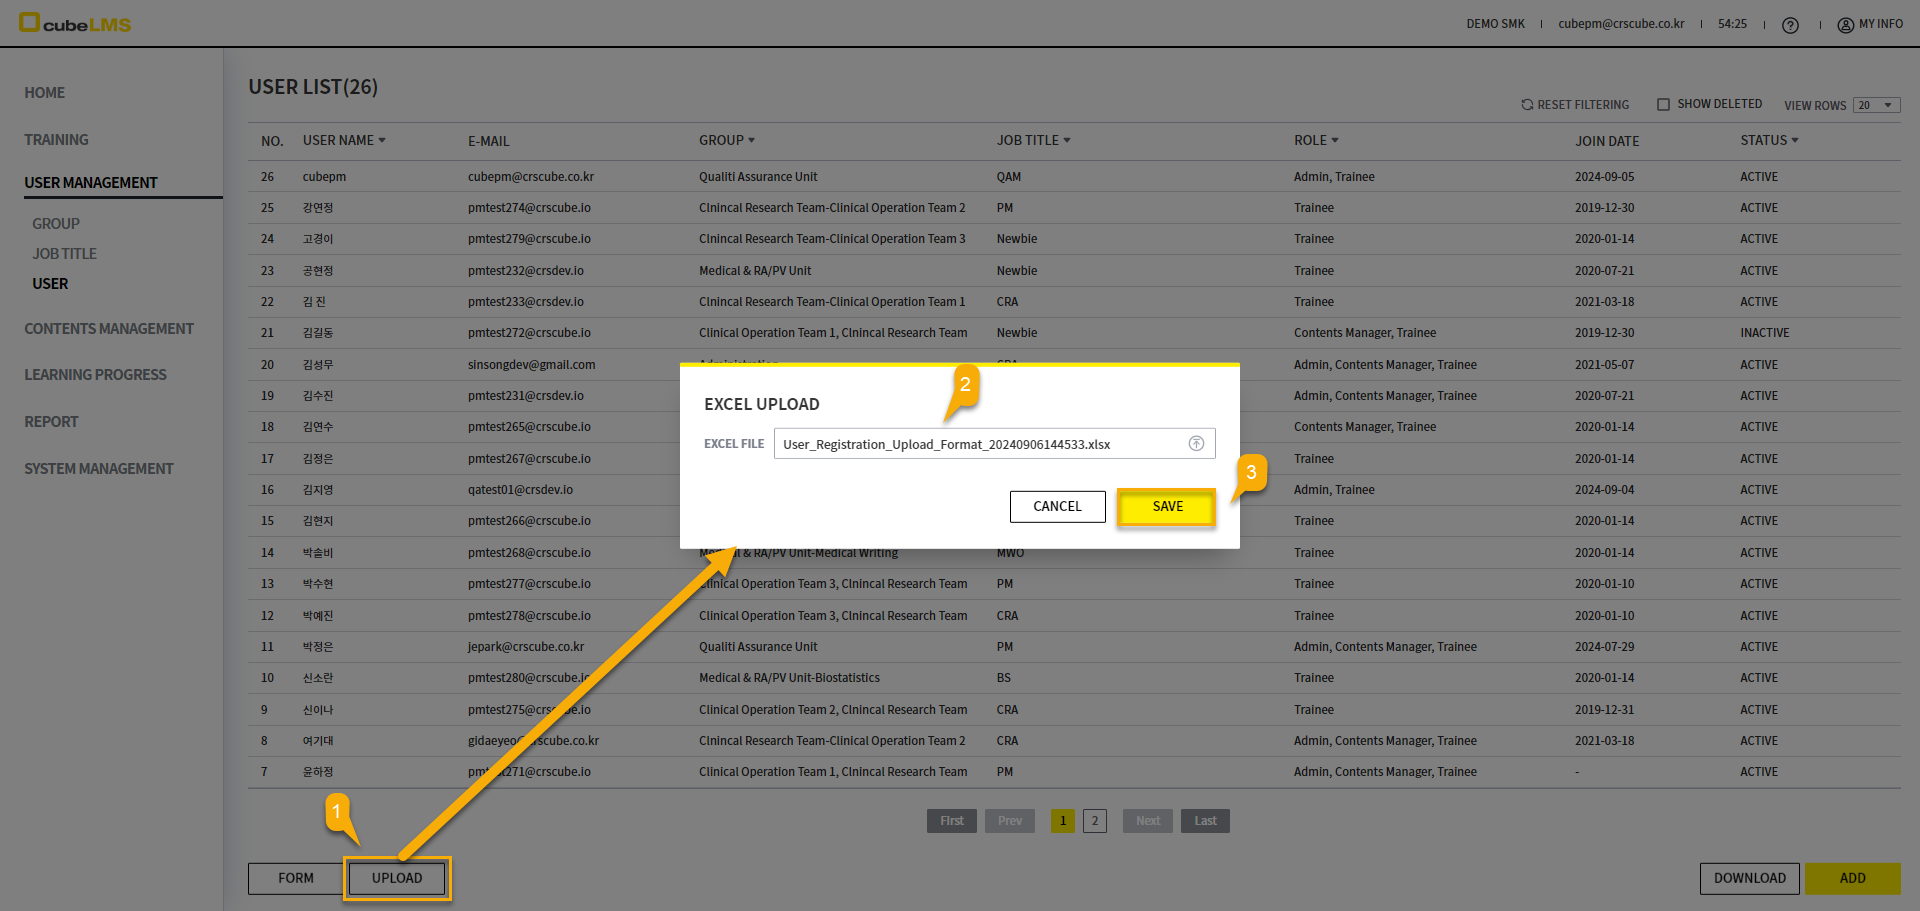
User Bulk Upload
Select the Form button to download the Format for bulk uploading User.
-
When uploading USER EXCEL, 2 or more GROUP and JOB TITLE entries cannot be registered for each USER. If necessary, edit them on the USER details page after upload.
-
When uploading through Excel, the START DATE of ACTIVE PERIOD is set to the TODAY date of the EXCEL UPLOAD, and the END DATE is set to 9999-12-31.
When uploading USER EXCEL, you cannot register more than one GROUP or JOB TITLE per USER. If necessary, please edit them on the USER detail page after upload.
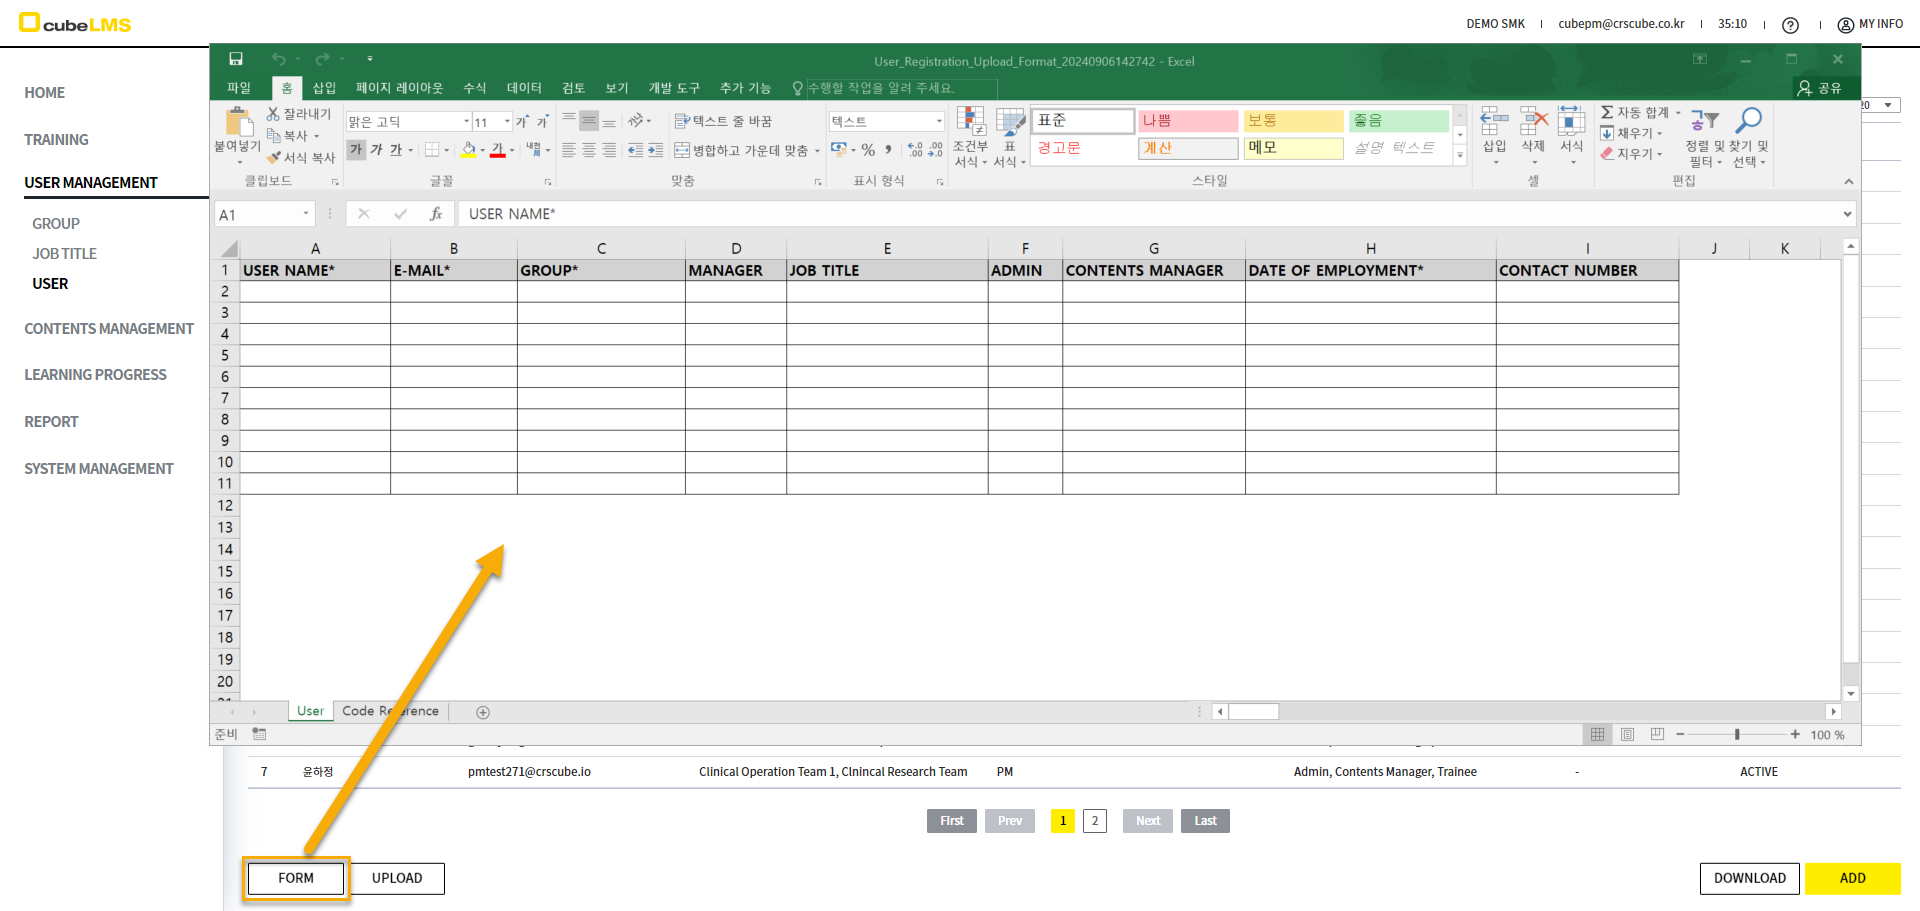
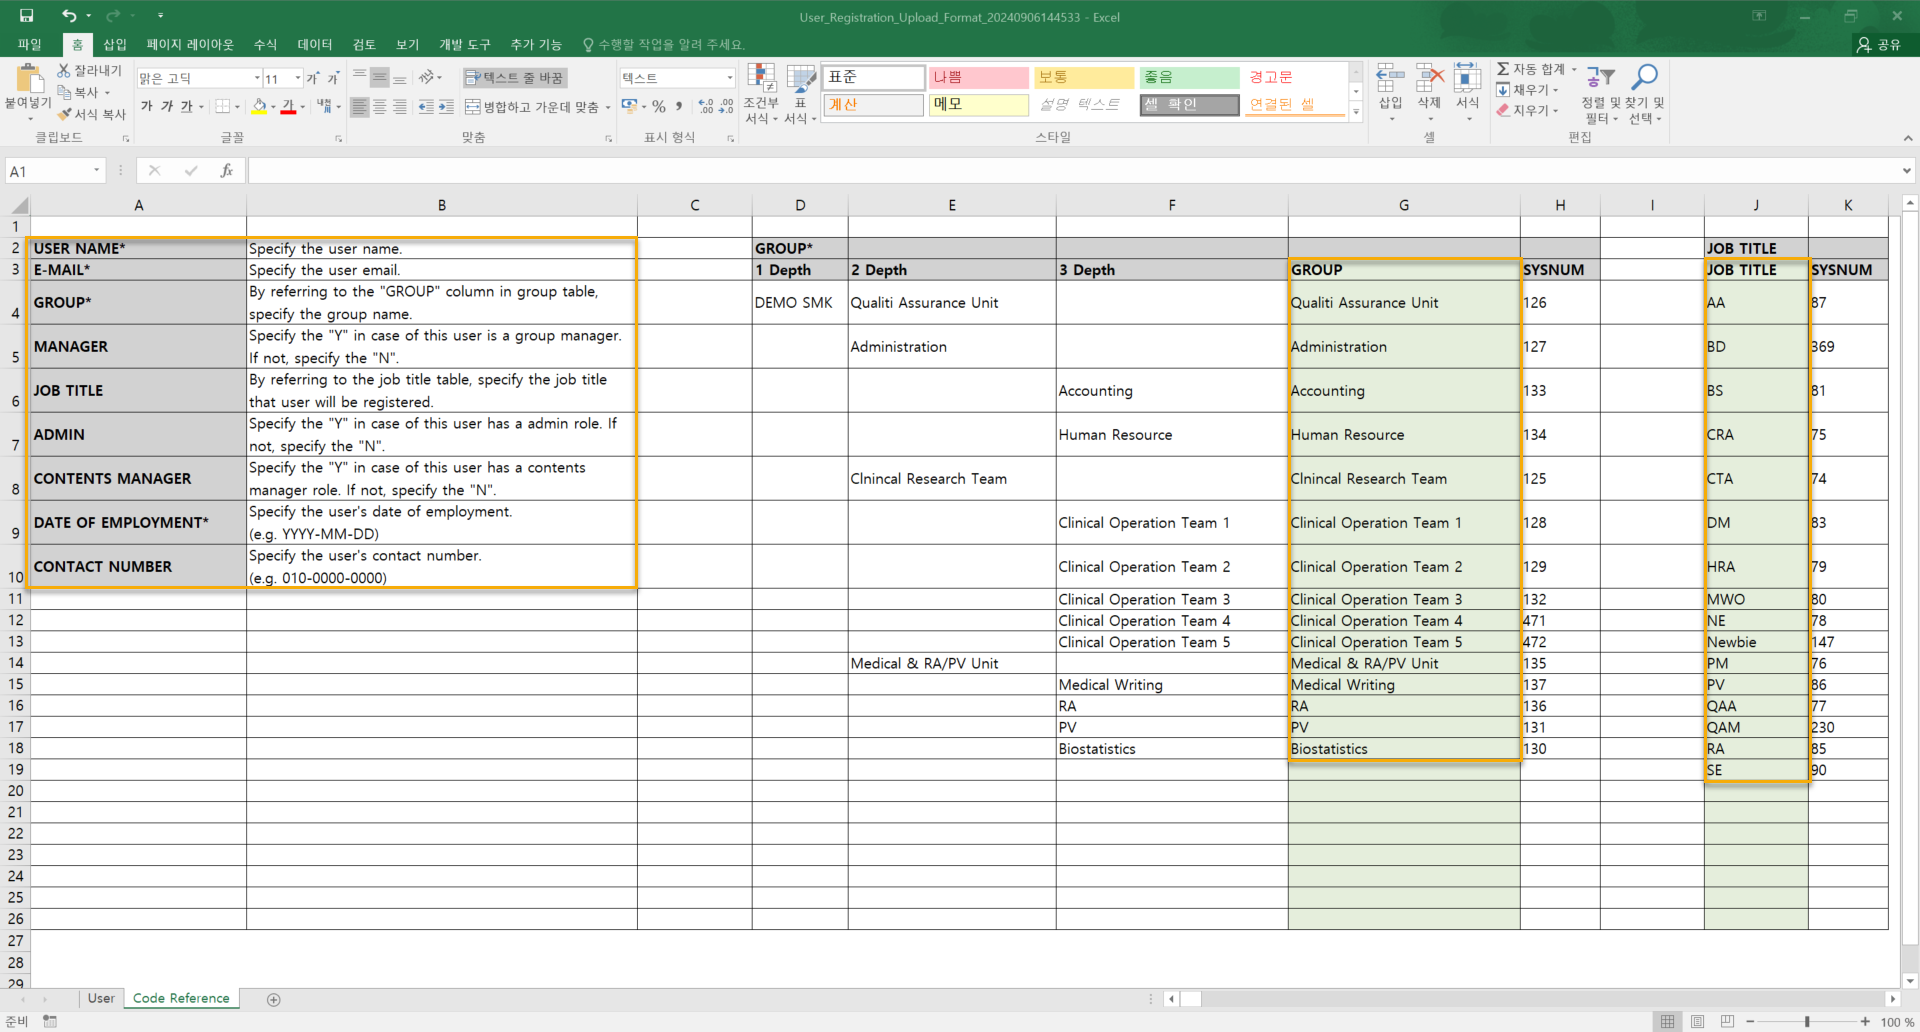
Refer to the Code Reference sheet, enter the User information to upload in the User sheet, and save the data entered in Excel.
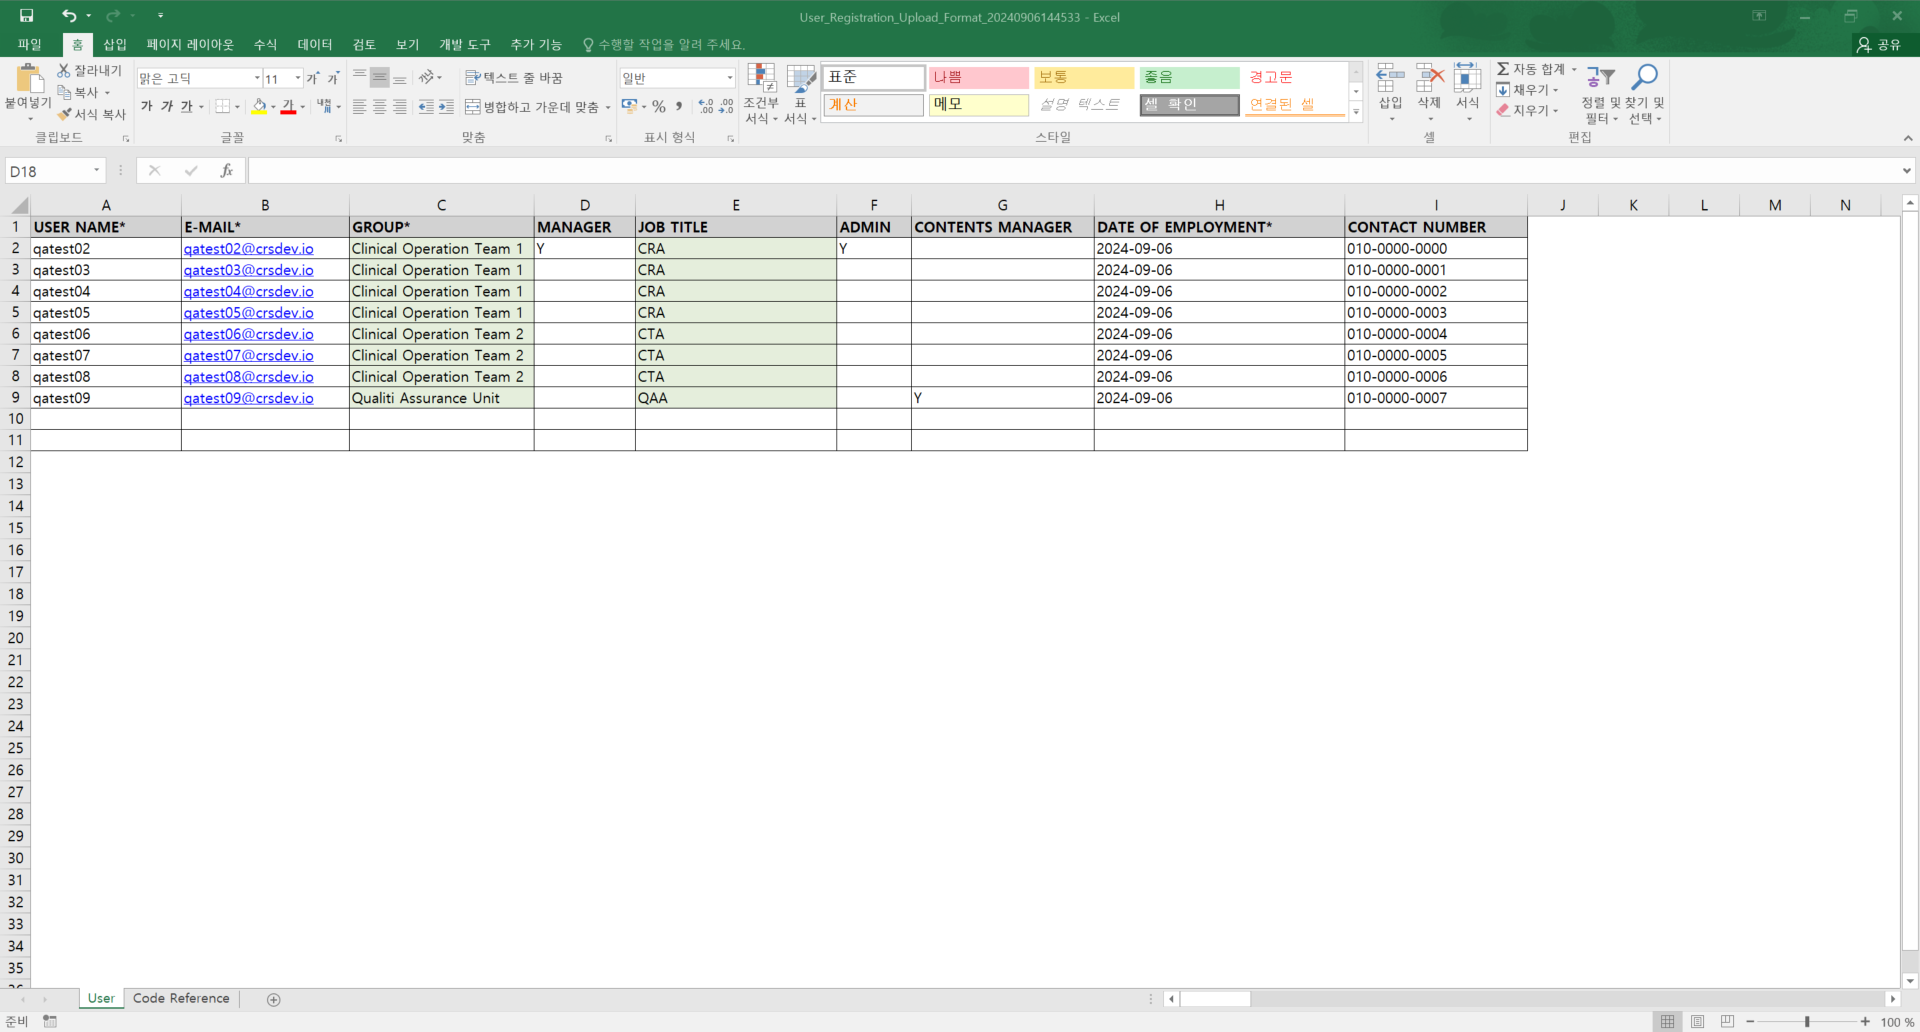
When you select the UPLOAD button, the EXCEL UPLOAD popup appears. Upload the Upload Format file containing User information, and then select the SAVE button to upload all entered User records according to the information you entered.
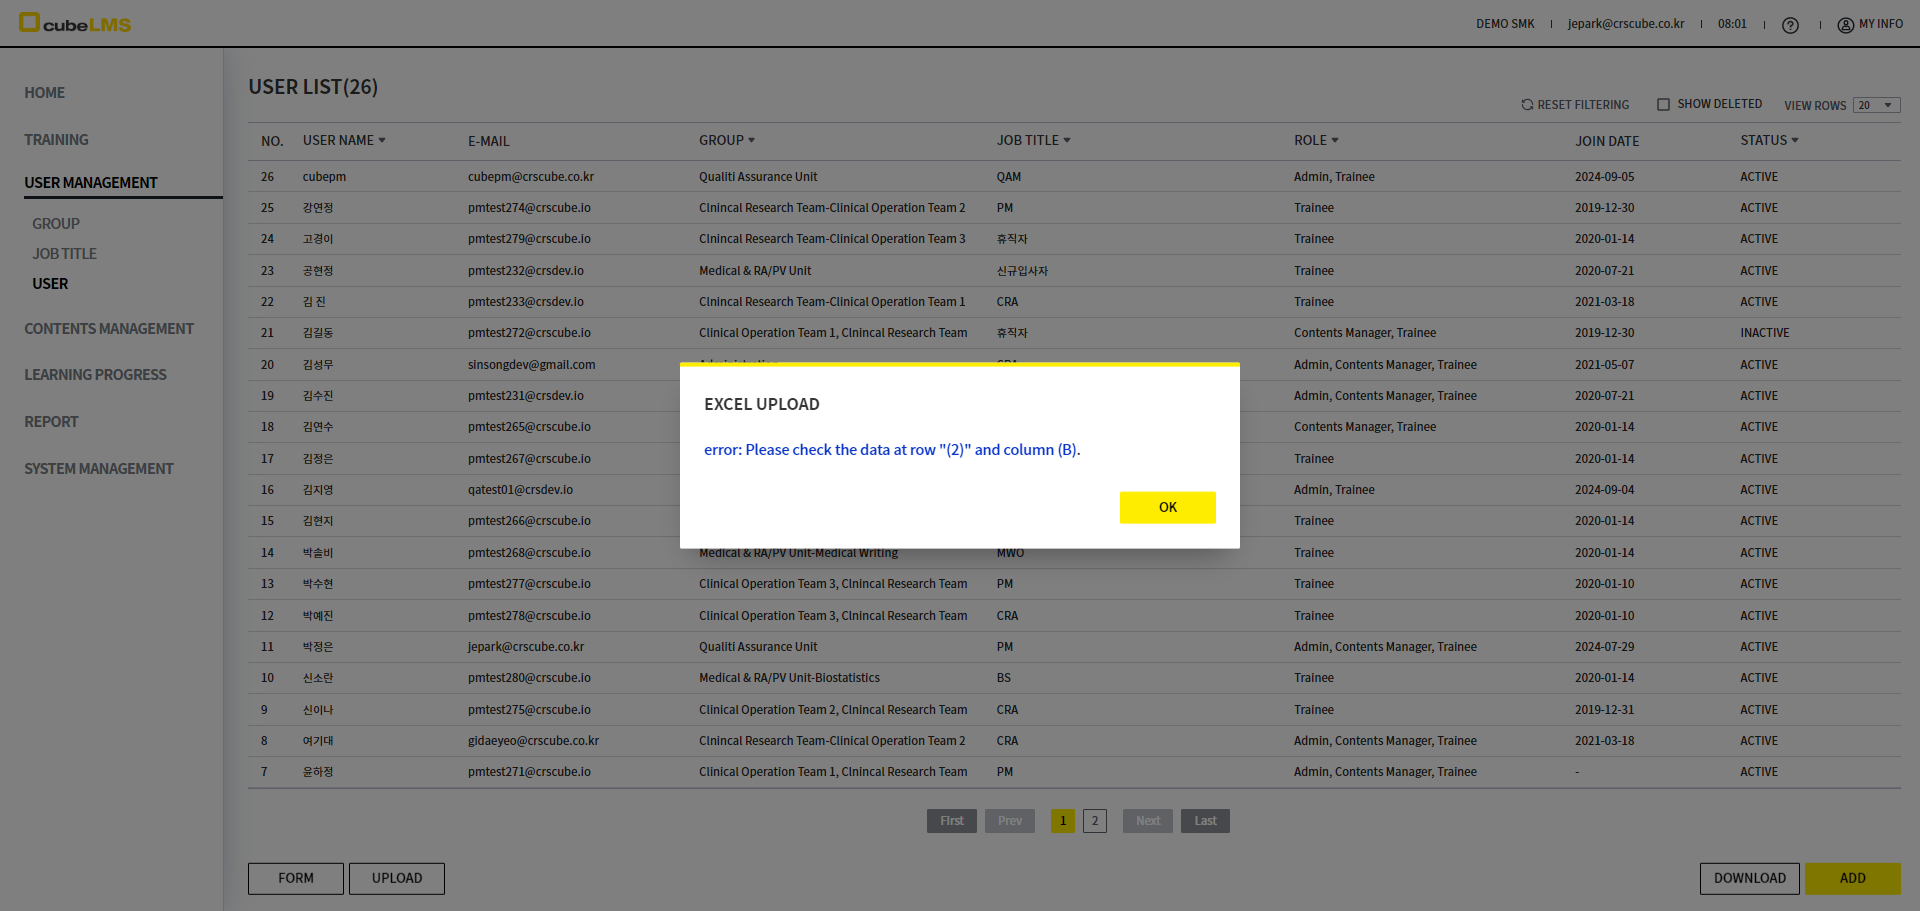
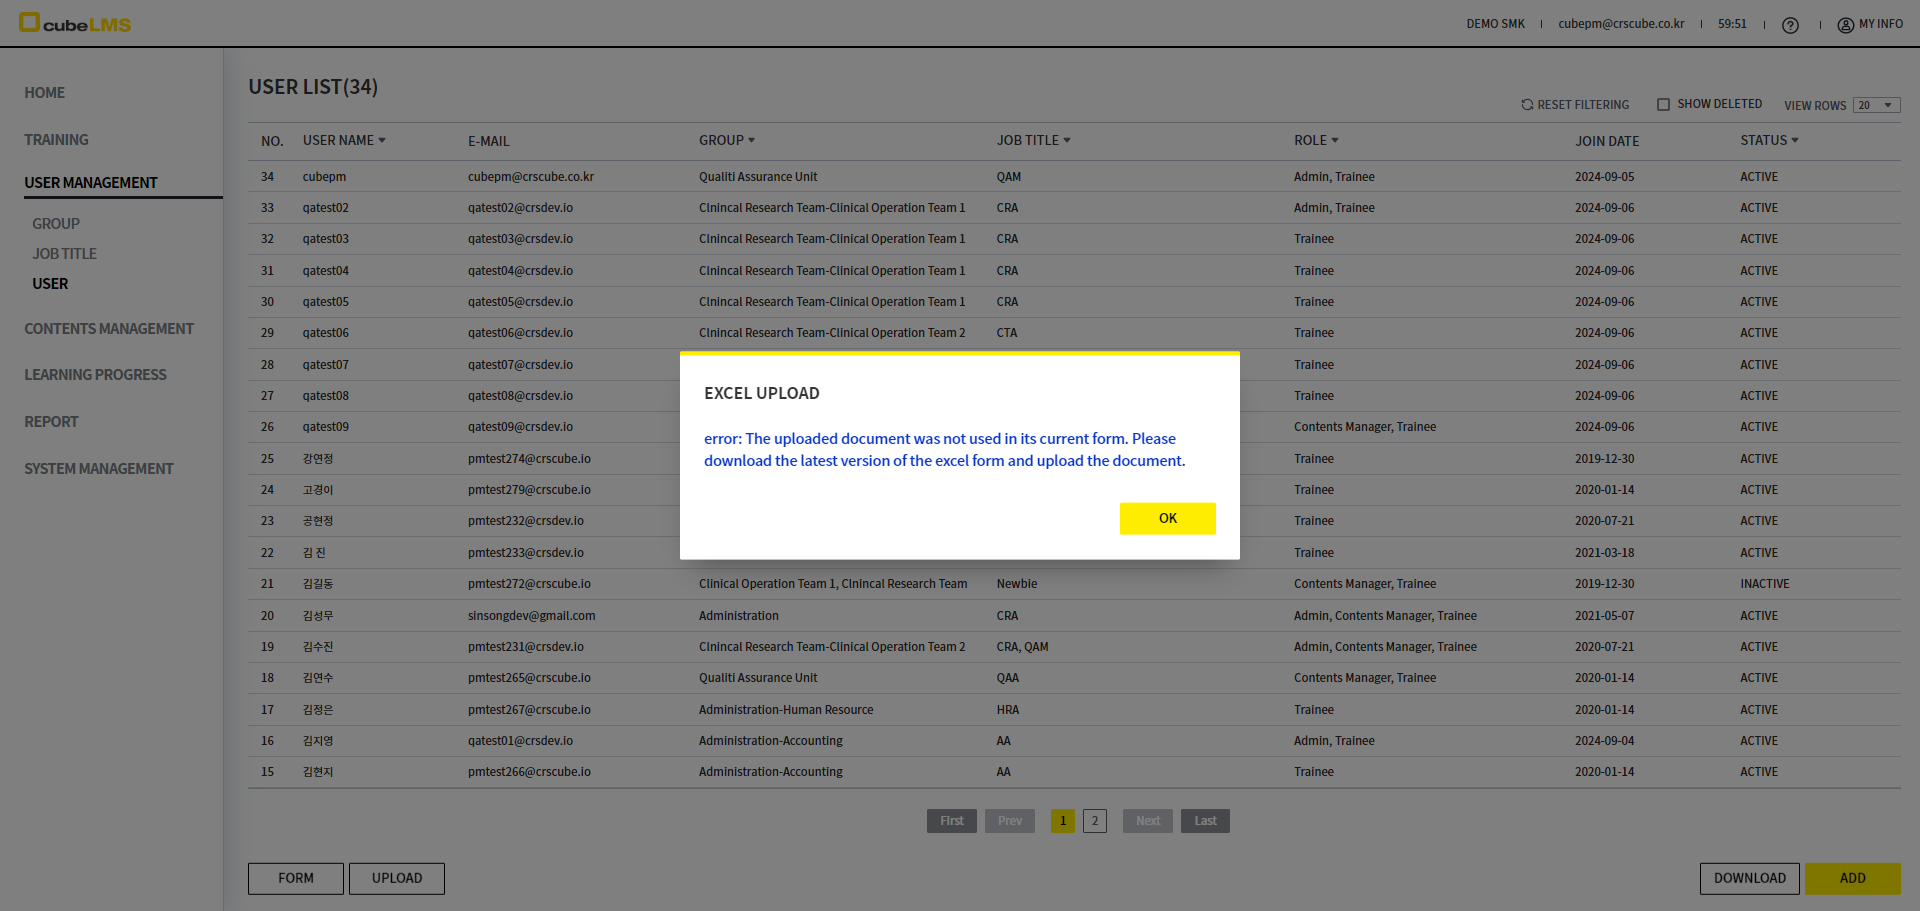
However, if the data entered for USER in the Excel file does not match the following, an error message is displayed in a popup.
-
If the values in the Upload file differ from the Code Reference or required input values are missing
-
If E-Mail is duplicated within the Company or Excel file
-
If the data is entered in a format that does not match the item's data type (ex. text entered in Date of employment)
-
If the input format specified in the Excel FORM is not 'General' or 'Text'
-
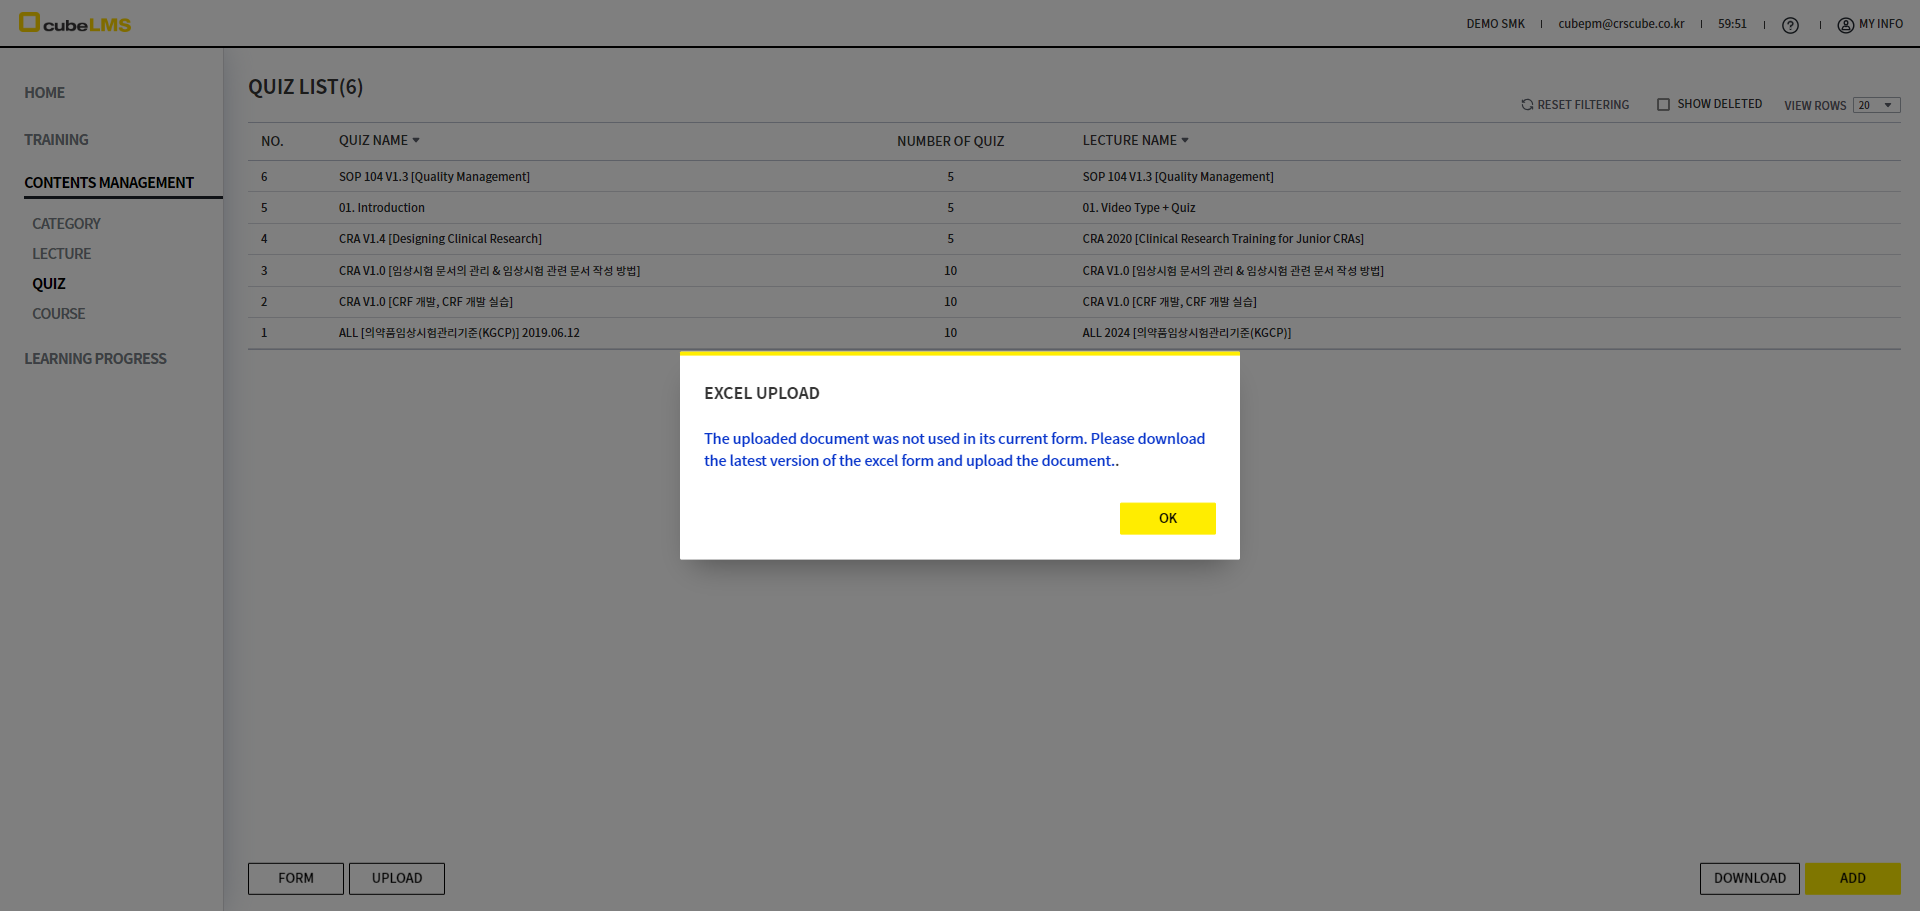
If the lecture or category changes after downloading the Upload Form and the Form is no longer the latest version
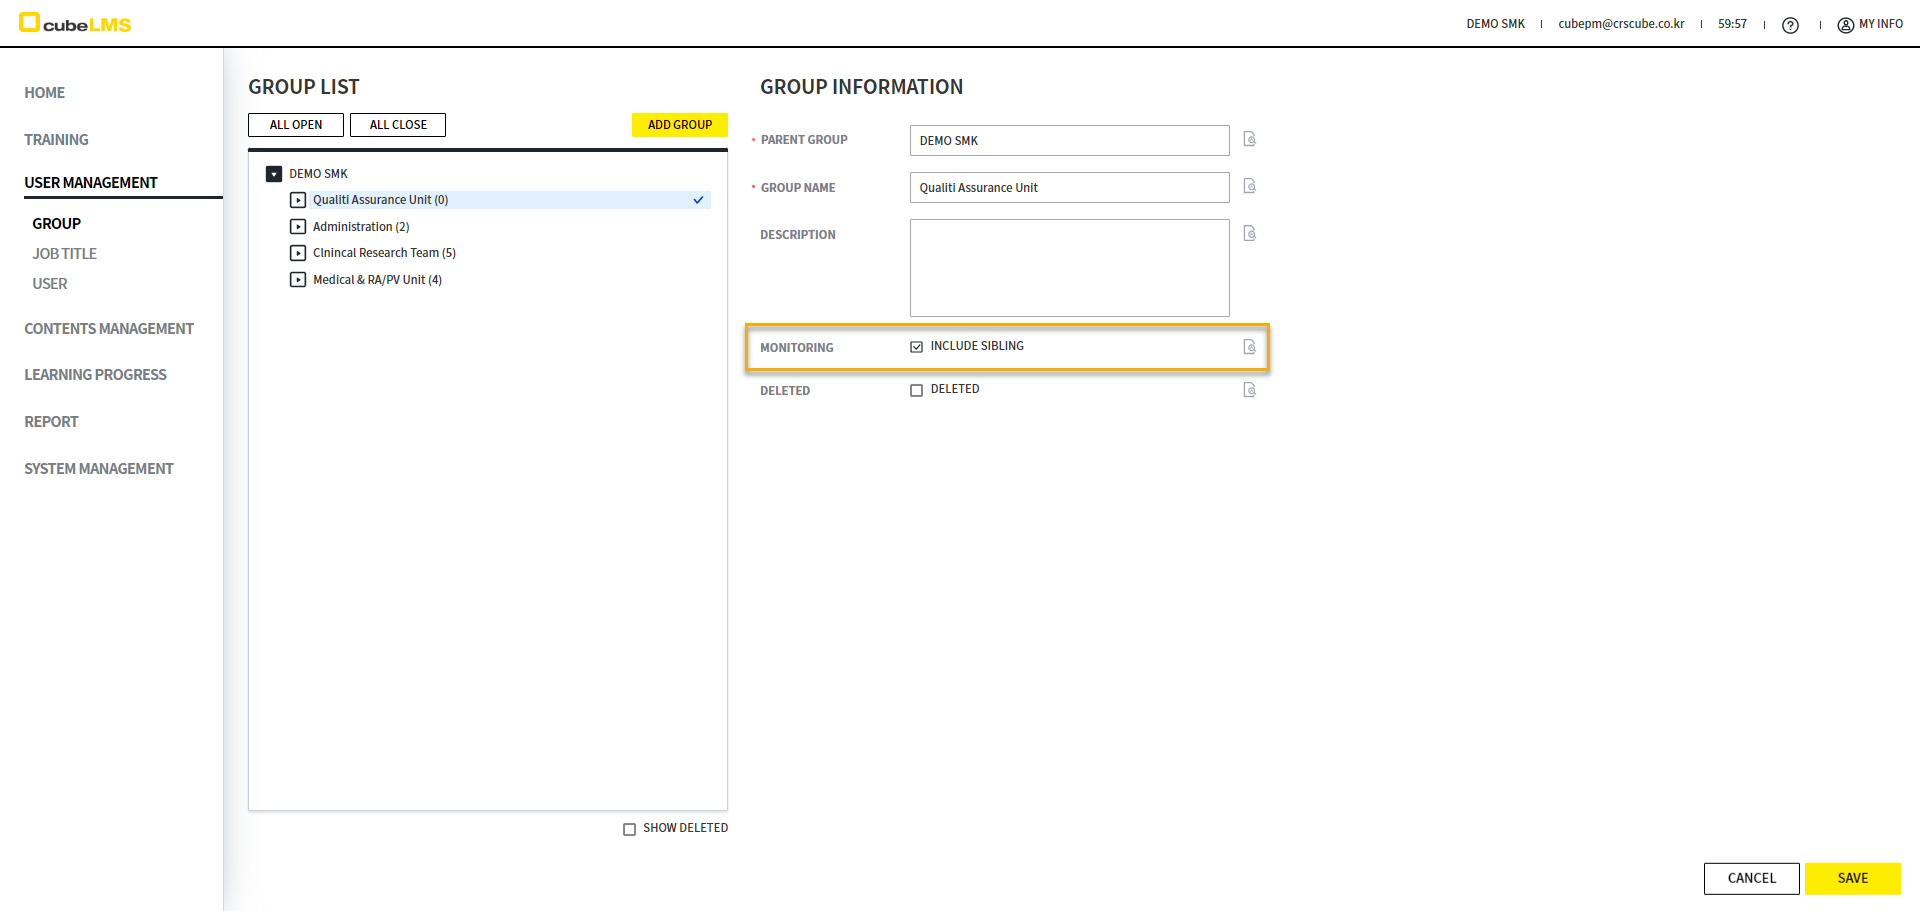
GROUP MANAGER
You can grant the User Manager privileges for the assigned Group.
Group Manager can check the training status of Trainees in the relevant Group by Lecture and Course. You can also check each Trainee's status on the detail screen that opens when you select each Training.
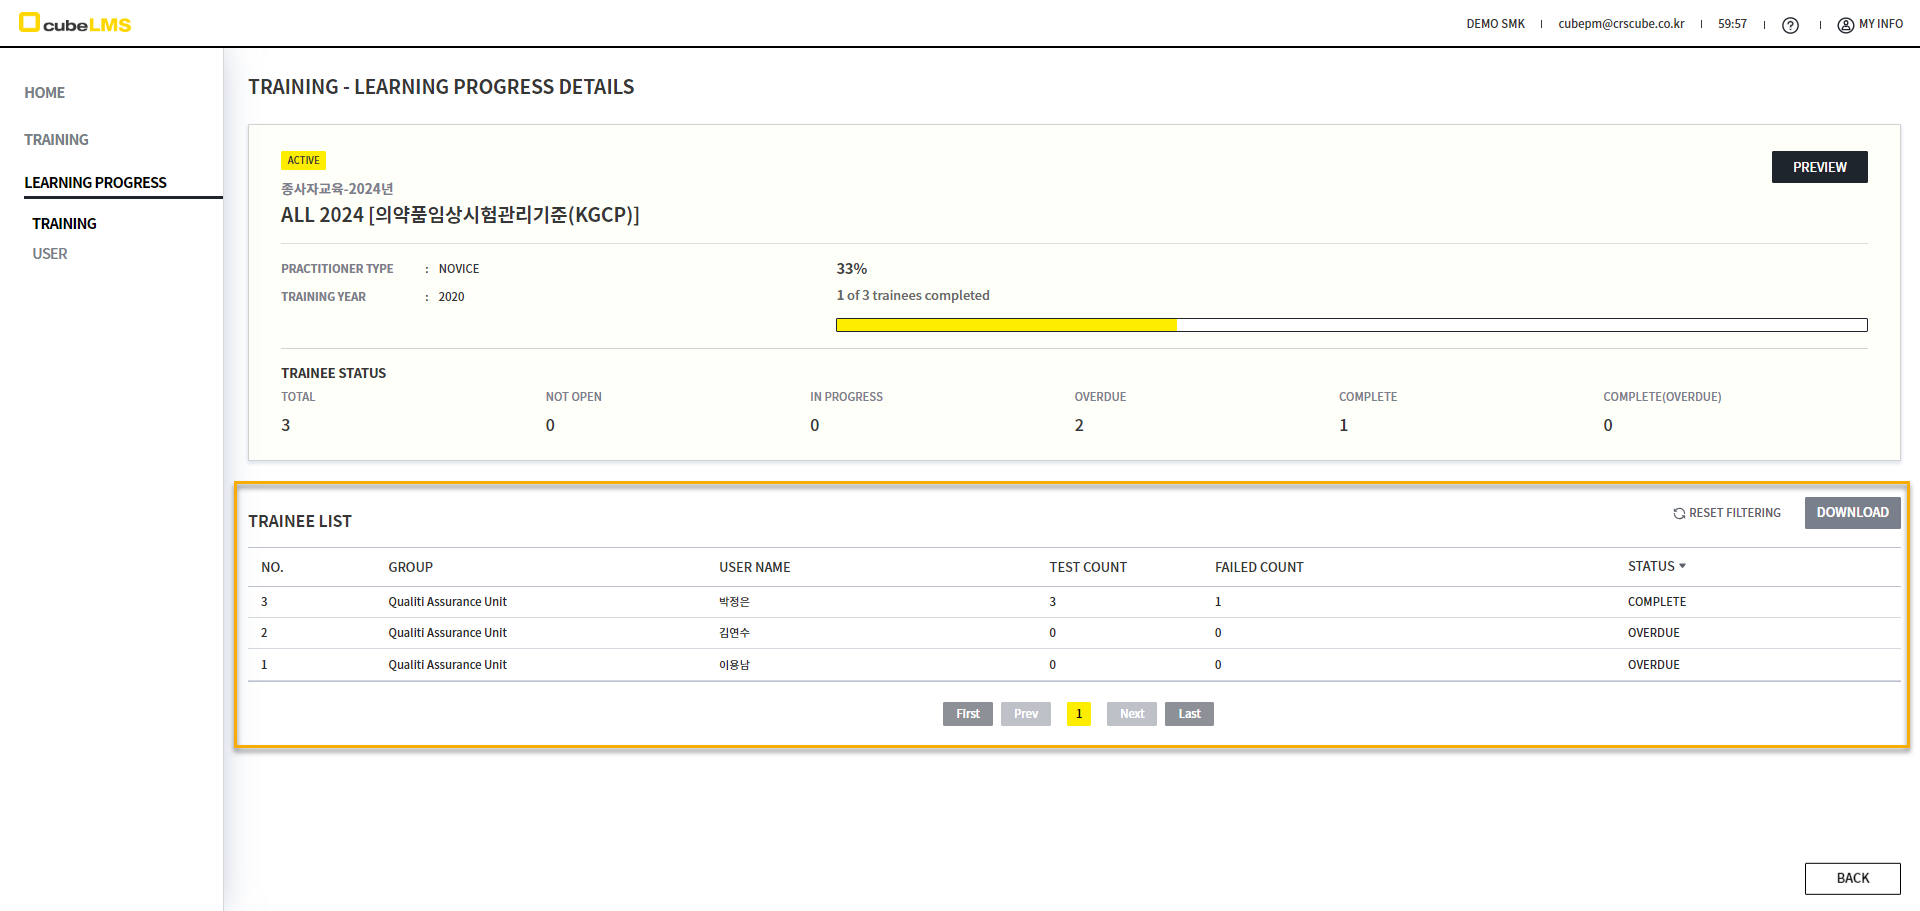
LEARNING PROGRESS-USER In this menu, Group Manager can check the status and due date of each Trainee's Training in the corresponding Group.
GROUP MANAGER-INCLUDE SIBLING
If you check INCLUDE SIBLING for the Group, the Group manager can also monitor the training status of members in other Groups at the same Level.

[LEARNING PROGRESS]
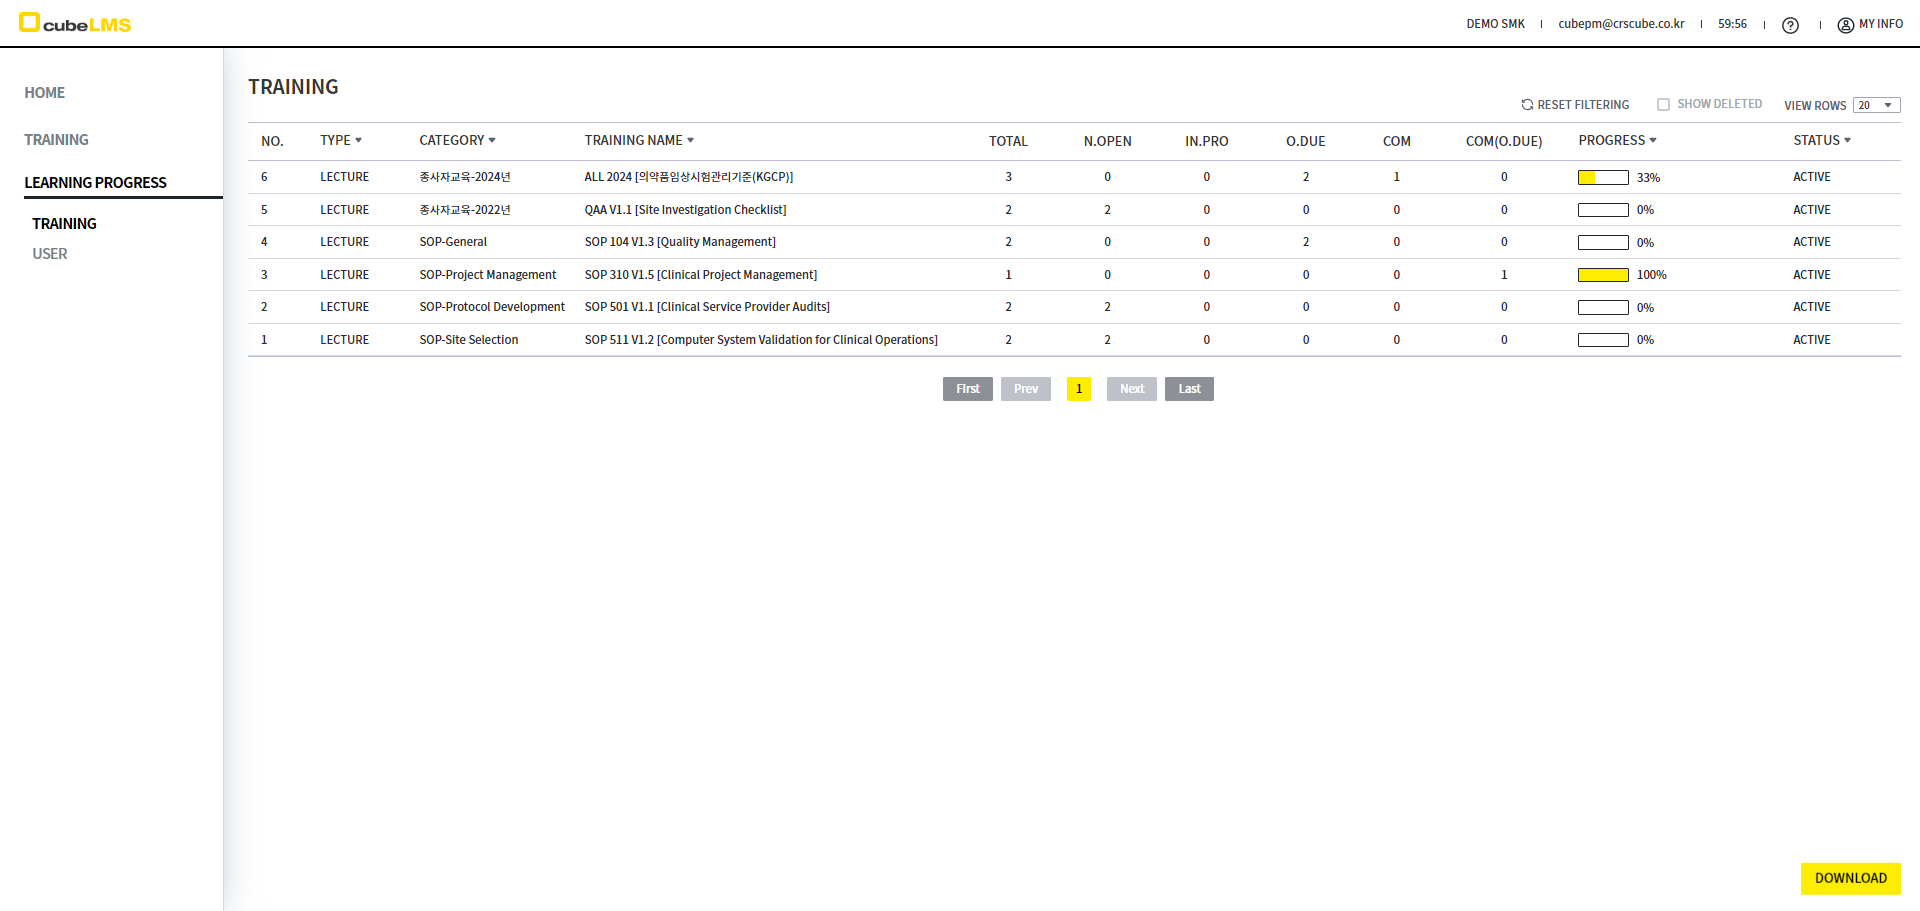
You can check the progress of Trainees assigned to each Training.
TRAINING
Depending on Role and privileges, you can check the training history of Trainee, the number of Trainee assigned to the Training, and progress status.
<Preview scope by R&P>
|
Role & Privilege |
Preview scope |
Details |
|---|---|---|
|
Admin |
All USER |
All registered Lecture are listed, and you can view the learning status of all Trainee in your company. |
|
Contents manager |
Self |
You can view only your own learning status. |
|
Group Manager with Include sibling unchecked |
User belonging to that Group and its lower-level Group |
You can view the learning status of Trainee in the Group you belong to. |
|
Group Manager with Include sibling checked |
User belonging to that Group and other Group at the same Group Level |
You can view the learning status of Trainee in your Group and in other Group at the same Level. |
|
Trainee not covered above |
Self |
You can view only your own learning status. |
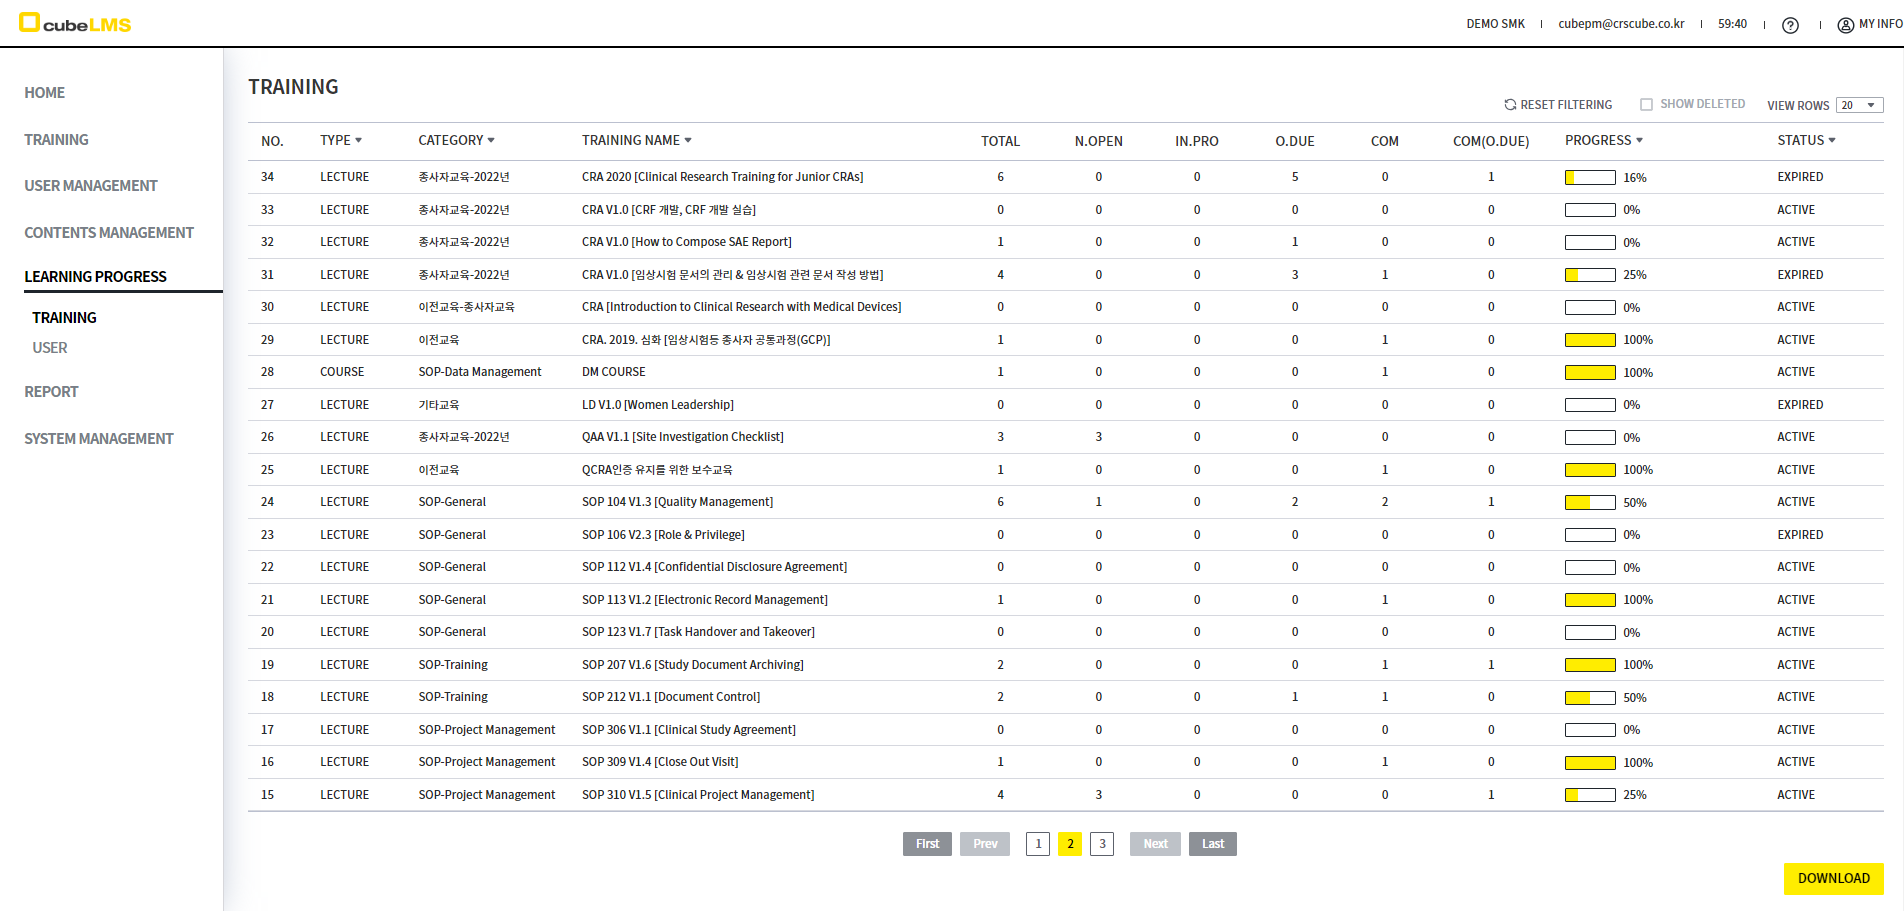
Select the row you want to check to view the progress for each Trainee.
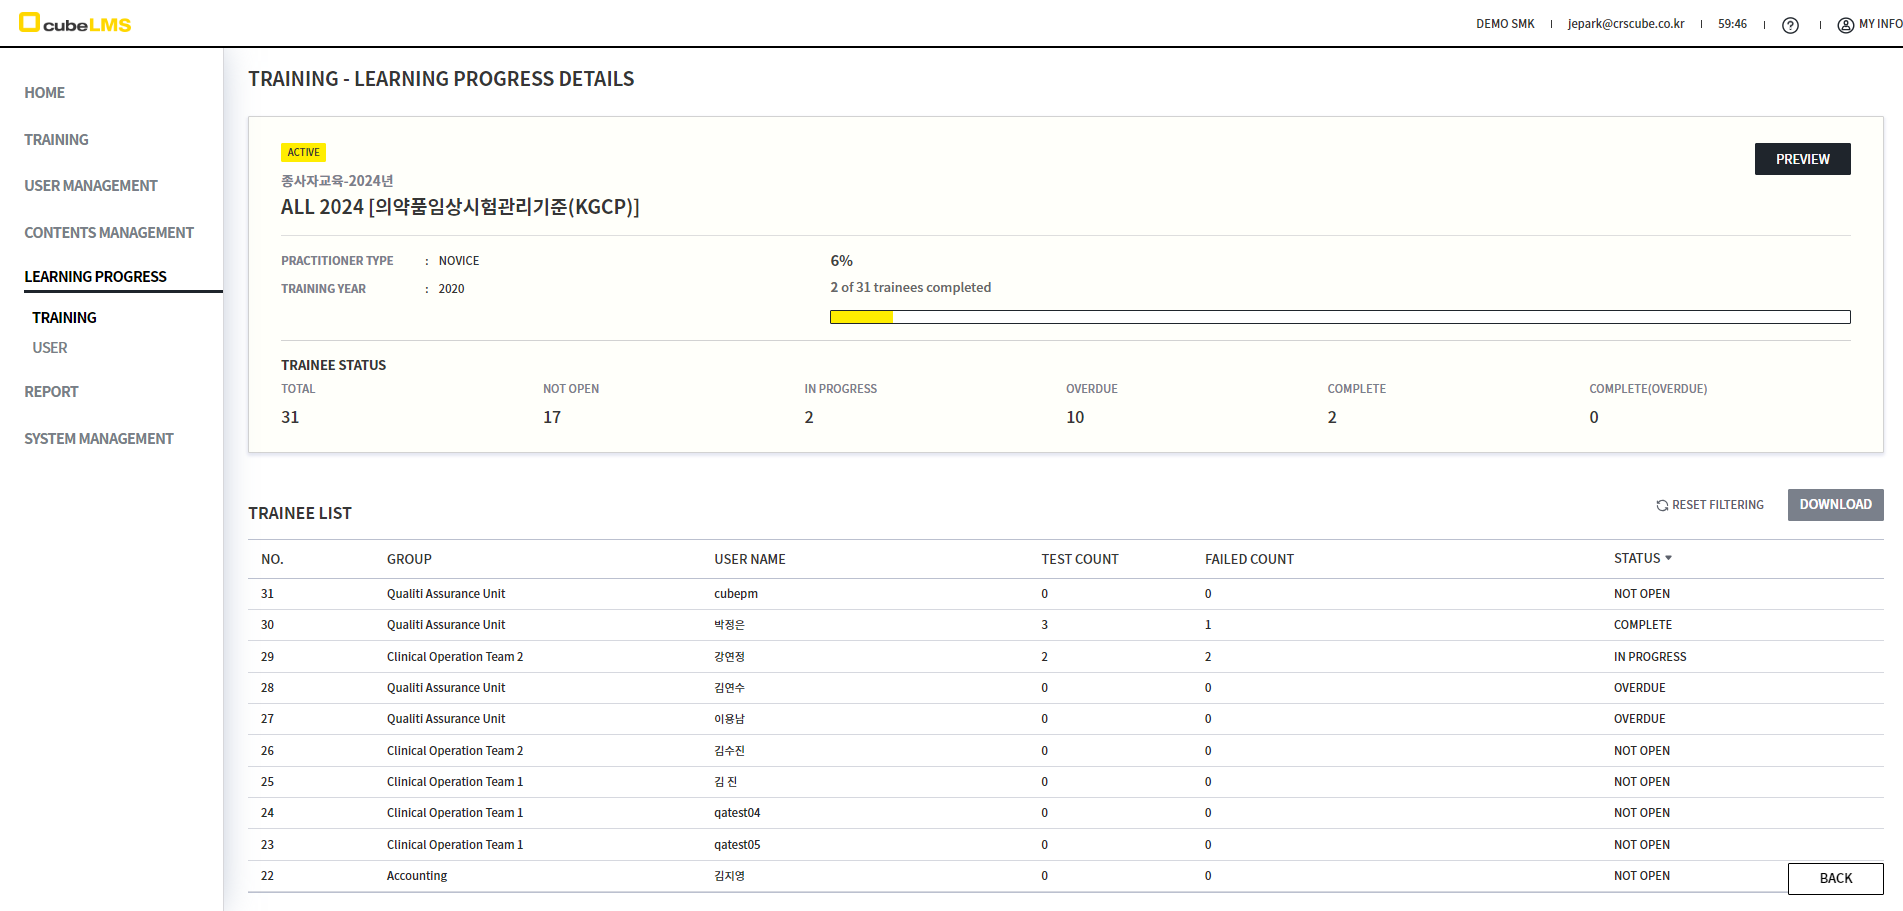
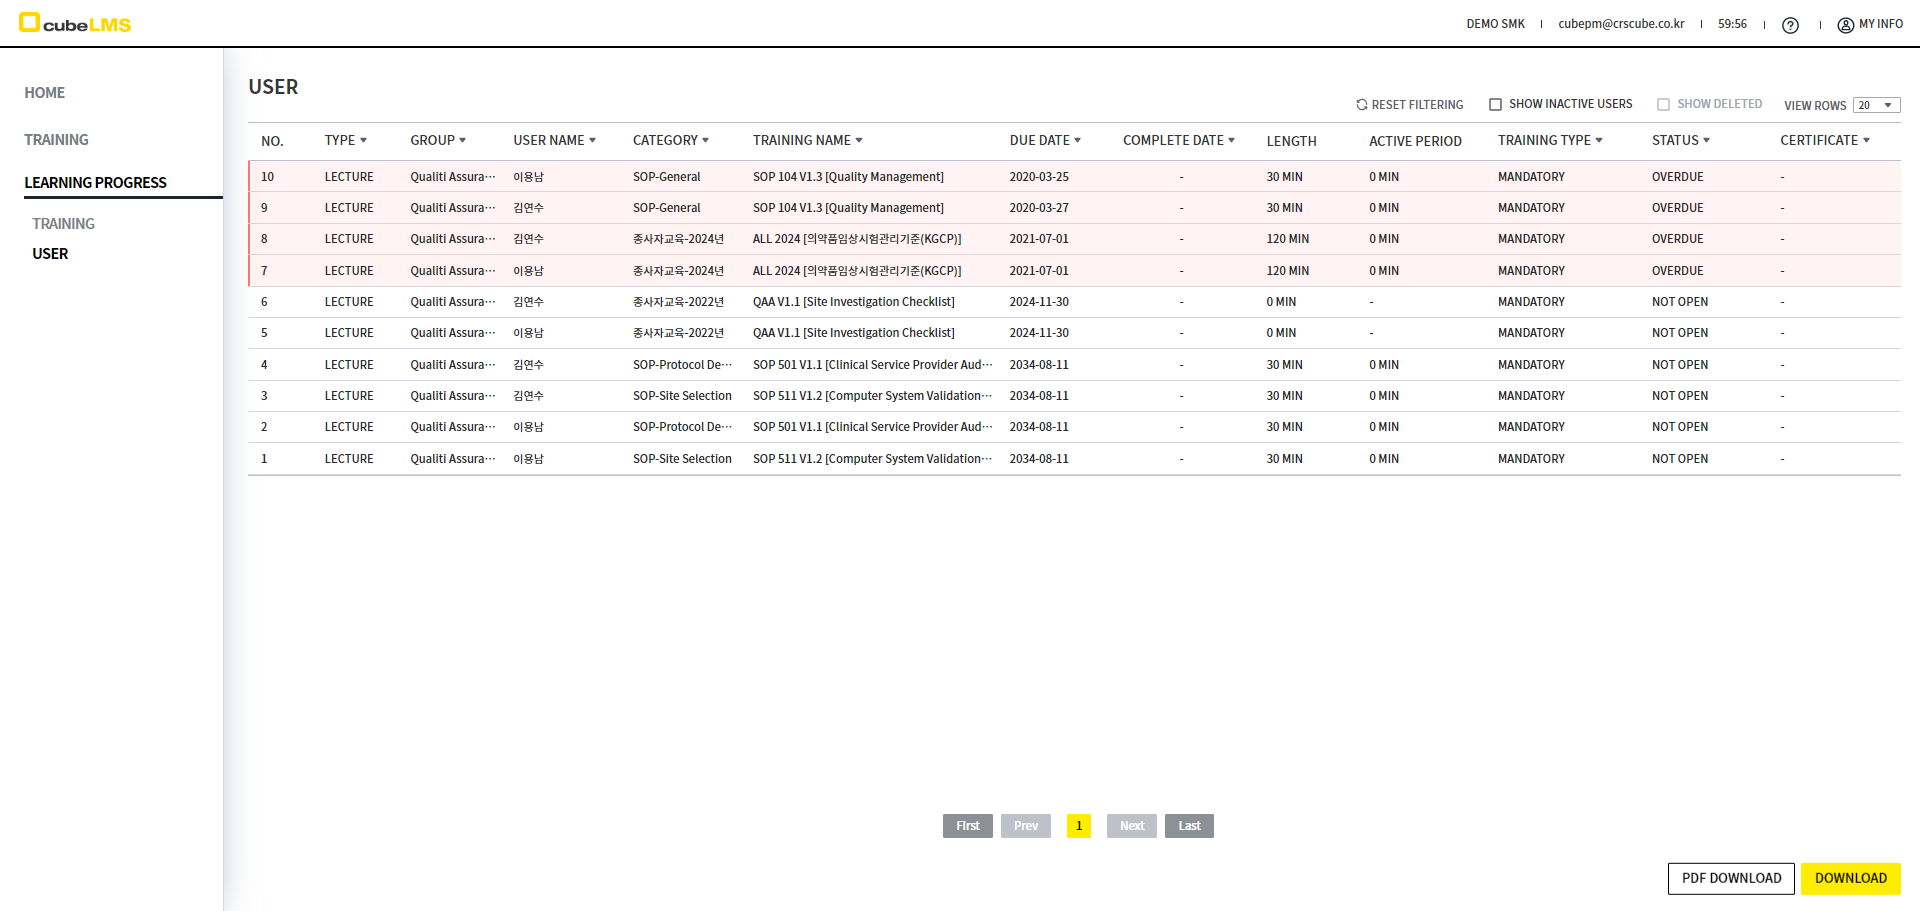
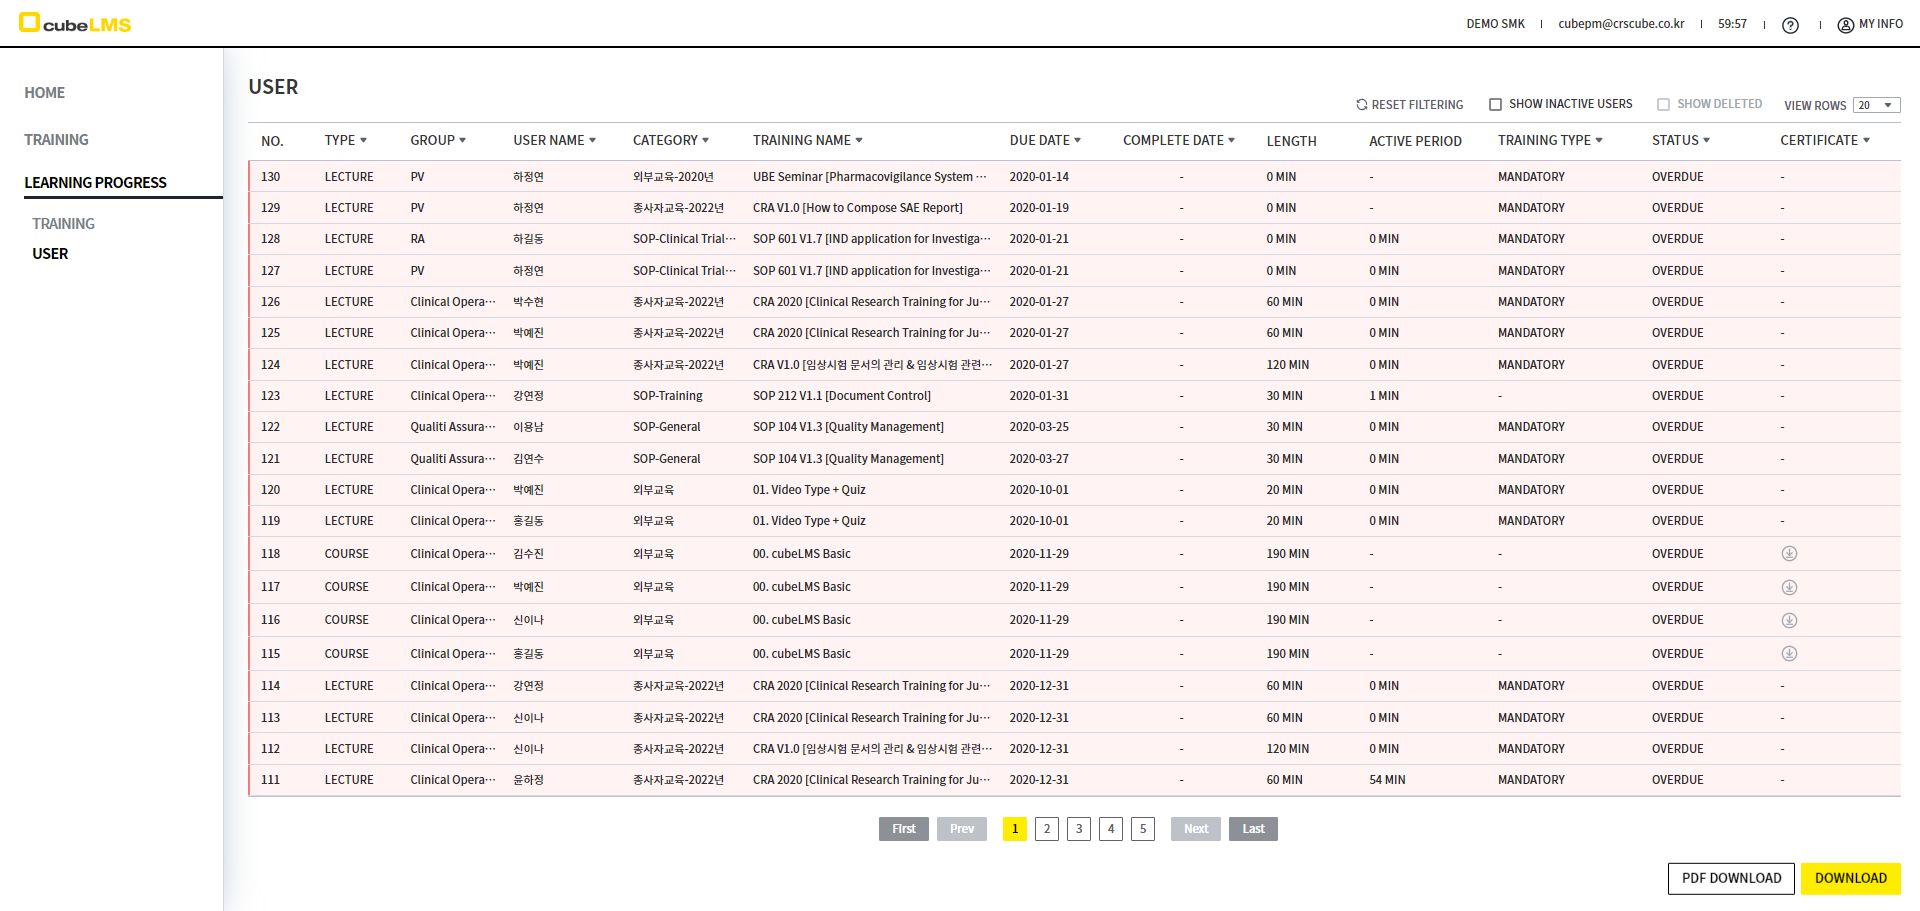
USER
You can check the STATUS and due date of the individual LECTURE for each USER. Click a specific USER row to view the details.
[SYSTEM MANAGEMENT]
You can configure the properties required for using the System.
CALENDAR STANDARD
You can set the calendar standard for calculating the Due date applied to each Lecture. (This Property is disabled after it is saved for the first time, so it cannot be changed. Please set it initially according to your company standards.)
-
WORKING: Apply based on Working day, excluding weekends and public holidays
-
CALENDAR: Apply based on Calendar, regardless of weekends and public holidays
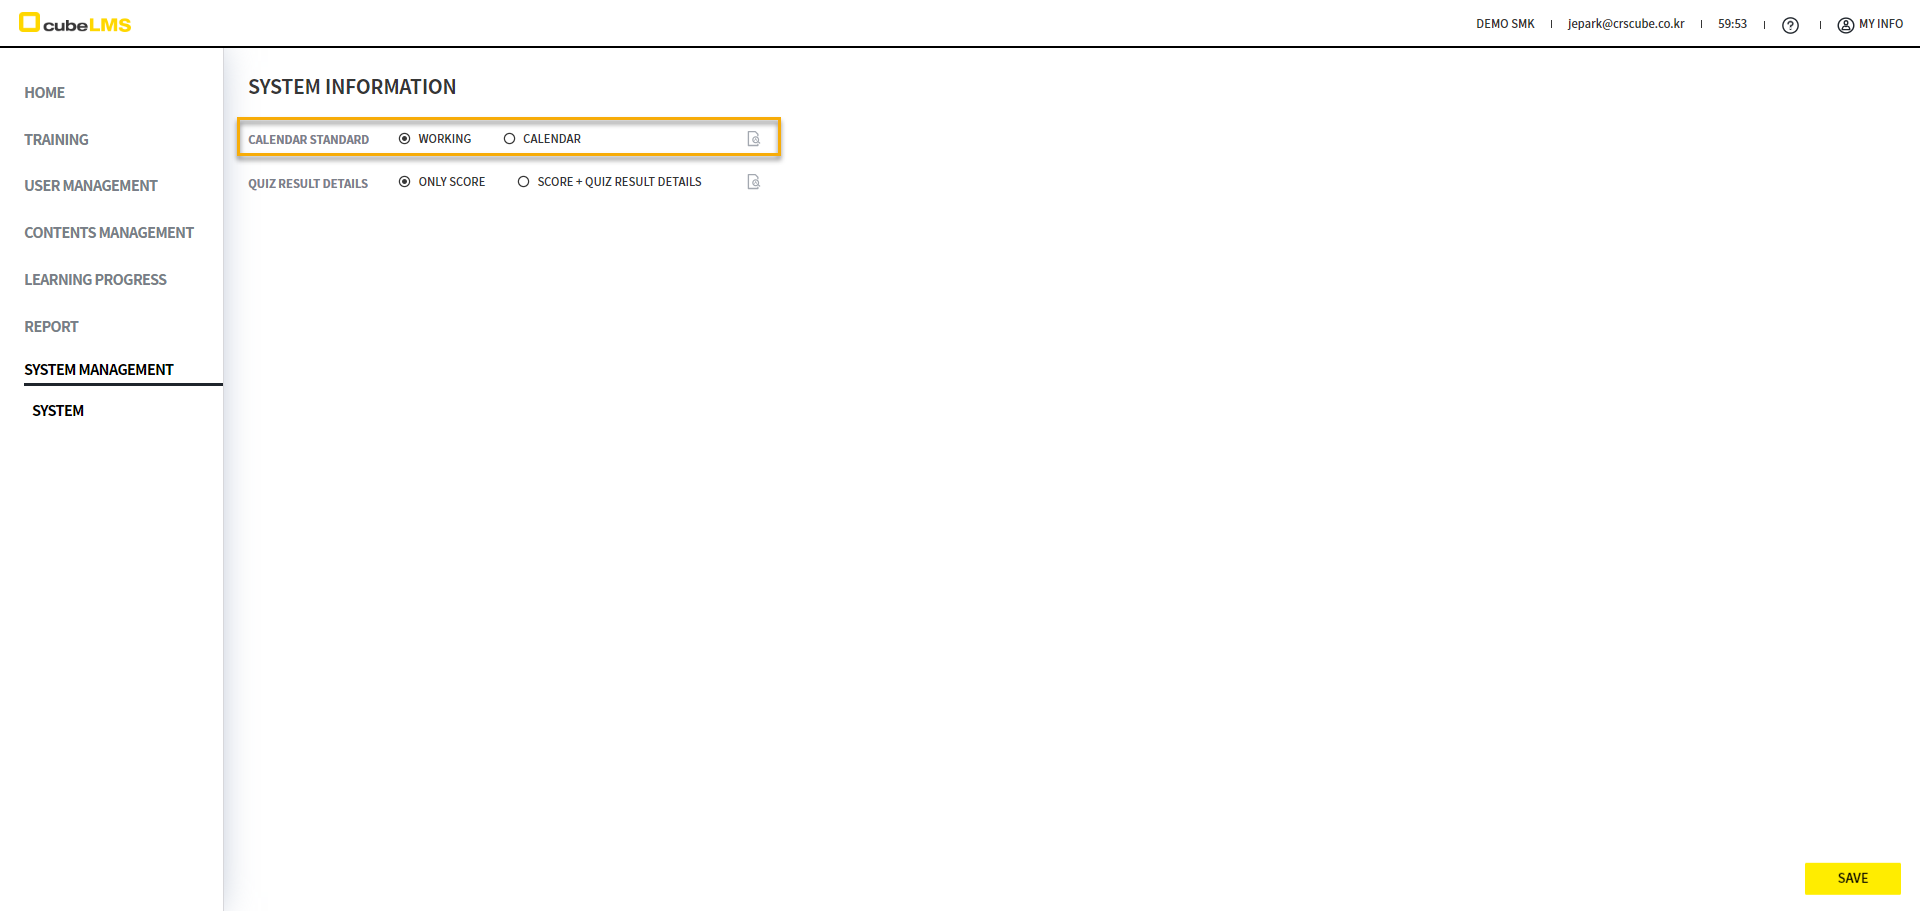
QUIZ RESULT DETAILS
When Quiz type is 2, you can set whether to display detailed Quiz result information in Quiz history.
-
ONLY SCORE: Quiz result details are not displayed, and only SCORE is displayed
-
SCORE + QUIZ RESULT DETAILS: Quiz result details display the score, answers, and correct answers together
[REPORT]
Admin can check the Due date compliance rate by User.
COMPLIANCE REORT
You can check the status to see whether all registered User are attending in compliance with the Due date.
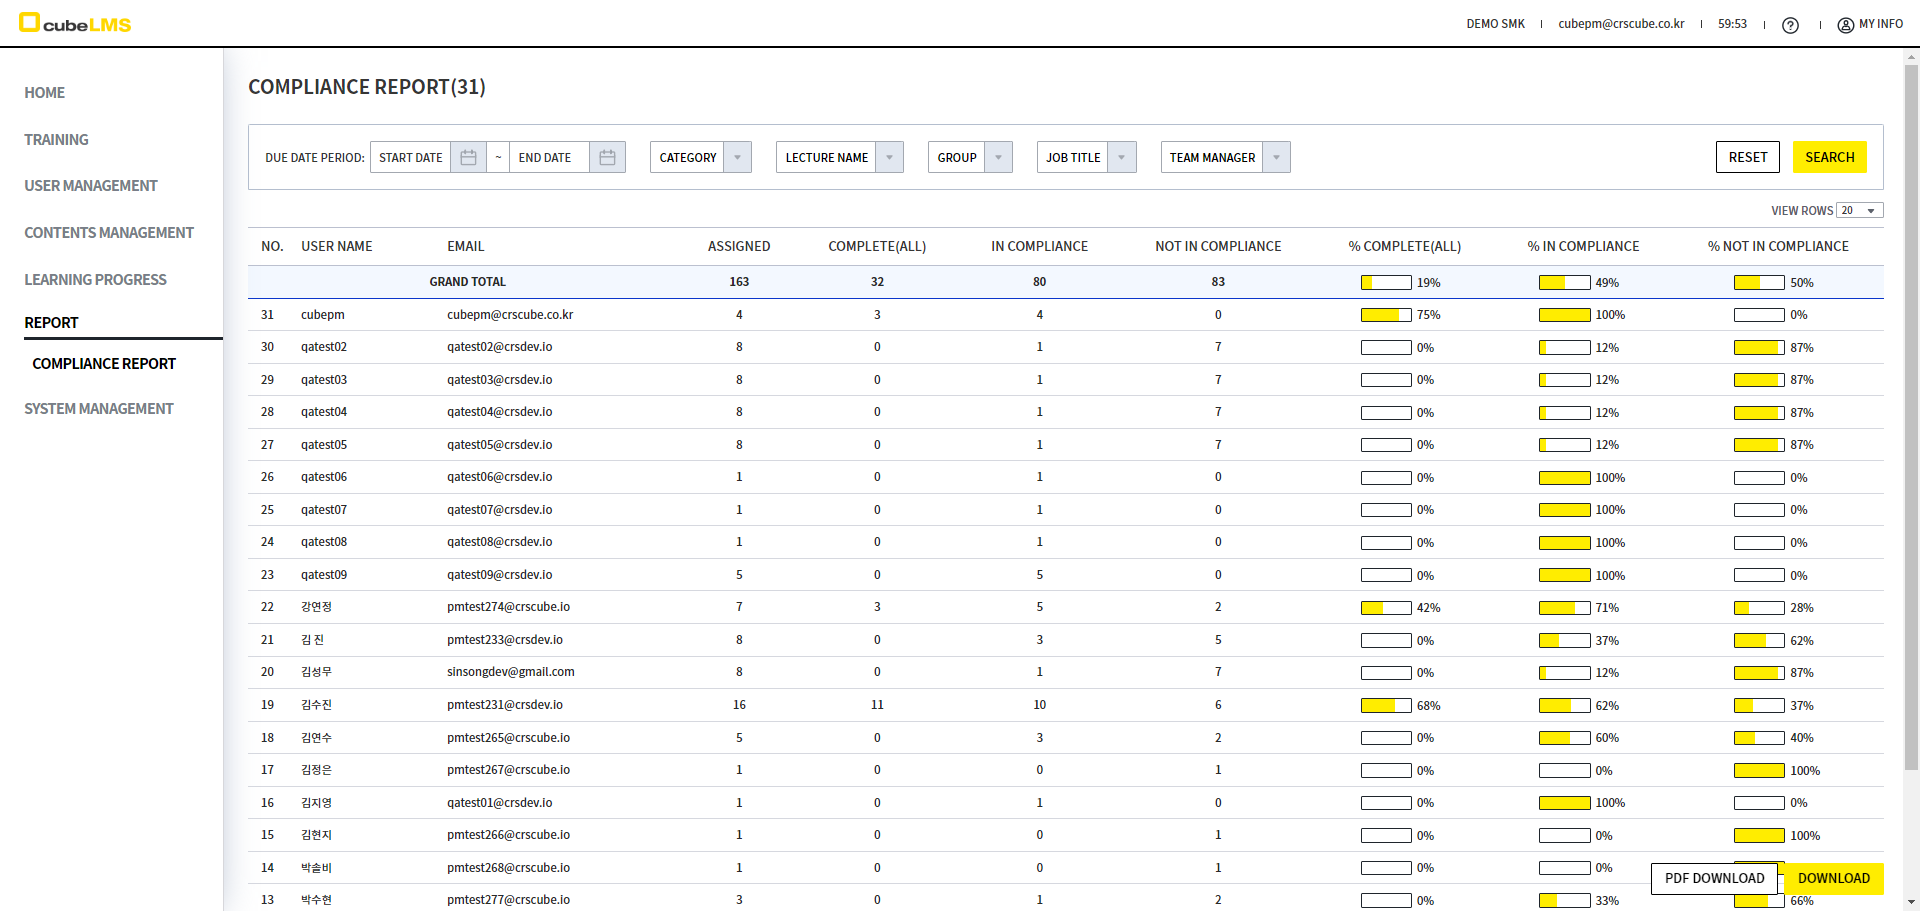
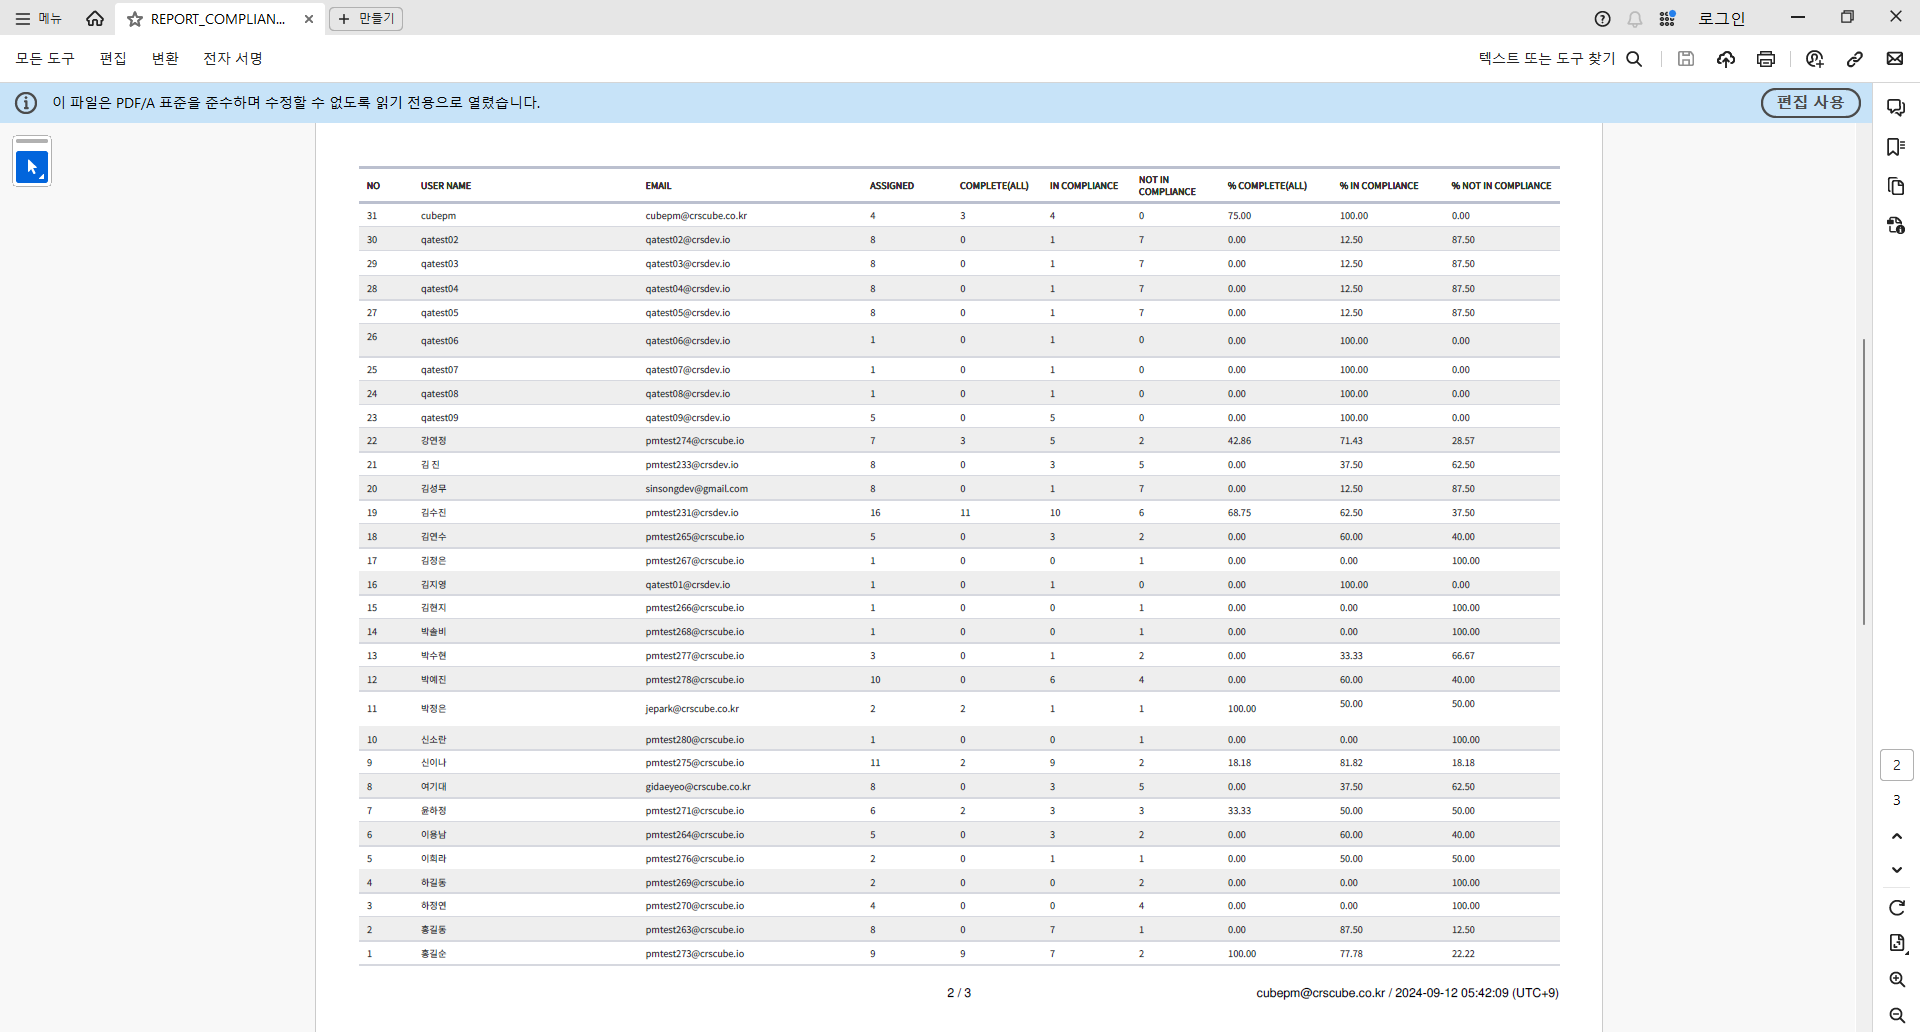
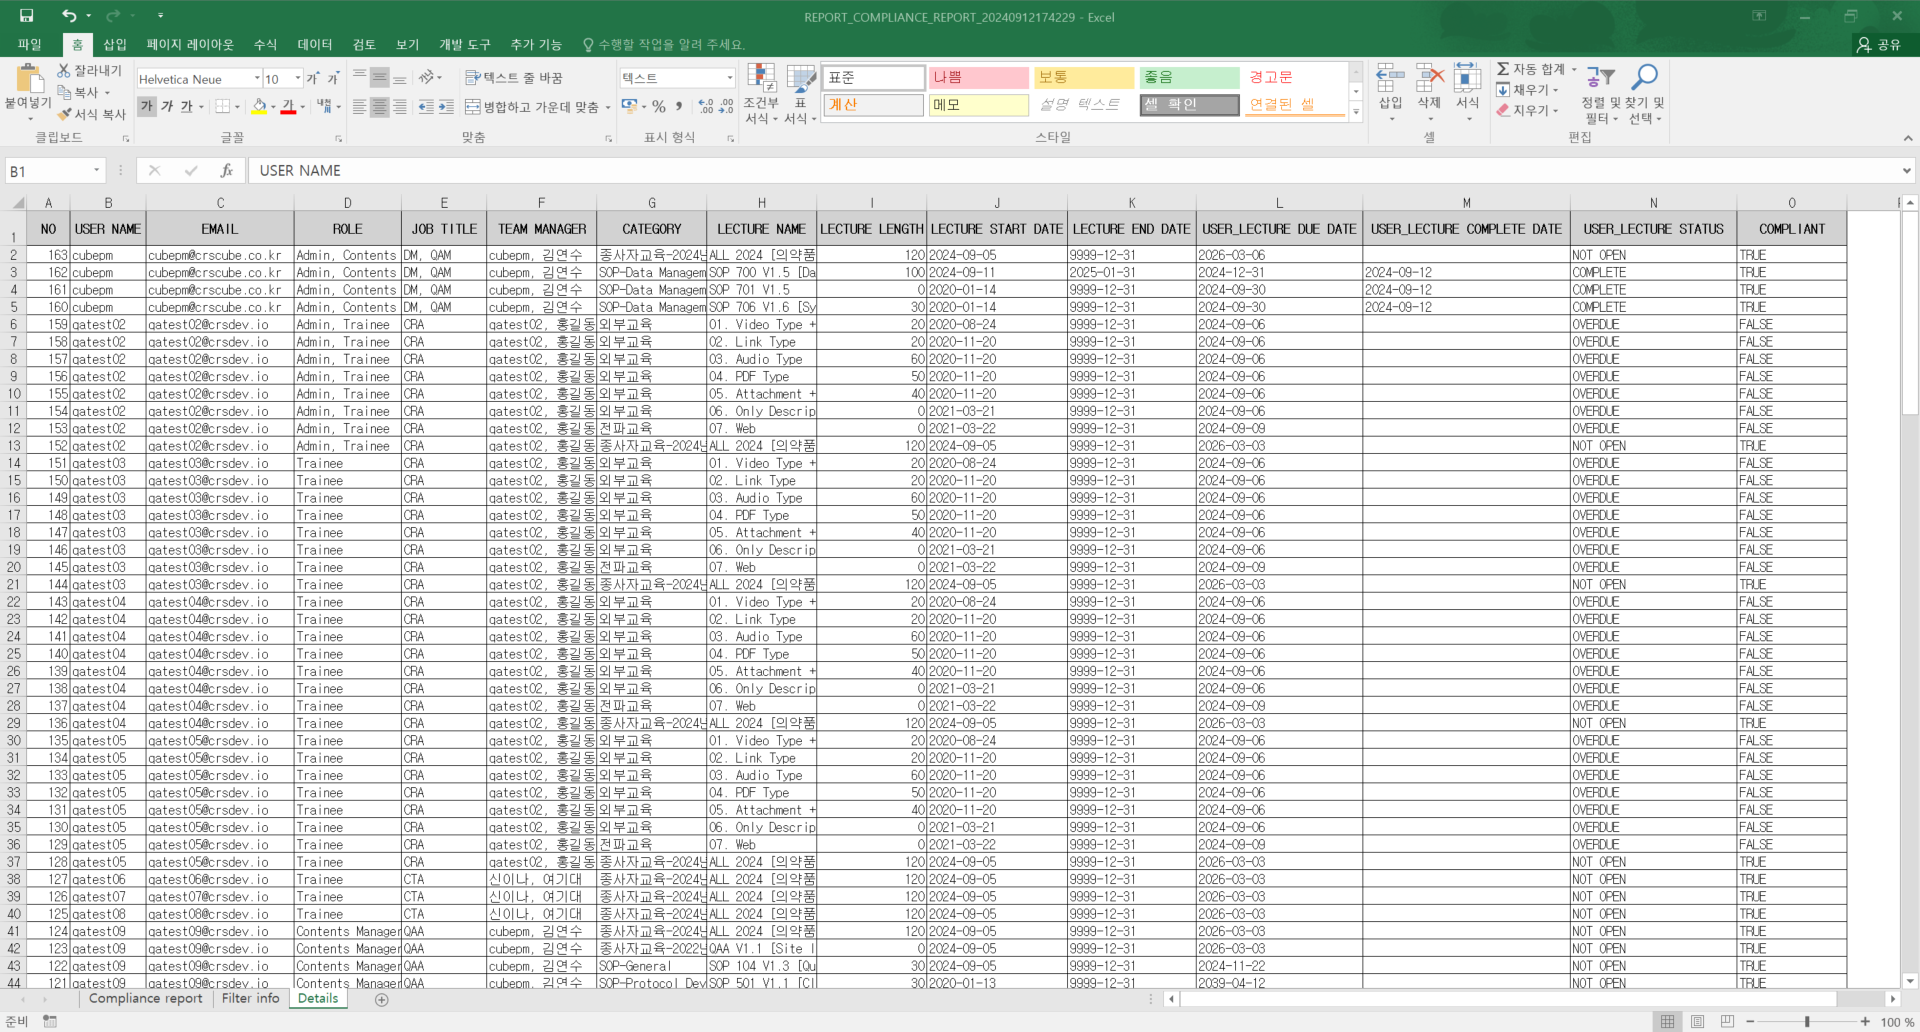
It can be downloaded as PDF or Excel, and detailed information can be viewed in the Excel Detail Sheet.
CONTENTS MANAGER
[CONTENTS MANAGEMENT]
Contents manager can configure the Category Tree structure.
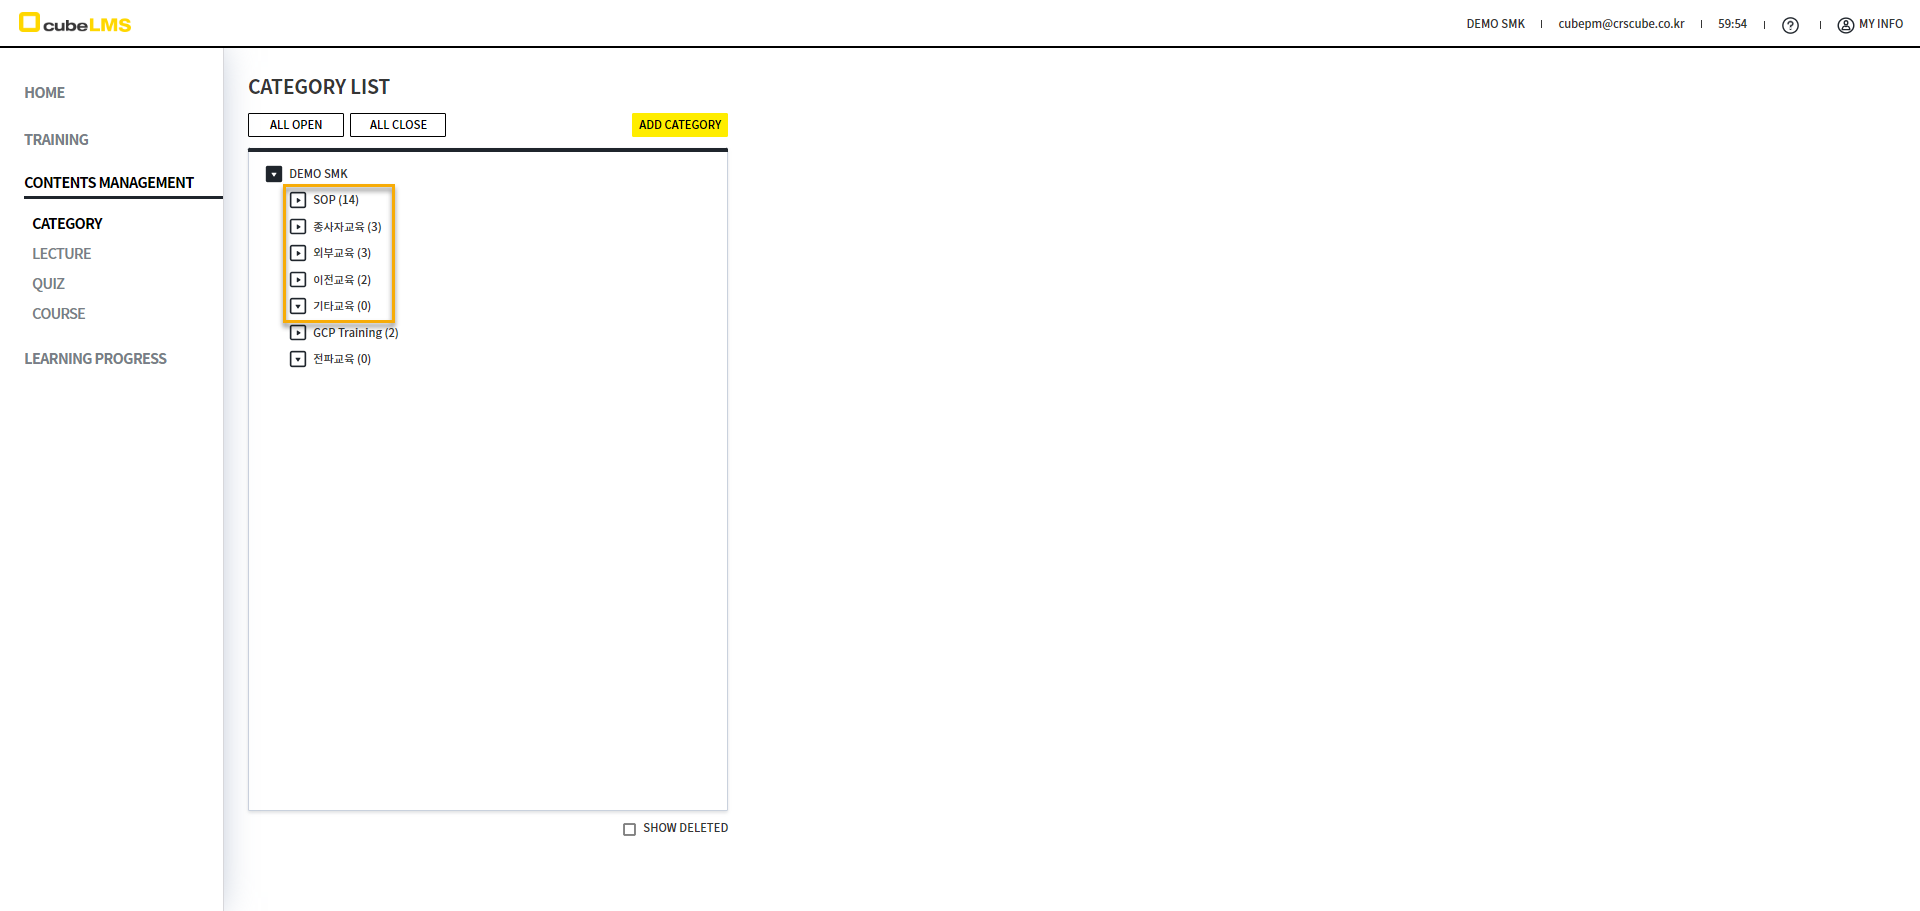
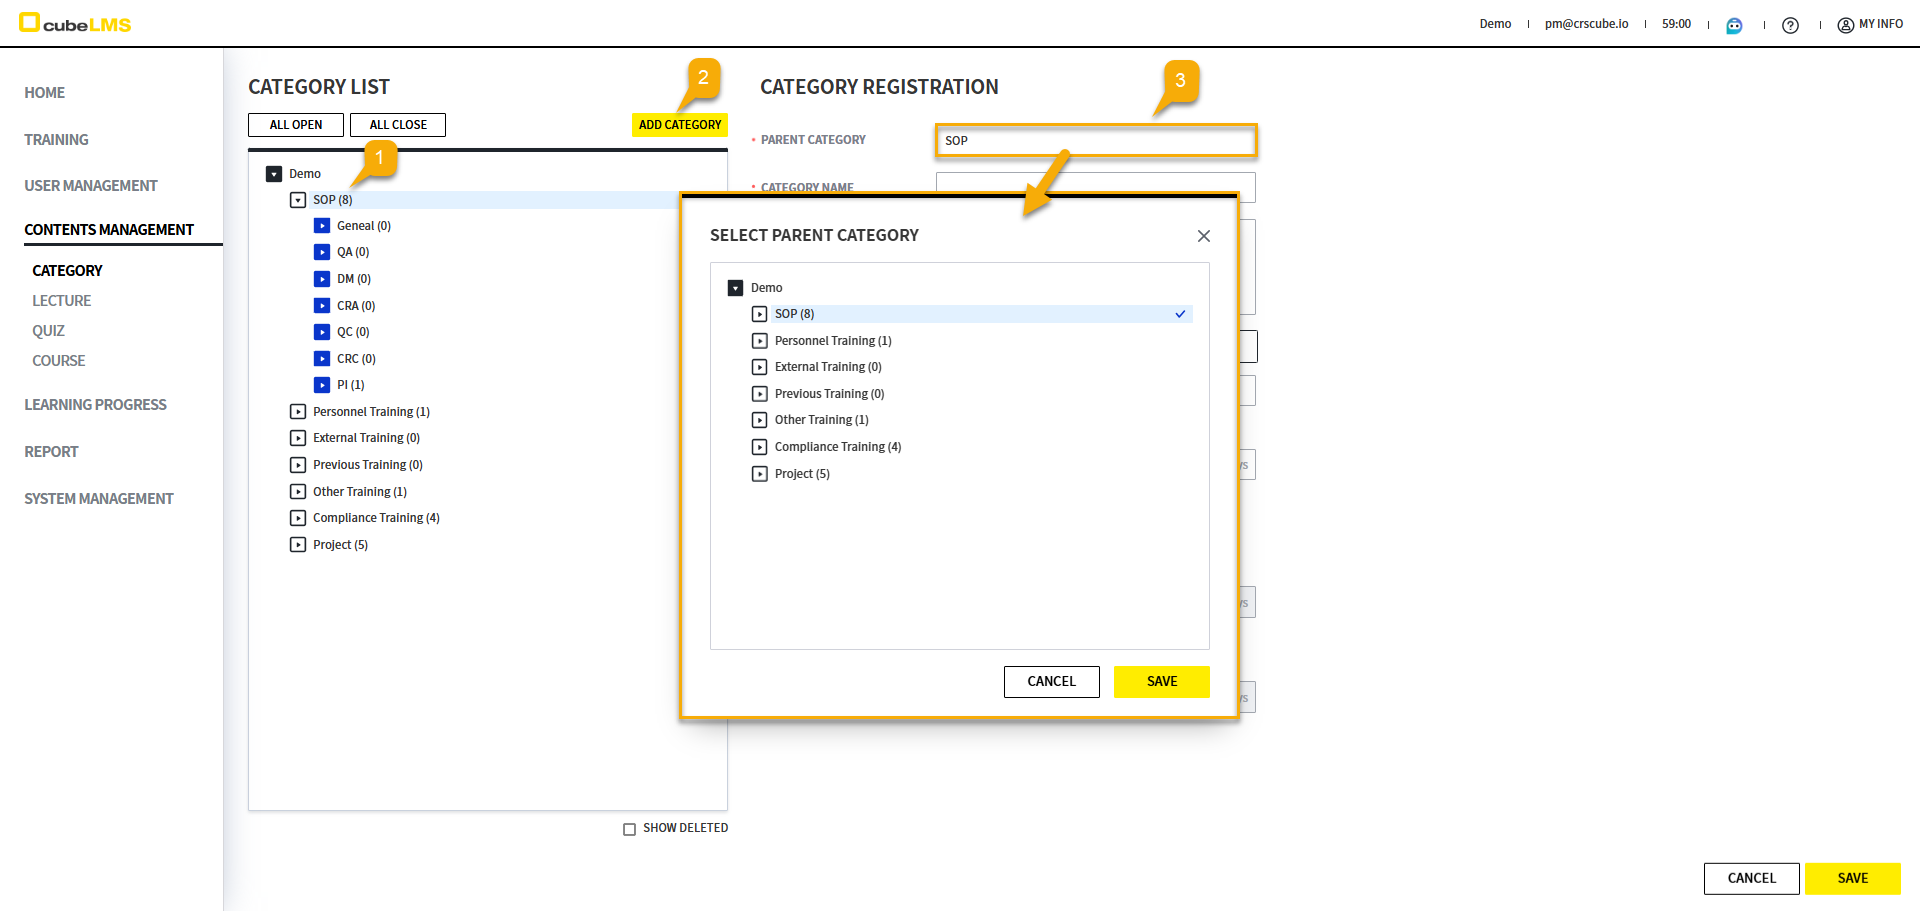
CATEGORY
You can create a Category according to the structure in which Lecture will be registered. When a Company is created, SOP, employee training, external training, previous training, and other training are displayed as Categories by default. These Categories cannot be reordered, but they can be deleted and edited, so you can modify them freely.
When Category is selected, if you select the ADD CATEGORY button, the selected Category is automatically displayed in Parent Category. If you want to change Parent Category, select that item and change Parent Category in the SELECT PARENT CATEGORY pop-up that appears.
To reduce duplicate settings when creating a Lecture, you can pre-set duplicate settings in Category. When you select Category on the Lecture creation screen, the information entered in that Category is loaded. All of that data can be edited.
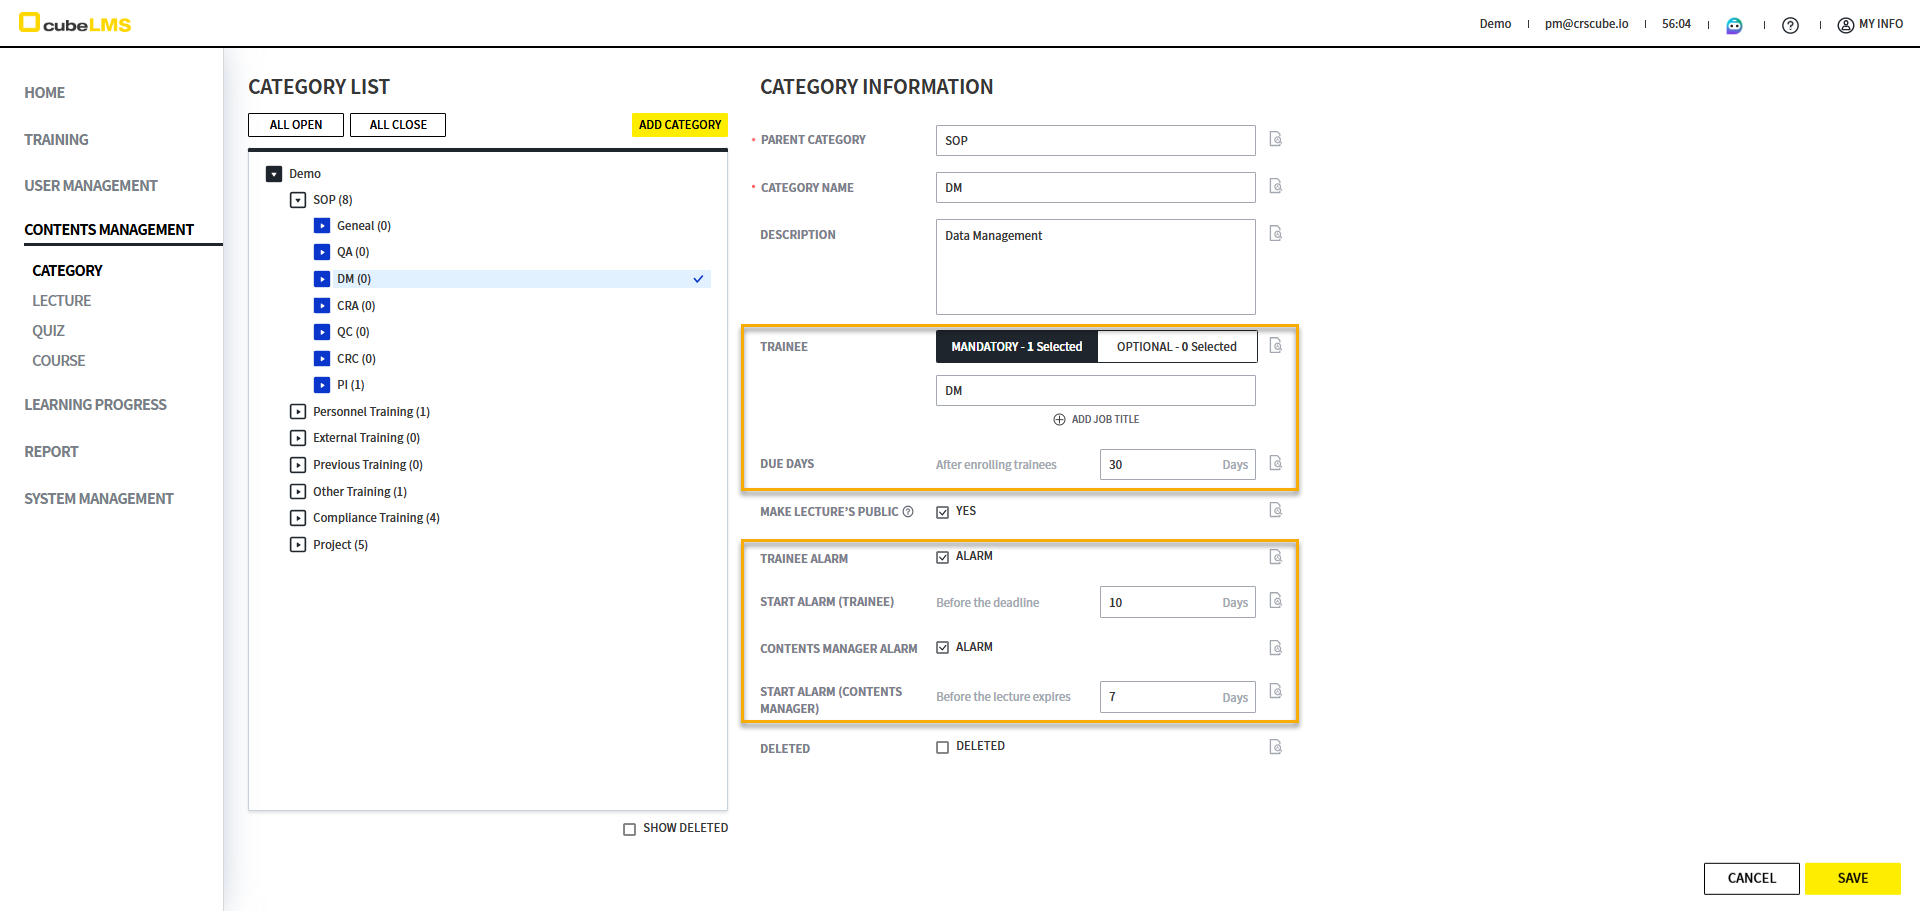
MAKE LECTURE’S PUBLIC setting
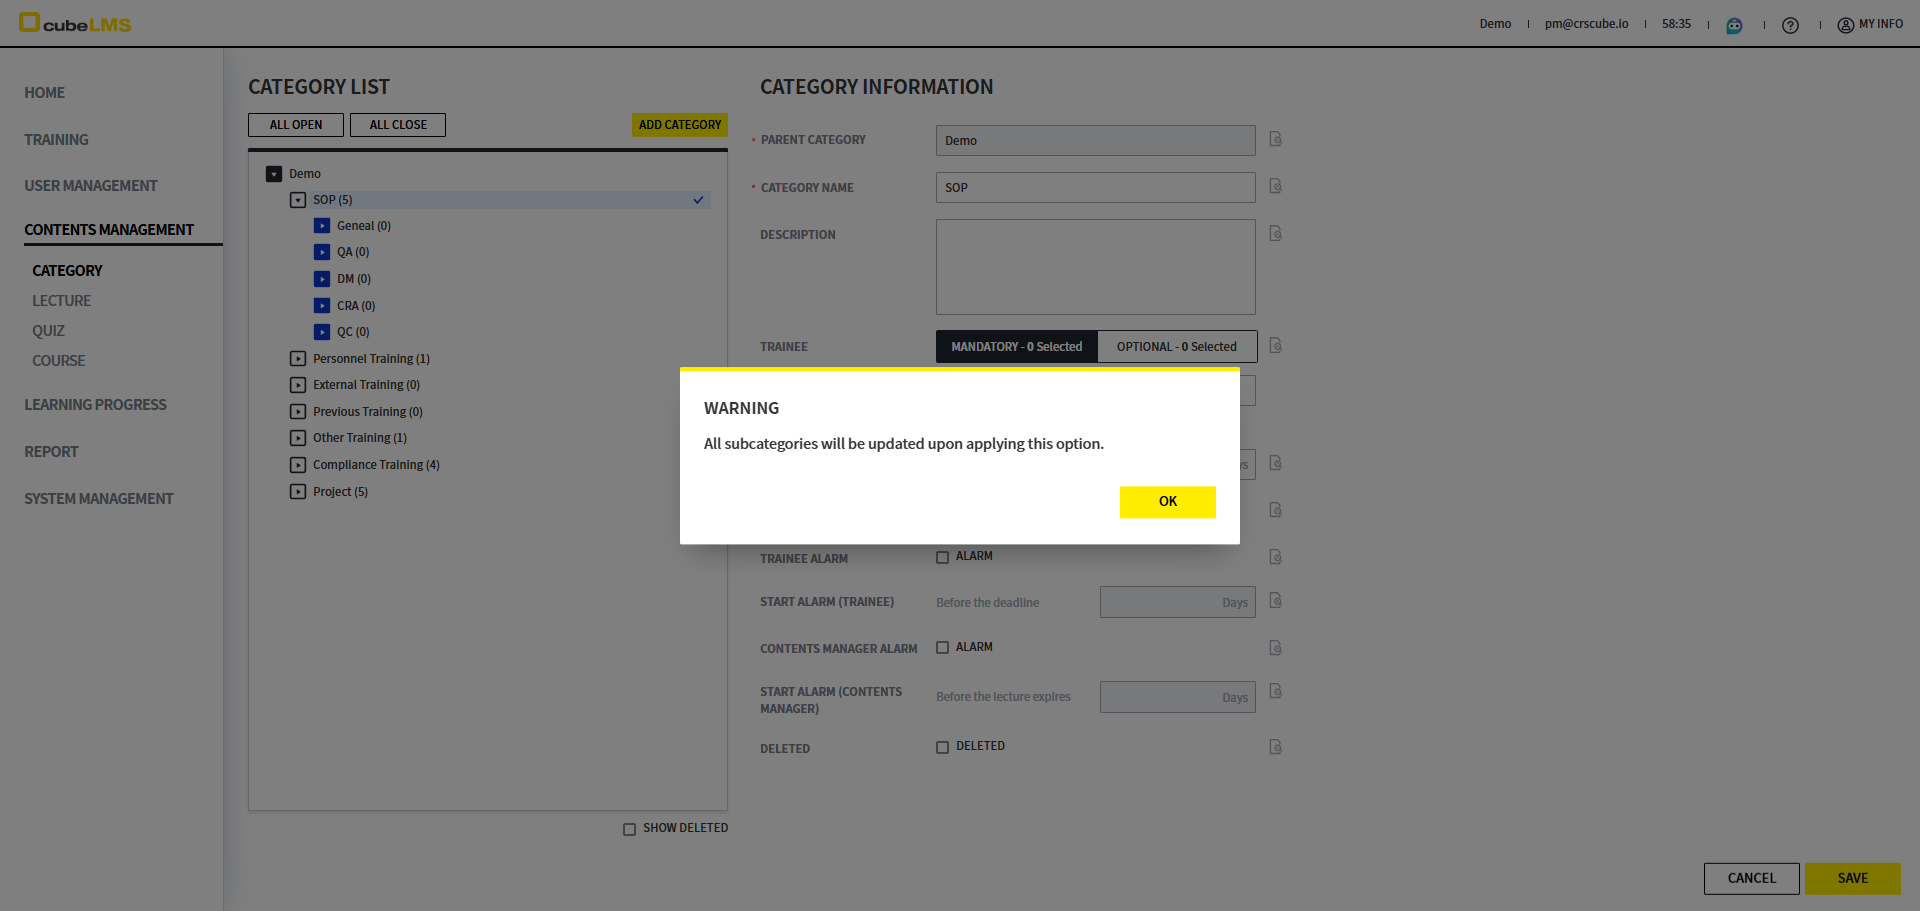
If you check the MAKE LECTURE’S PUBLIC option, you can make the Contents of Lectures belonging to that Category and its subcategories visible to all Trainees, regardless of whether they are assigned.
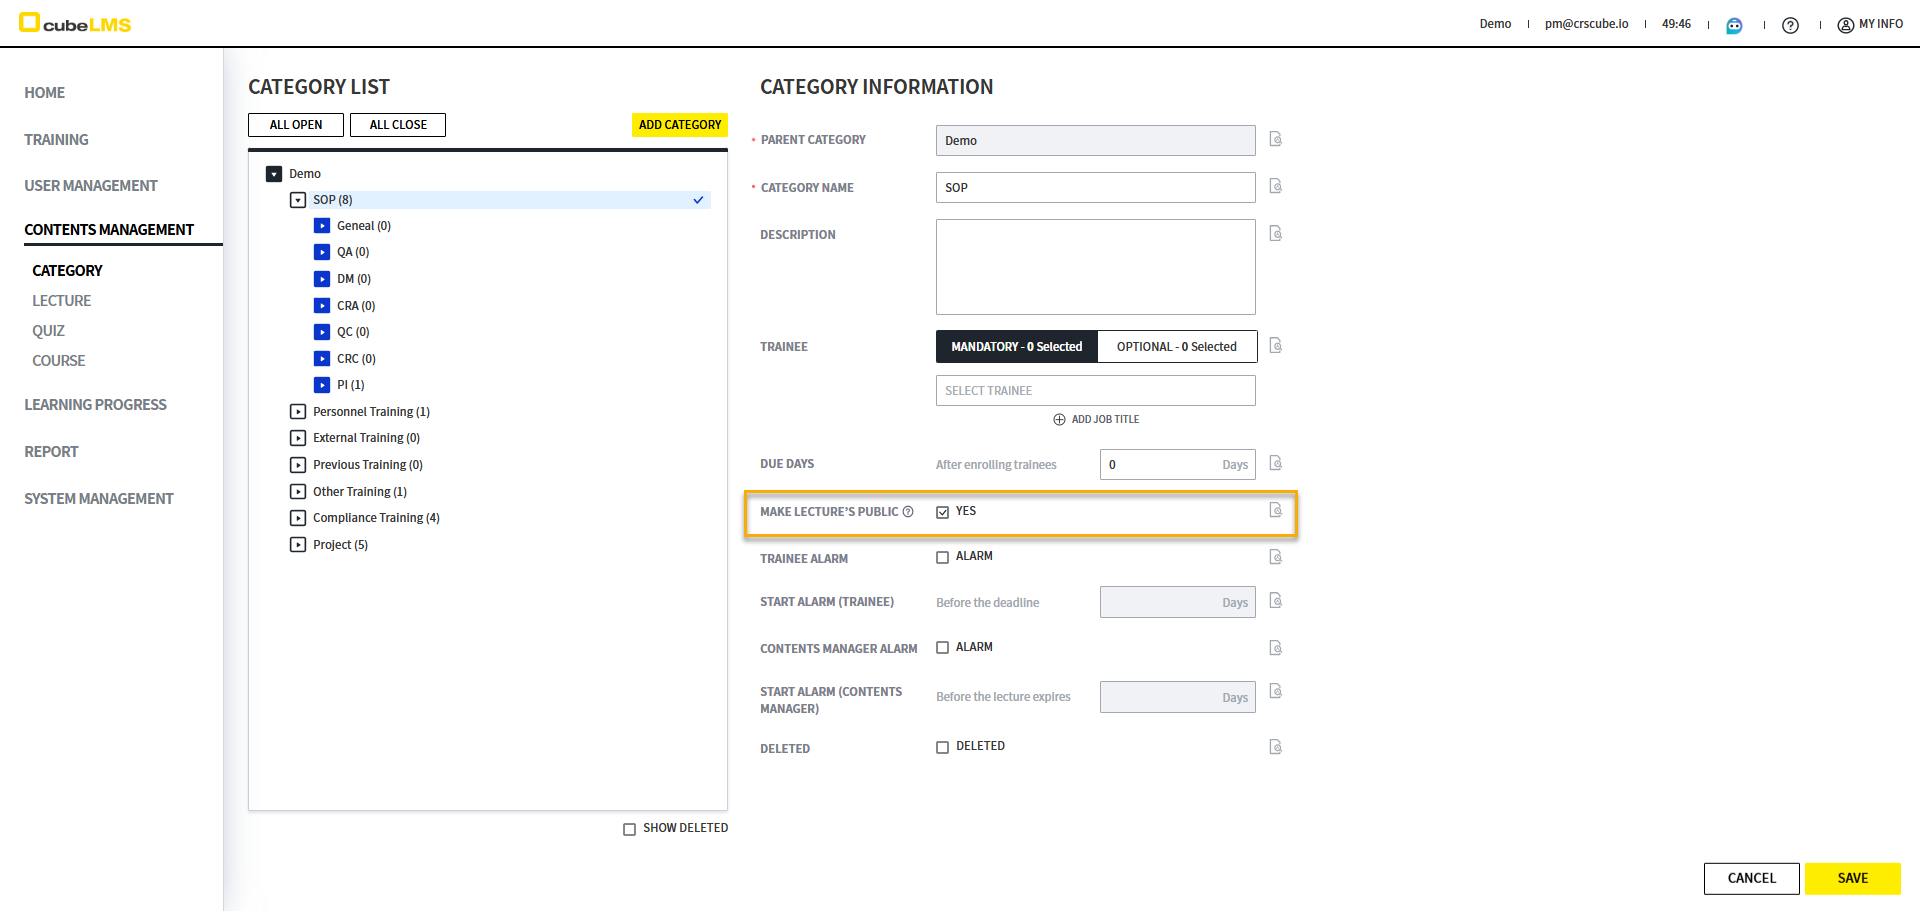
When you check or uncheck this item, the 'All subcategories will be updated upon applying this option.' popup appears.
Go to the TRAINING > ALL TRAINING menu. In the VISIBILITY column, you can check whether Lecture is available for viewing.
-
YES: MAKE LECTURE’S LECTURE checked Lecture under Category
-
NO: MAKE LECTURE’S LECTURE not checked Lecture under Category
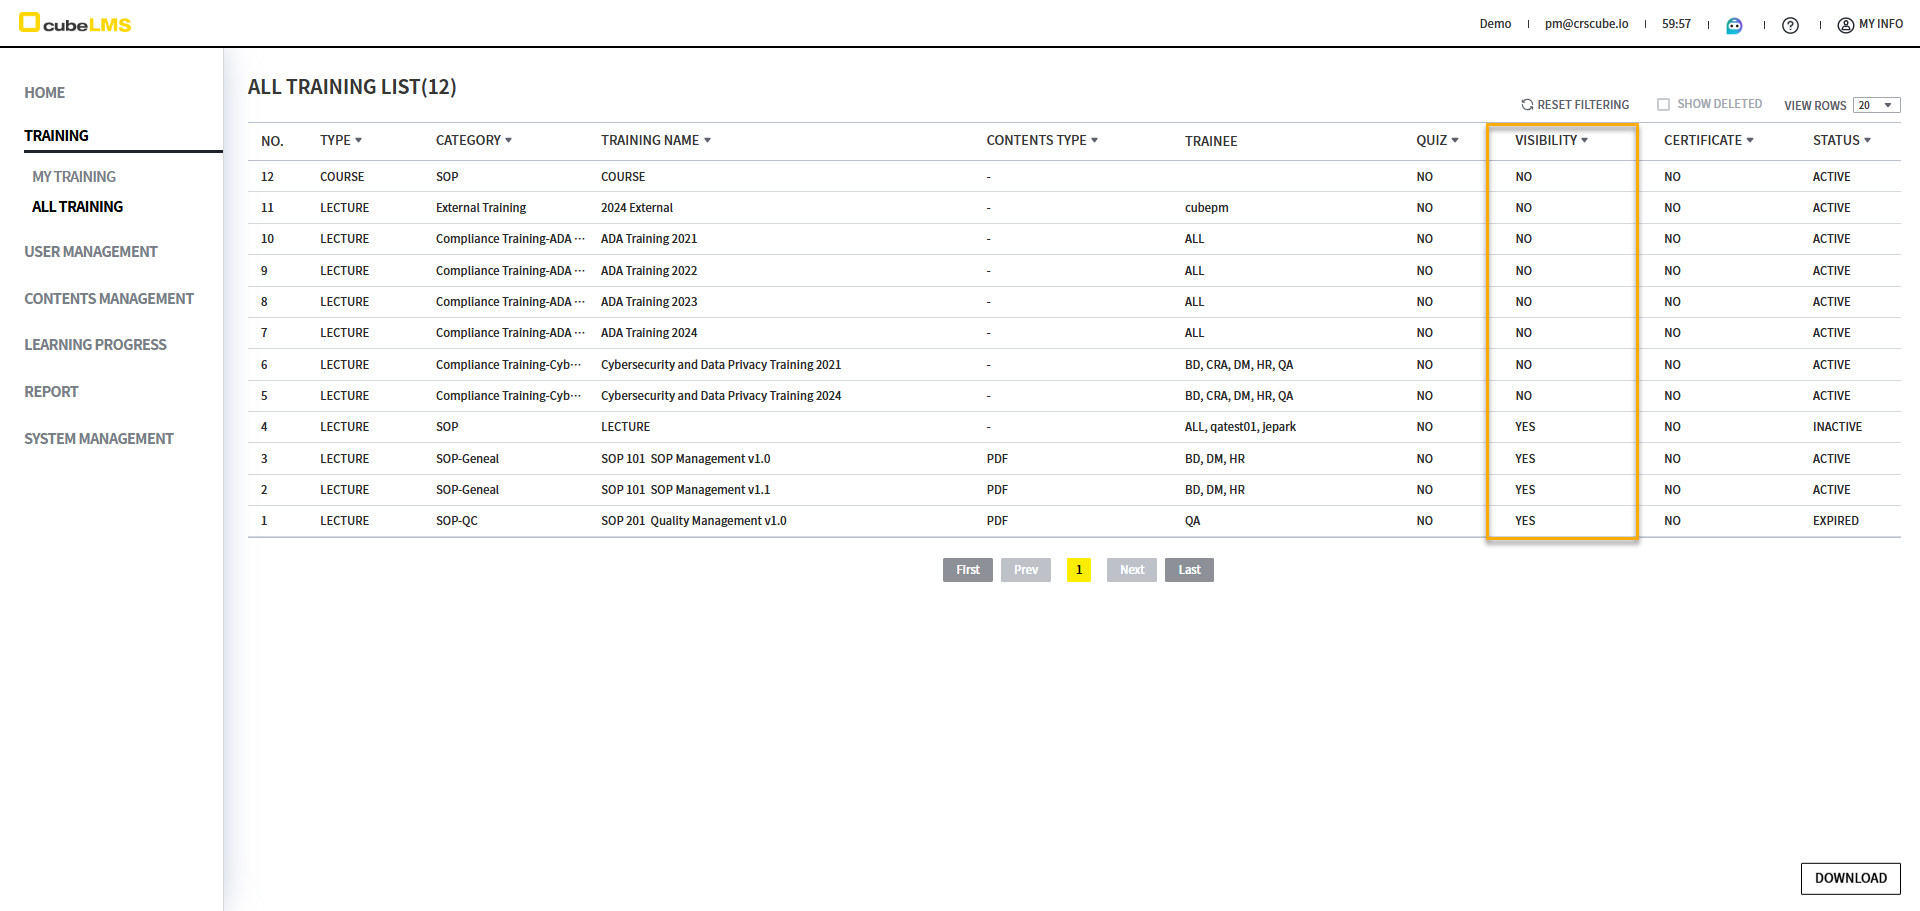
If you select a Lecture with VISIBILITY marked as YES, the detailed screen opens. On that screen, you can view the Lecture Contents. If ADD-ON FILE display is enabled for that Lecture, that item is also displayed.
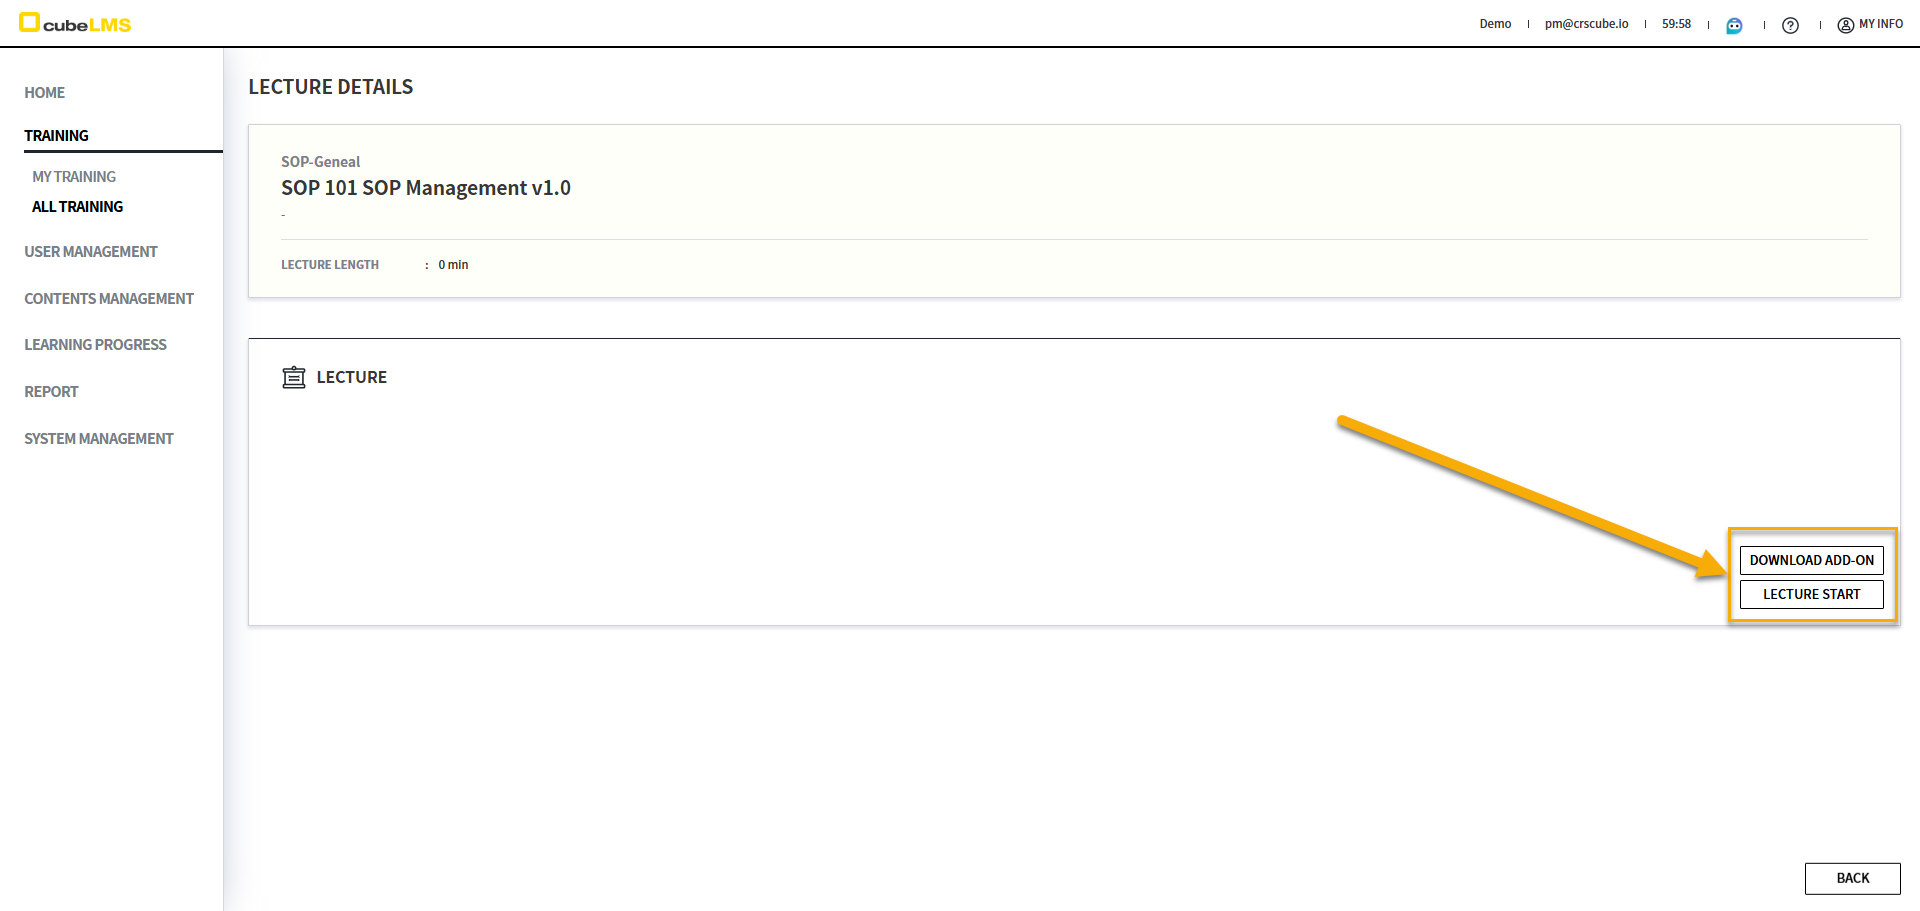
Select the LECTURE START button to view the Contents of the Lecture.
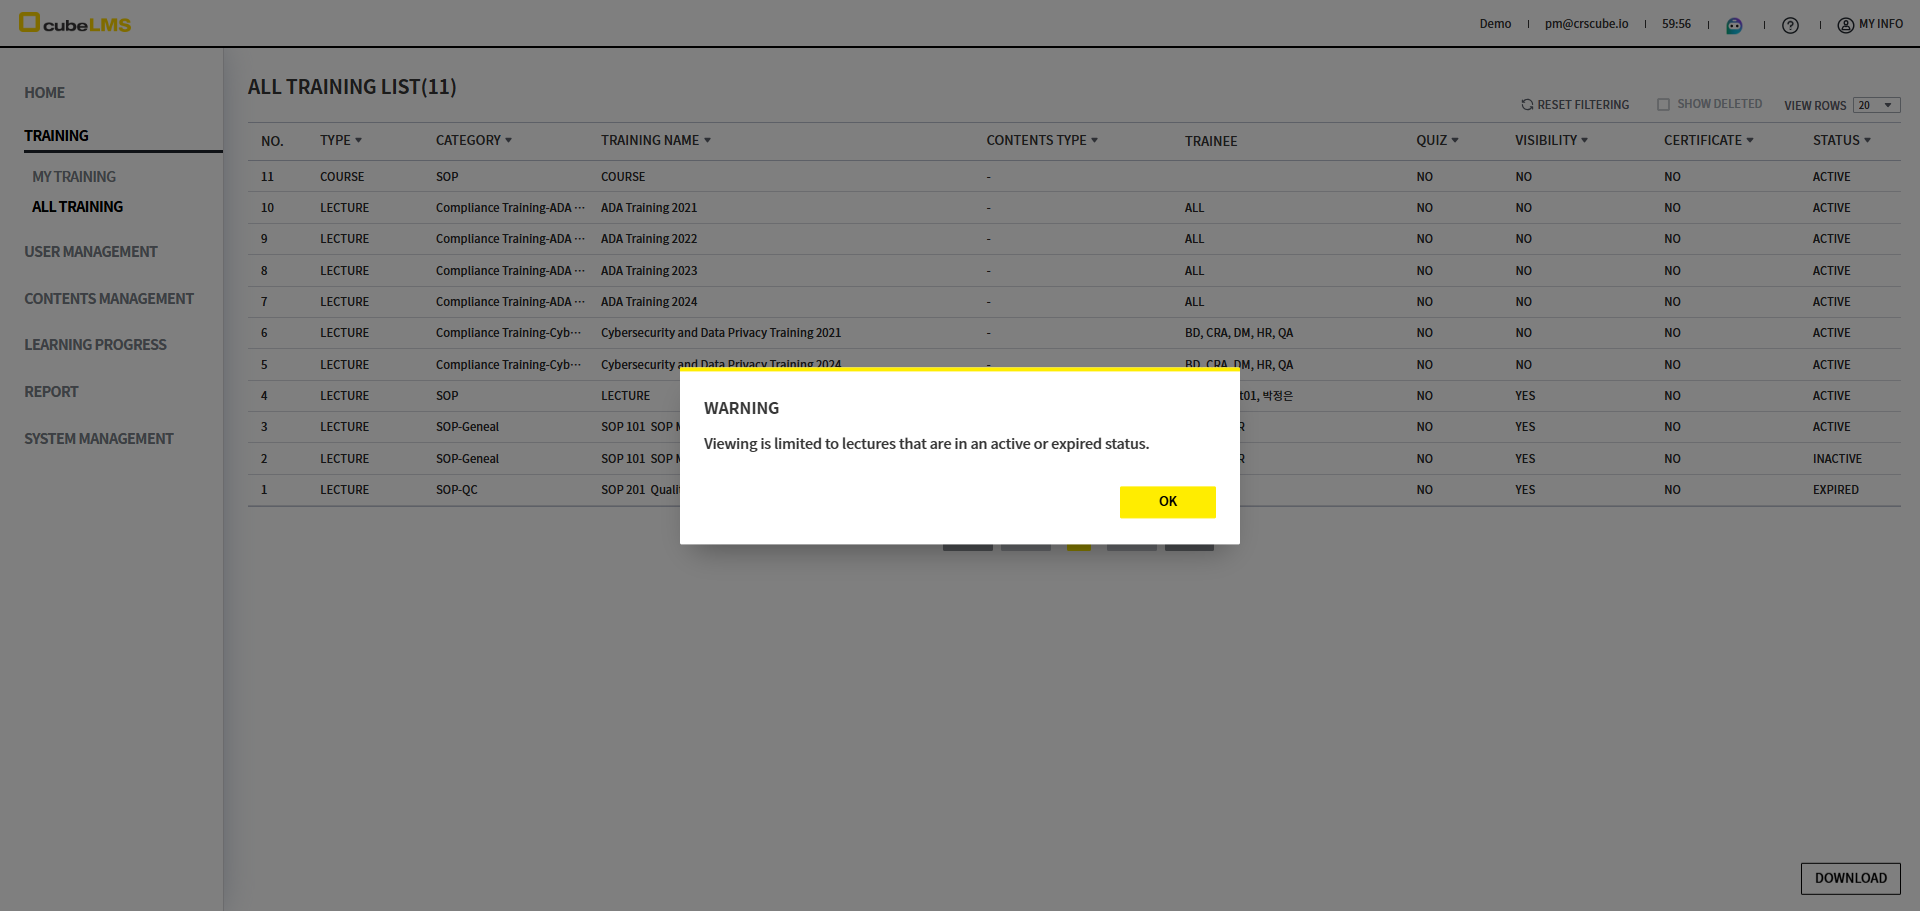
However, even if the Lecture belongs to a Category with MAKE LECTURE’S PUBLIC checked, if Status is INACTIVE, viewing is restricted and the warning popup 'Viewing is limited to lectures that are in an active or expired status.' is displayed.
Notes
-
Lectures in Categories for which MAKE LECTURE’S PUBLIC is not checked remain restricted from viewing, as before.
-
The same restriction also applies to all Course.
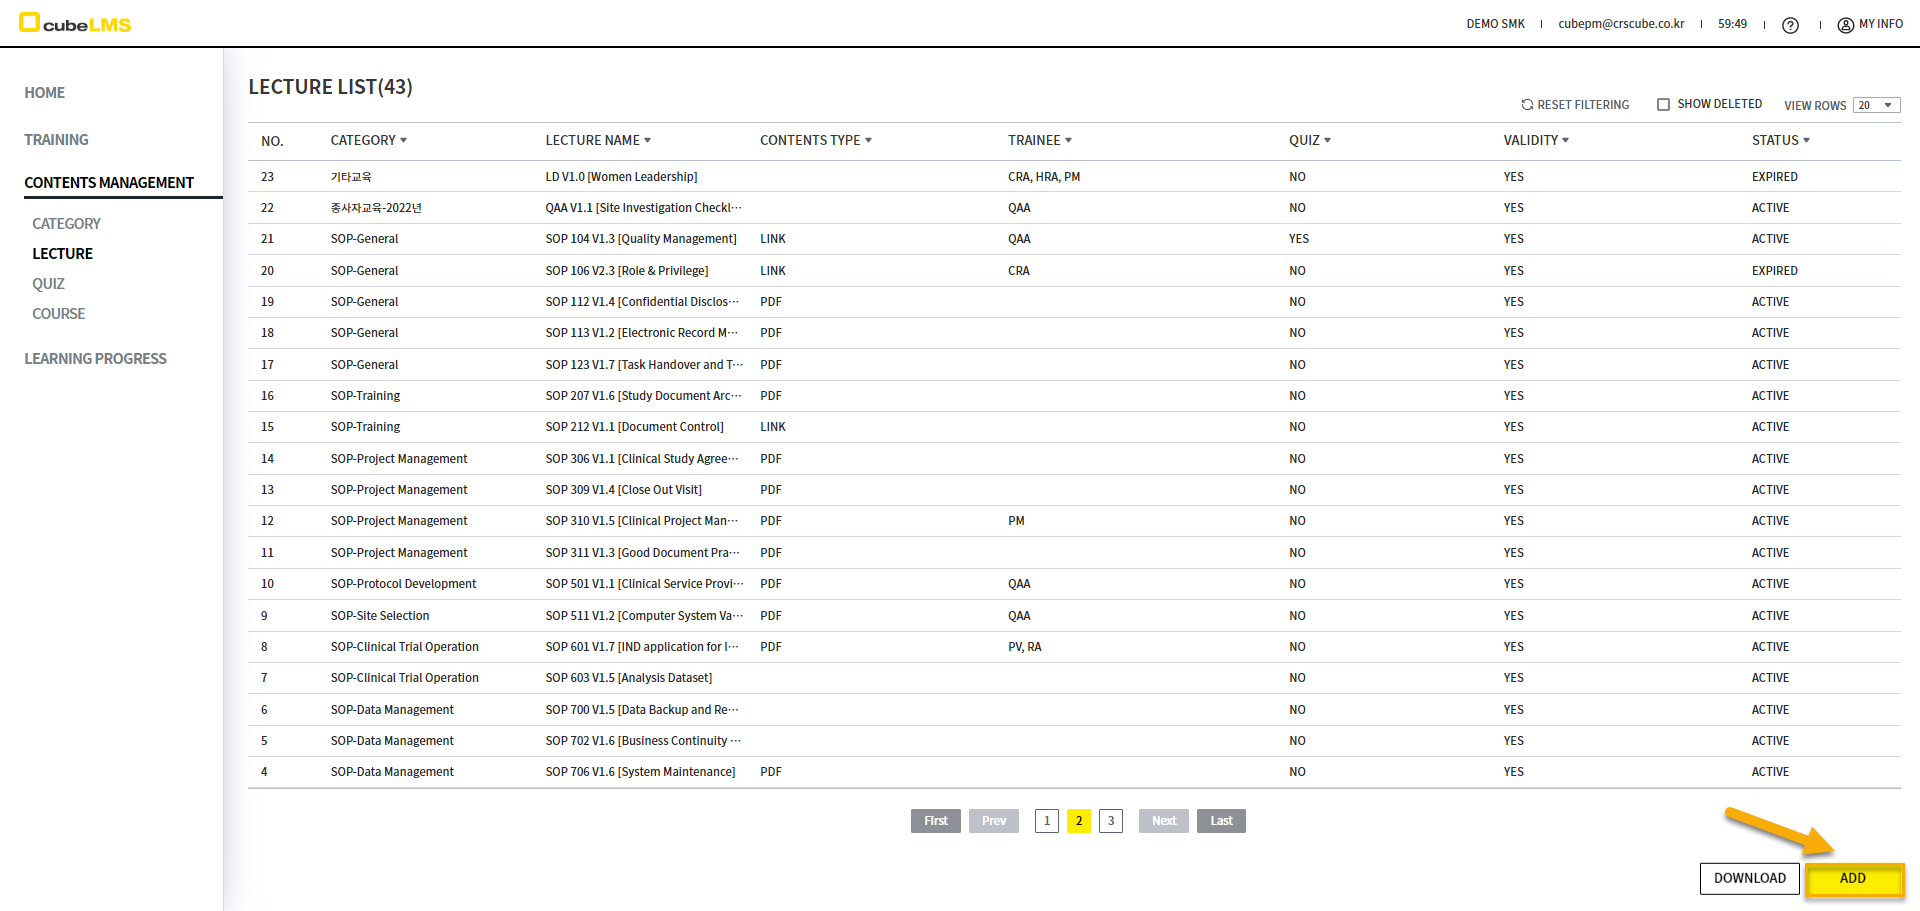
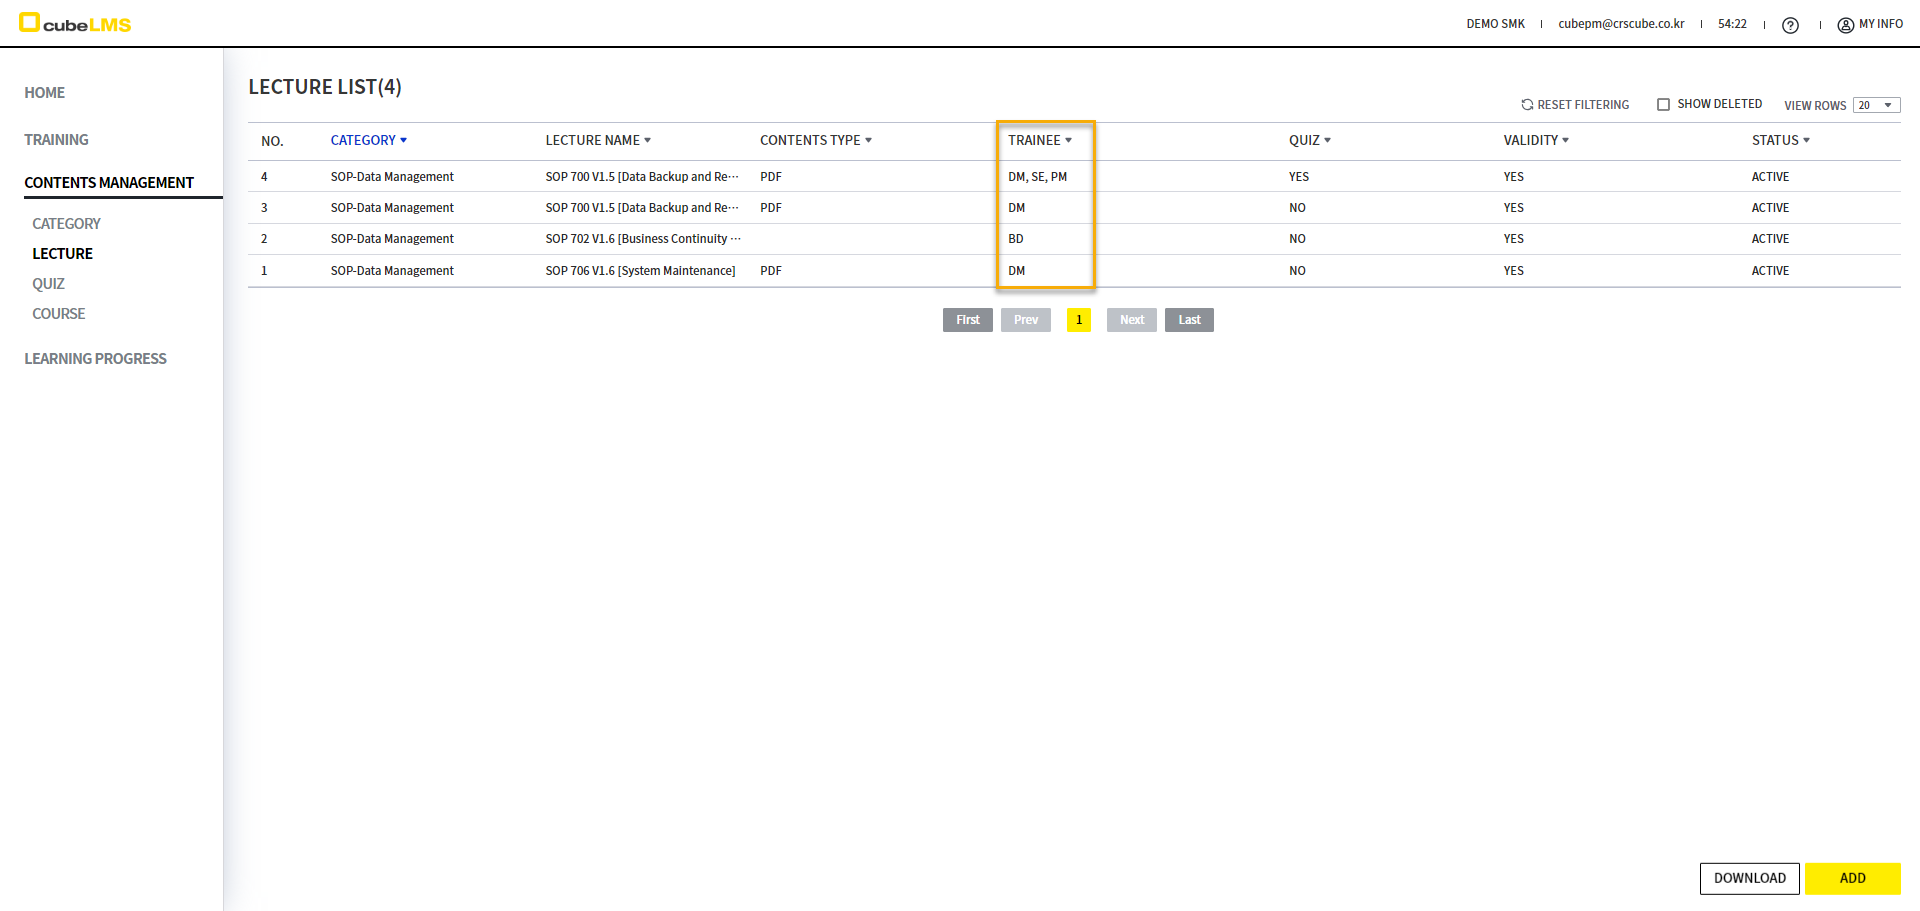
LECTURE
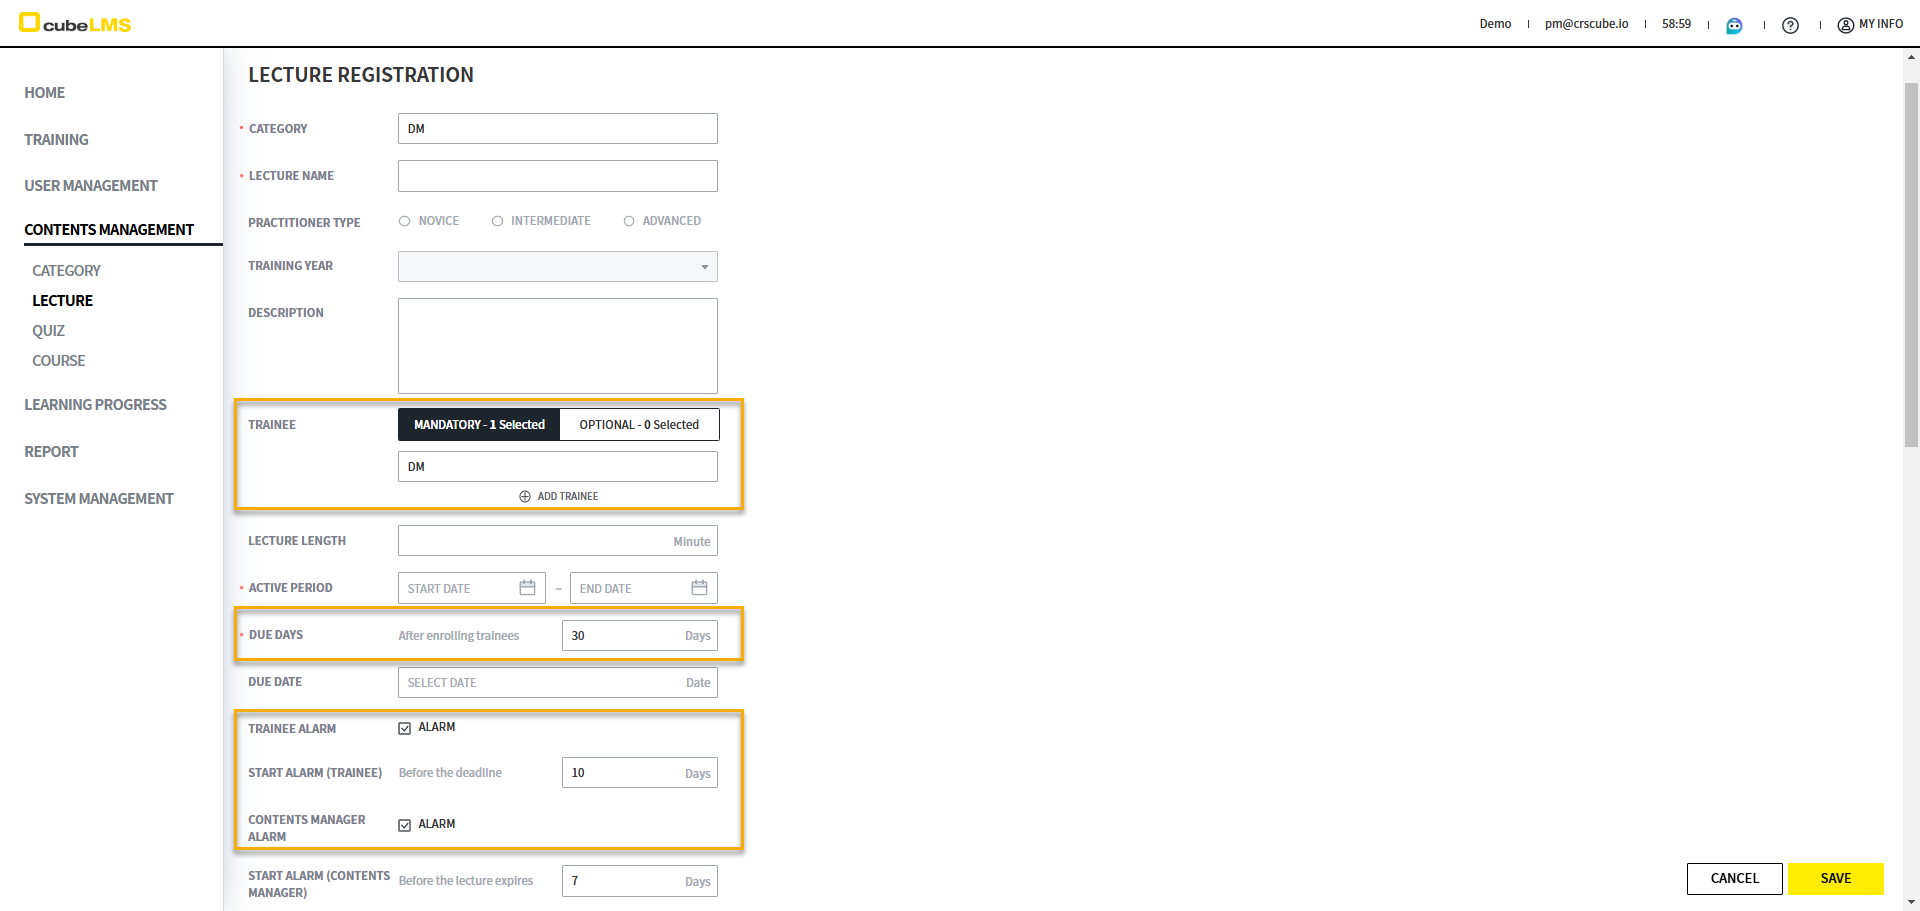
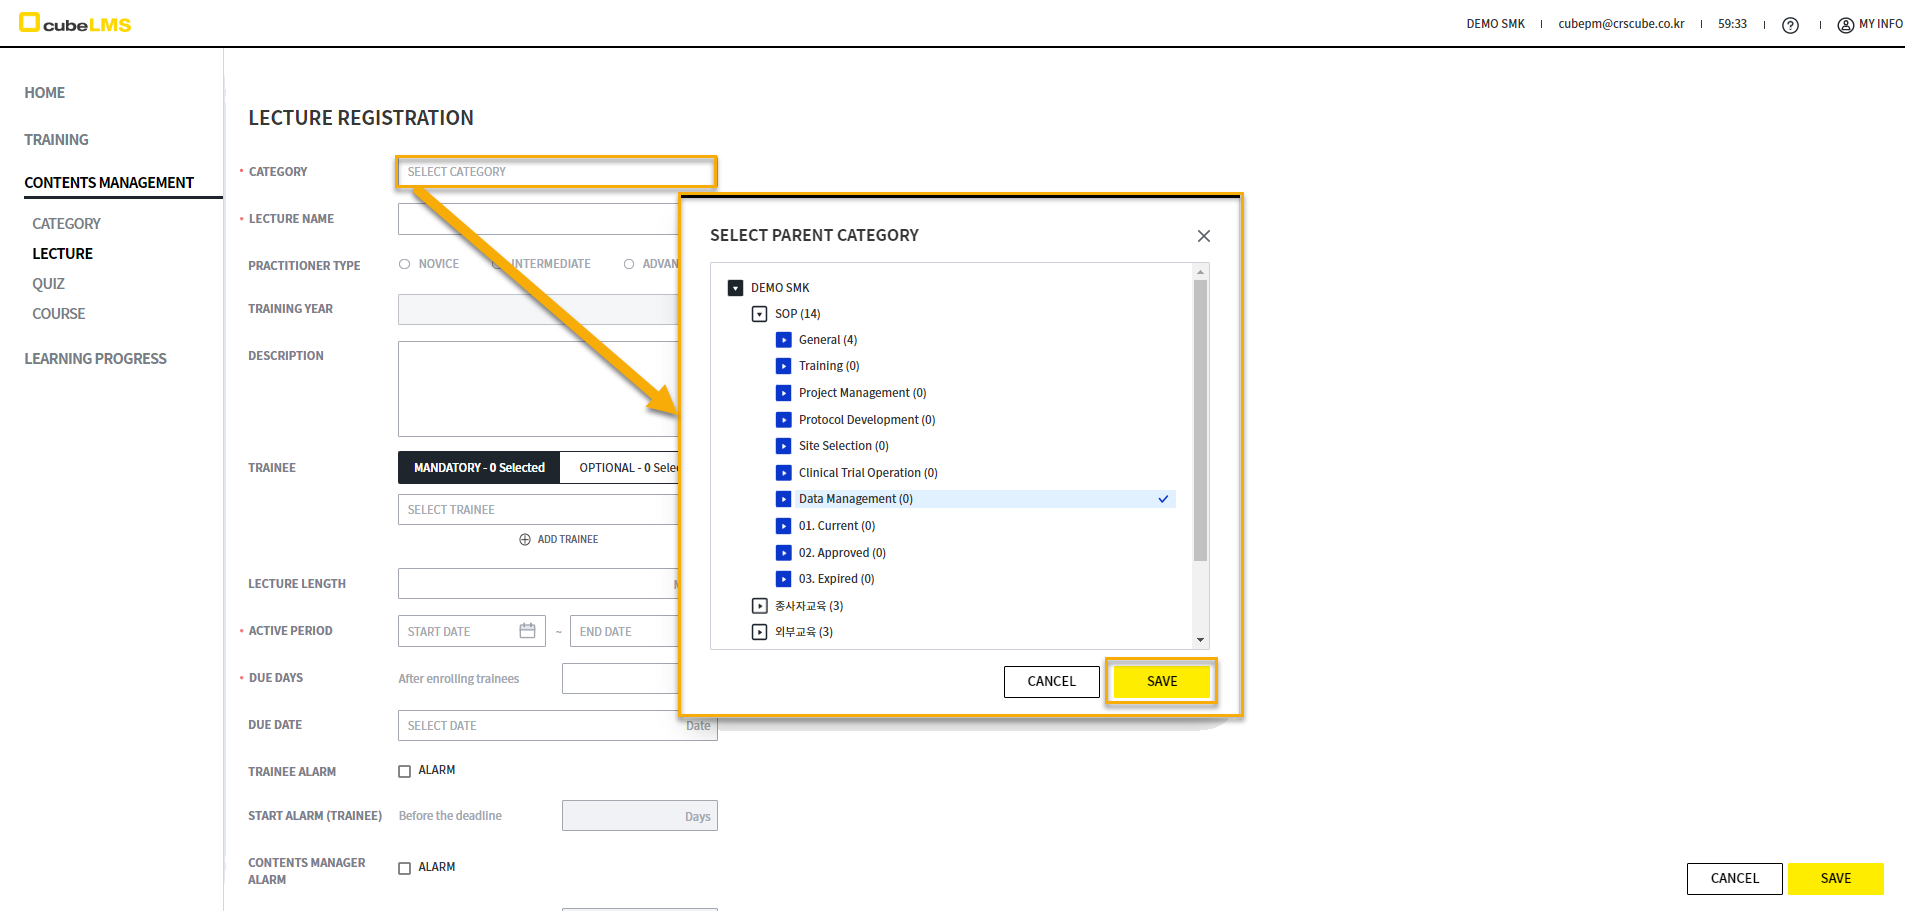
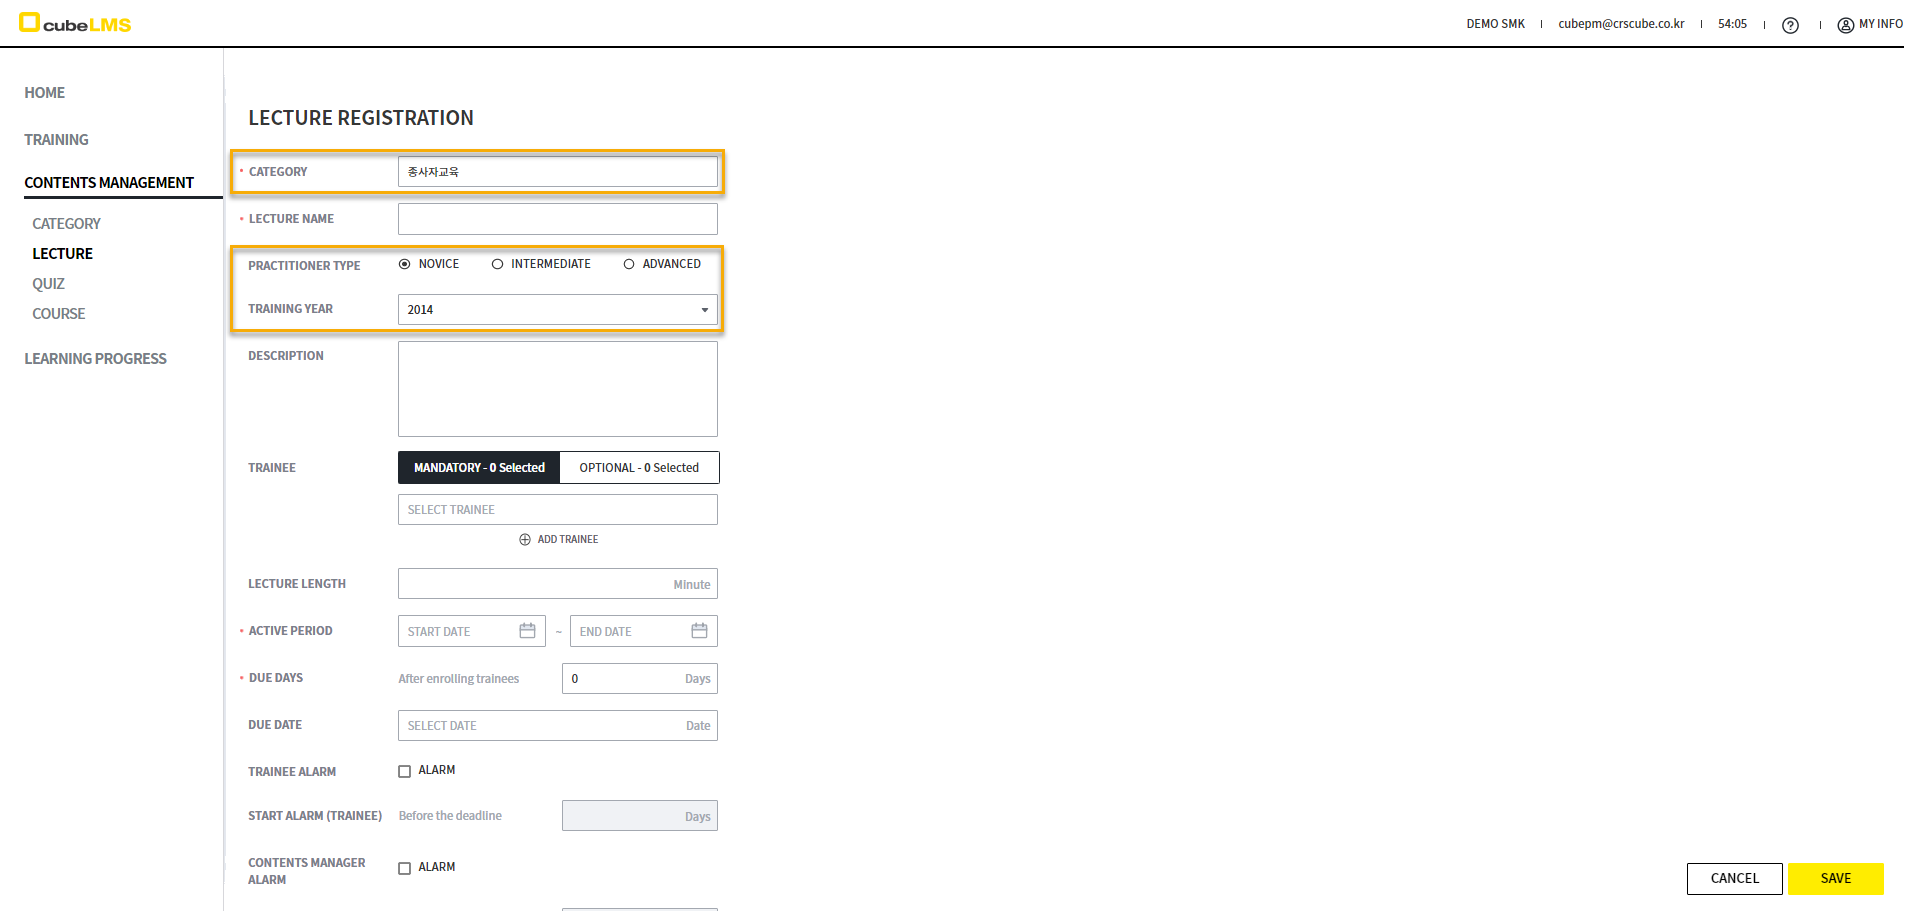
Select the ADD button in the bottom right to go to the Lecture creation screen.
In SELECT PARENT CATEGORY that appears when Category is selected, select the Category of the Lecture to register and save it.
PRACTITIONER TYPE and TRAINING YEAR are enabled only when you select the practitioner education Category and its subcategories. You can set PRACTITIONER TYPE and TRAINING YEAR according to each practitioner education.
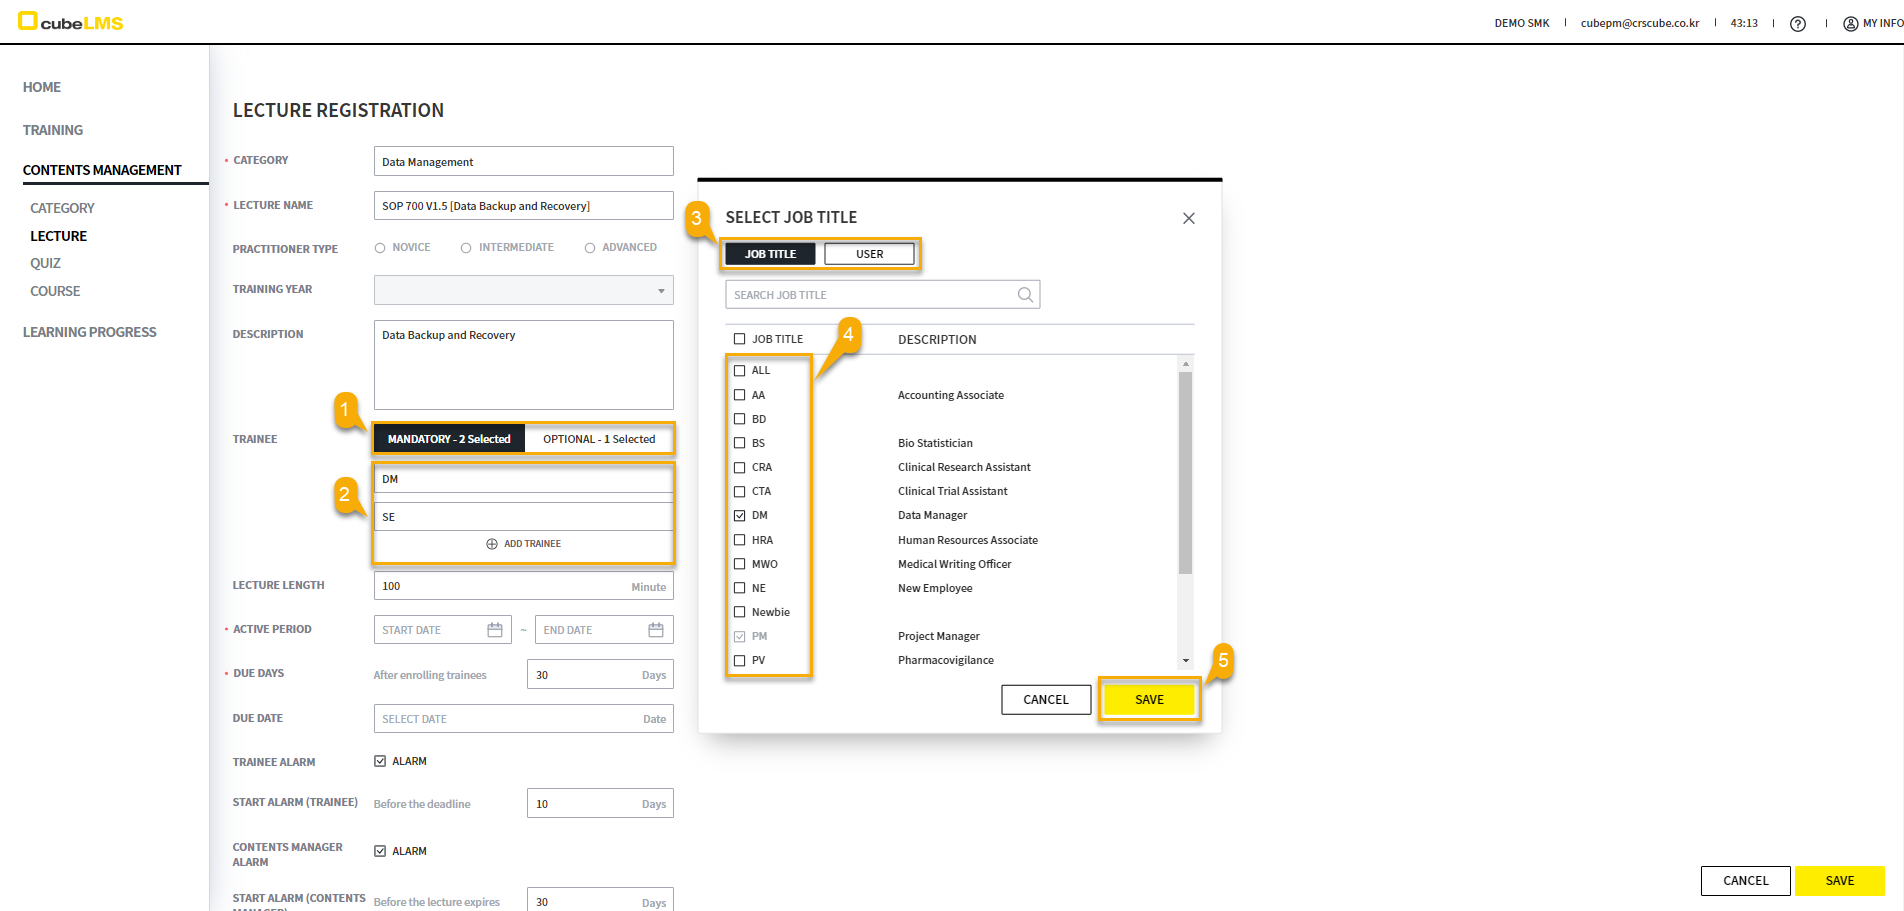
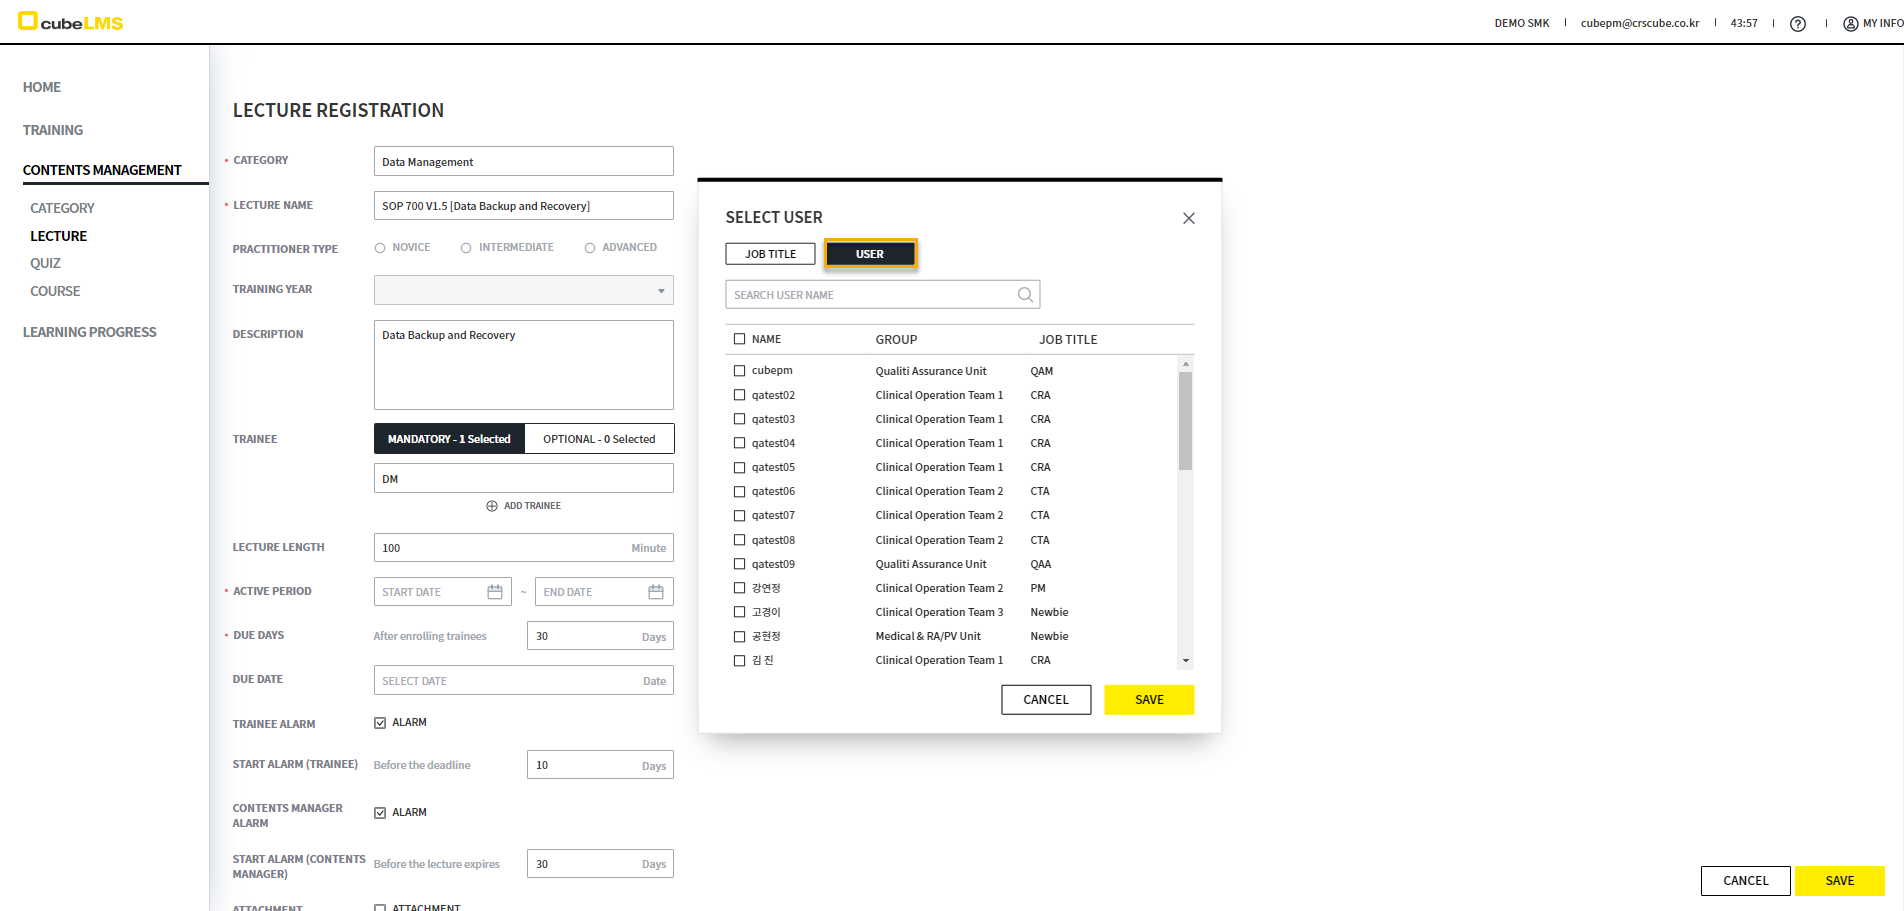
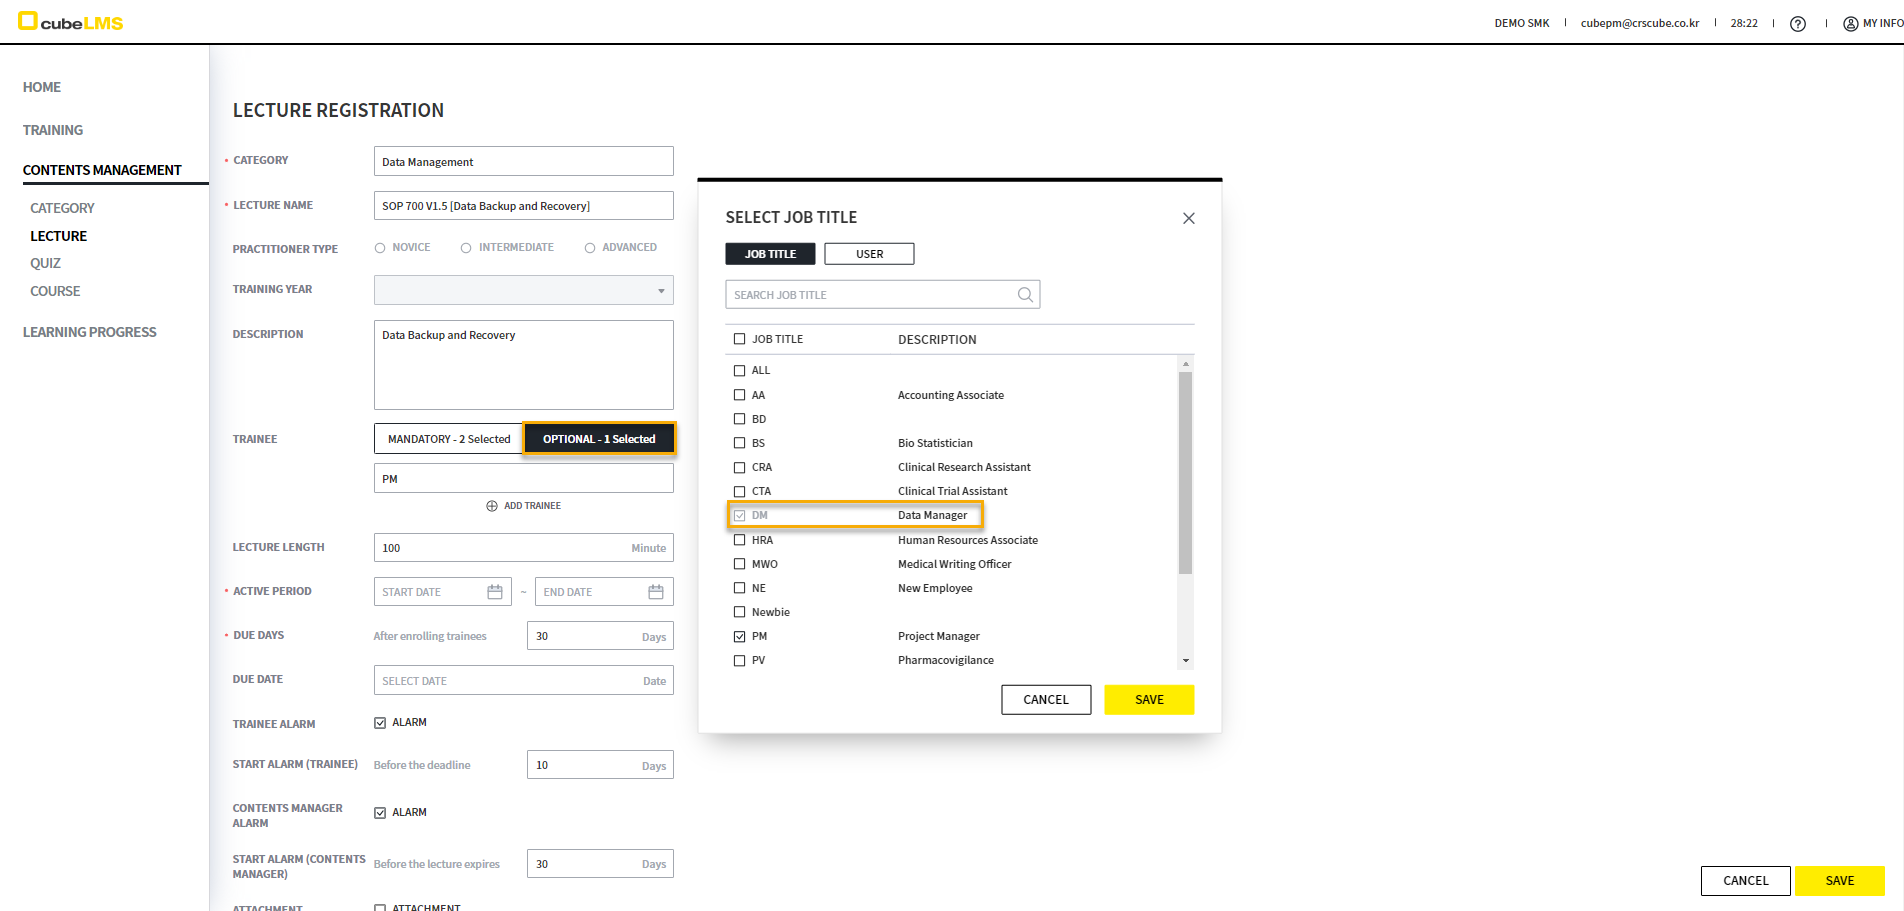
You can assign Trainee to a Lecture according to Training type. In the SELECT JOB TITLE, SELECT USER popup that appears after you select Training type(MANDATORY, OPTIONAL) and then select Trainee, only Active Job title and User are displayed.
If set to MANDATORY, it is assigned as required to the Trainee corresponding to the configured Job title and User, and if set to OPTIONAL, the Trainee must complete Registration in the MY TRAINING > OPTIONAL tab to take it. You can assign Trainee by Job title or User, and you can also use both together. However, Job title and User already selected in another Training Type are disabled and cannot be selected.
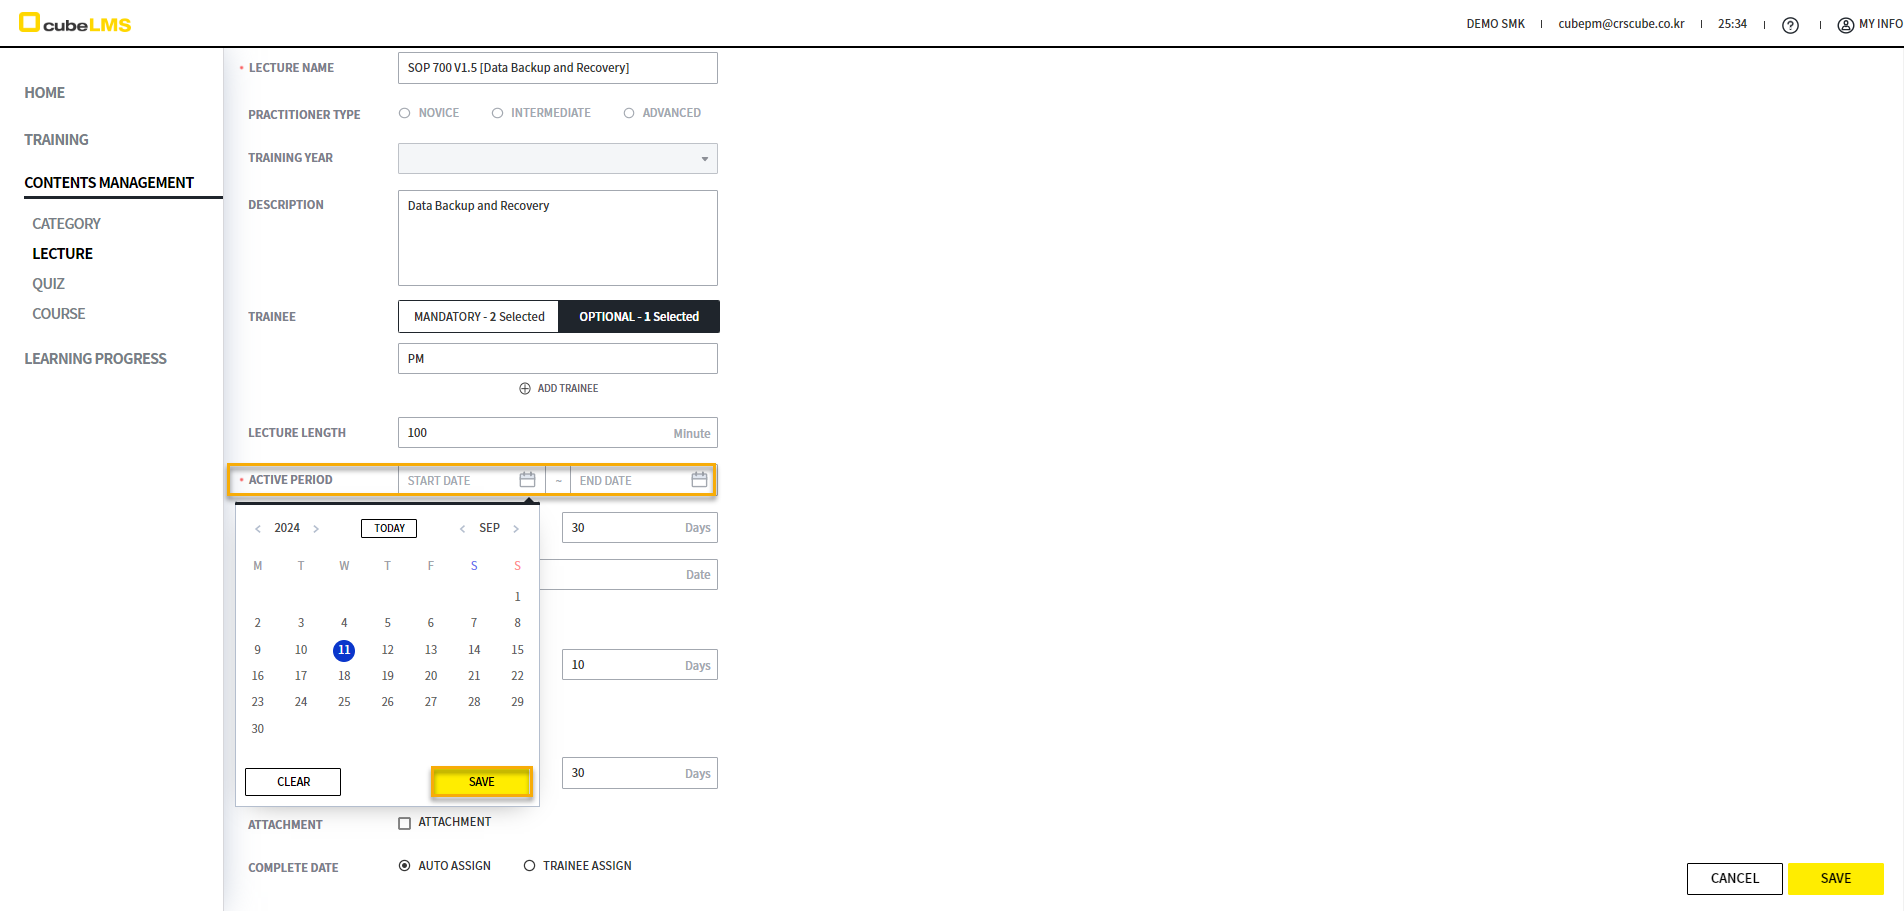
You can specify the usage period of Lecture in ACTIVE PERIOD. For each date, past dates cannot be entered based on TODAY, and Lecture will not be assigned to Trainee before START DATE or after END DATE. If you save without entering END DATE, it is automatically saved as 9999-12-31.
If START DATE is set to TODAY, it is assigned to the TRAINEE immediately upon saving, so we recommend setting it to a future date rather than TODAY for sufficient review.
The detailed description of LECTURE STATUS according to ACTIVE PERIOD is as follows.
-
INACTIVE: Until LECTURE becomes ACTIVE after START DATE > TODAY, the LECTURE is not assigned to the TRAINEE.
-
ACTIVE: START DATE ≤ TODAY ≤ END DATE, and LECTURE is active.
-
EXPIRED: END DATE < TODAY, and the LECTURE is no longer assigned to the TRAINEE.
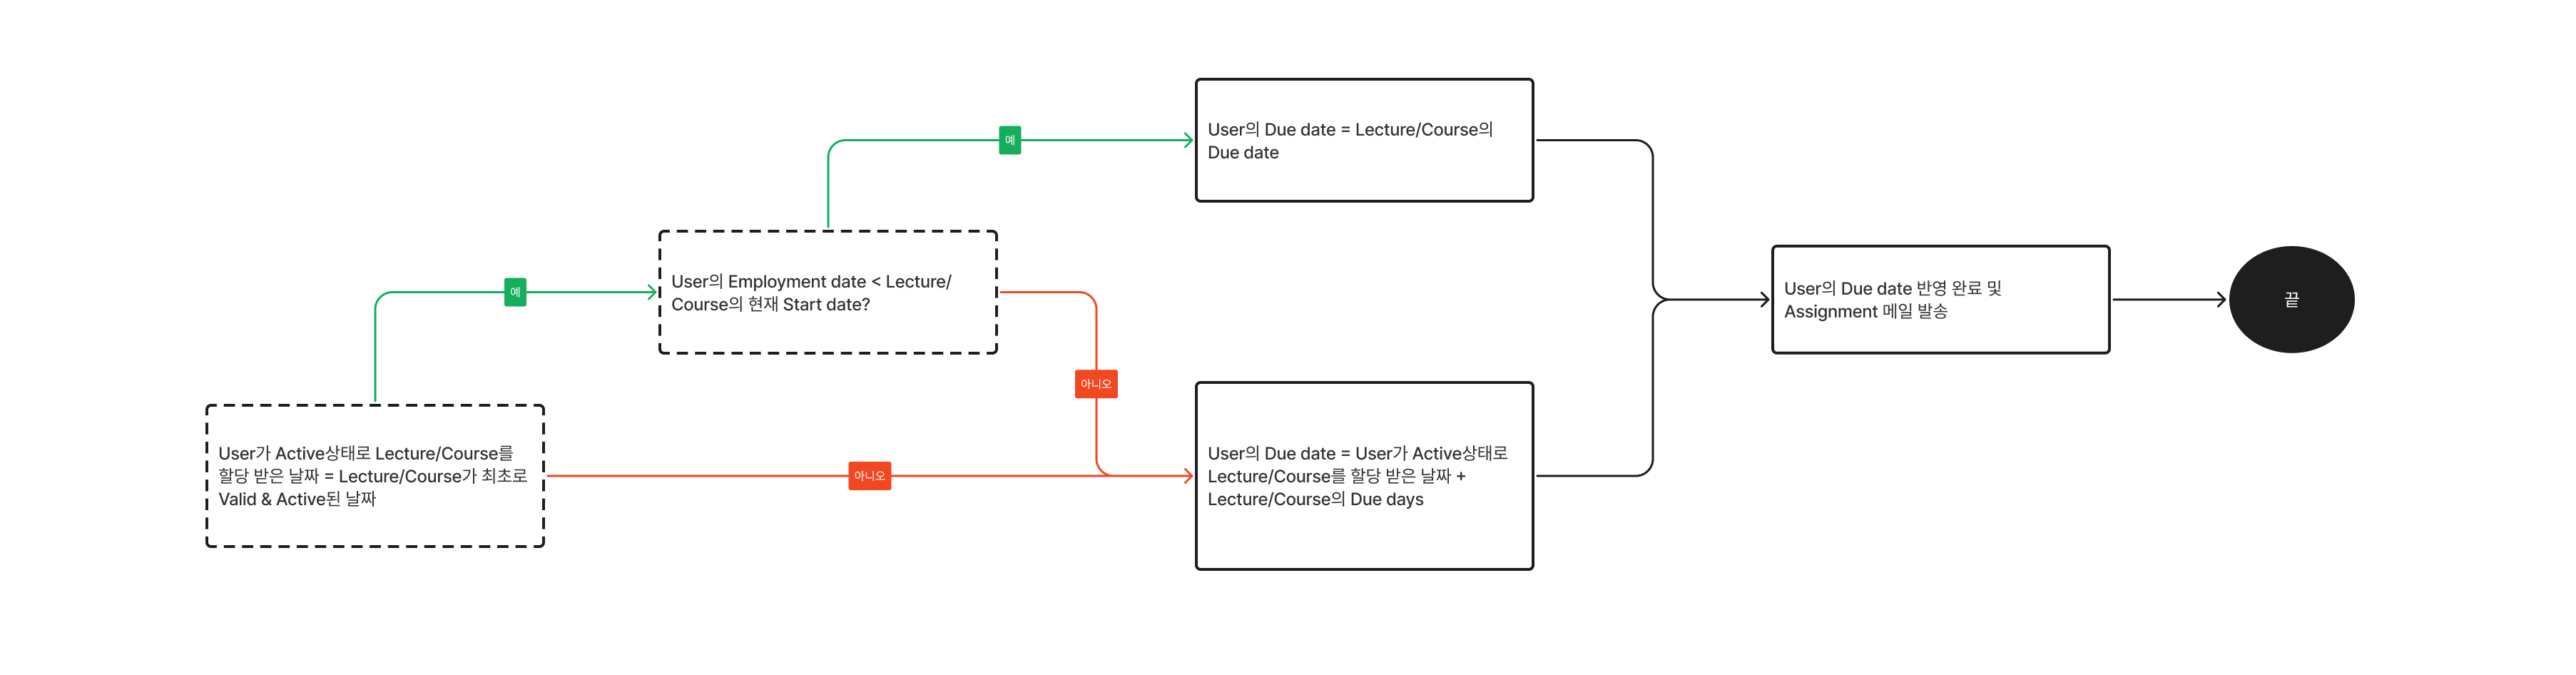
You can specify a User's Due date with DUE DATE and DUE DAYS. The diagram below determines whether it is calculated using DUE DAYS or displayed as DUE DATE.
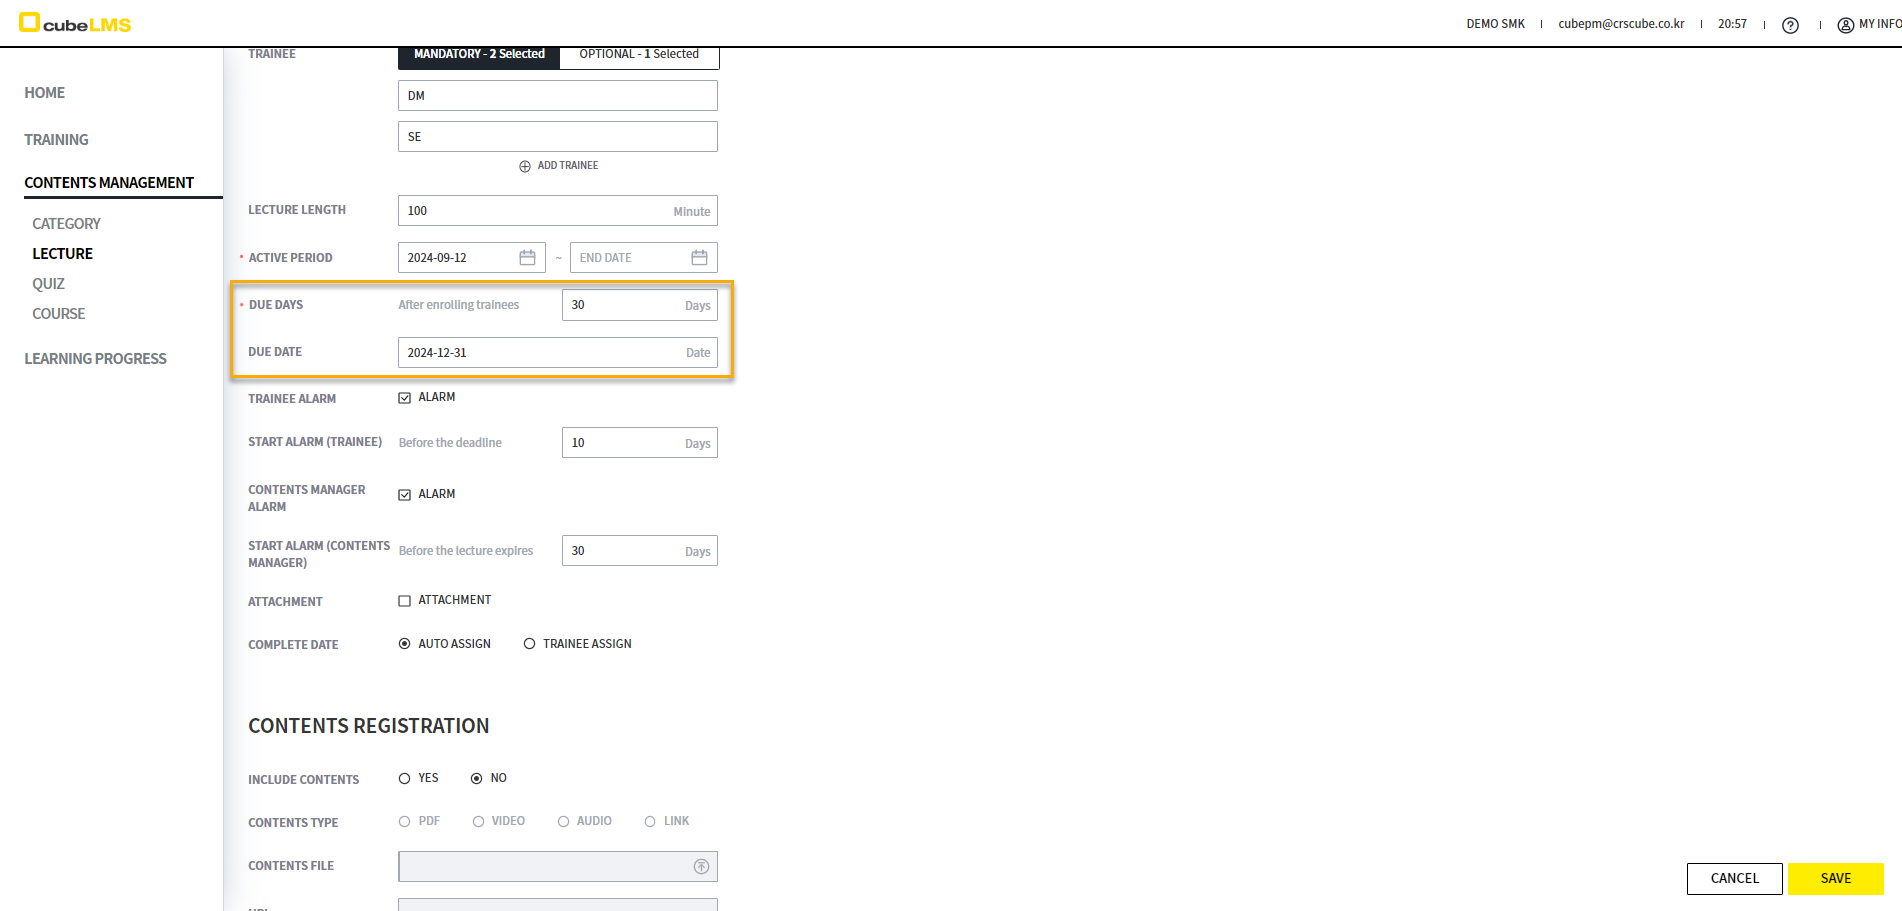
According to the deadline set in START ALARM(TRAINEE), an alarm email is sent before DUE DATE to notify you that the deadline is about to expire. For example, if START ALARM is set to 10 days, the alarm email is sent starting 10 days before Due date.
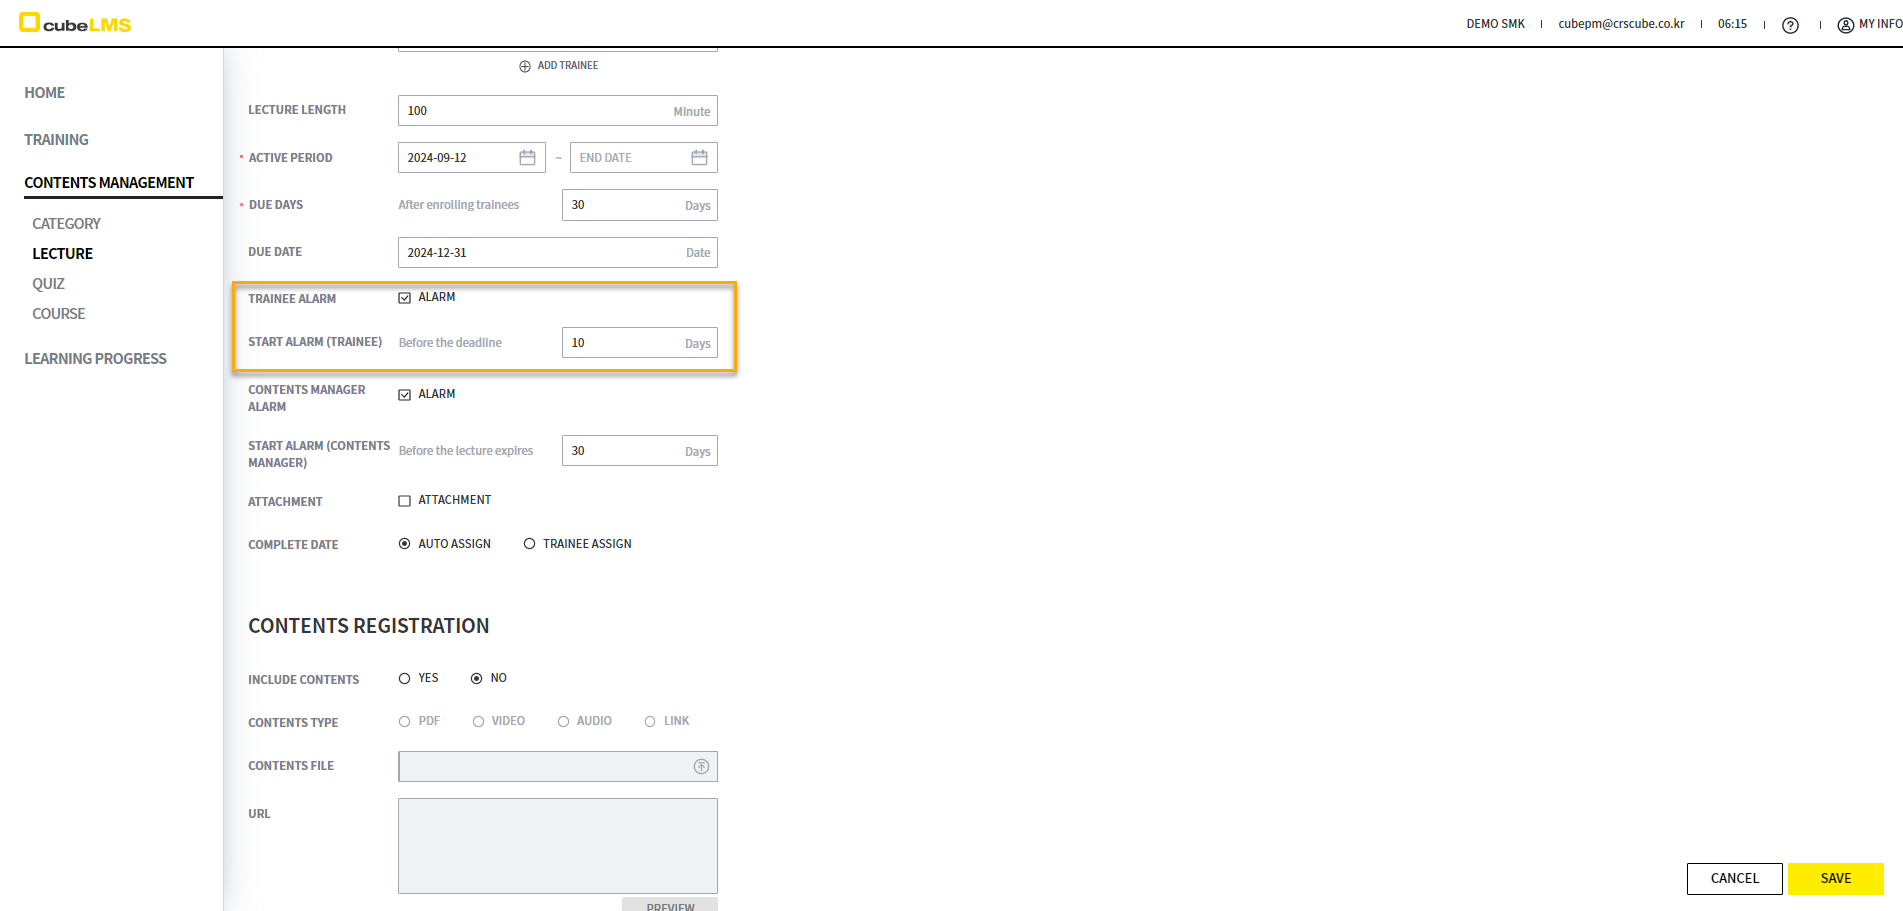
According to the deadline set in START ALARM(CONTENTS MANAGER), an alarm email is sent to the Contents manager in Active status before the END DATE of the ACTIVE PERIOD arrives. For example, if START ALARM is set to 3 days, the alarm email is sent starting 3 days before the END DATE of the ACTIVE PERIOD.
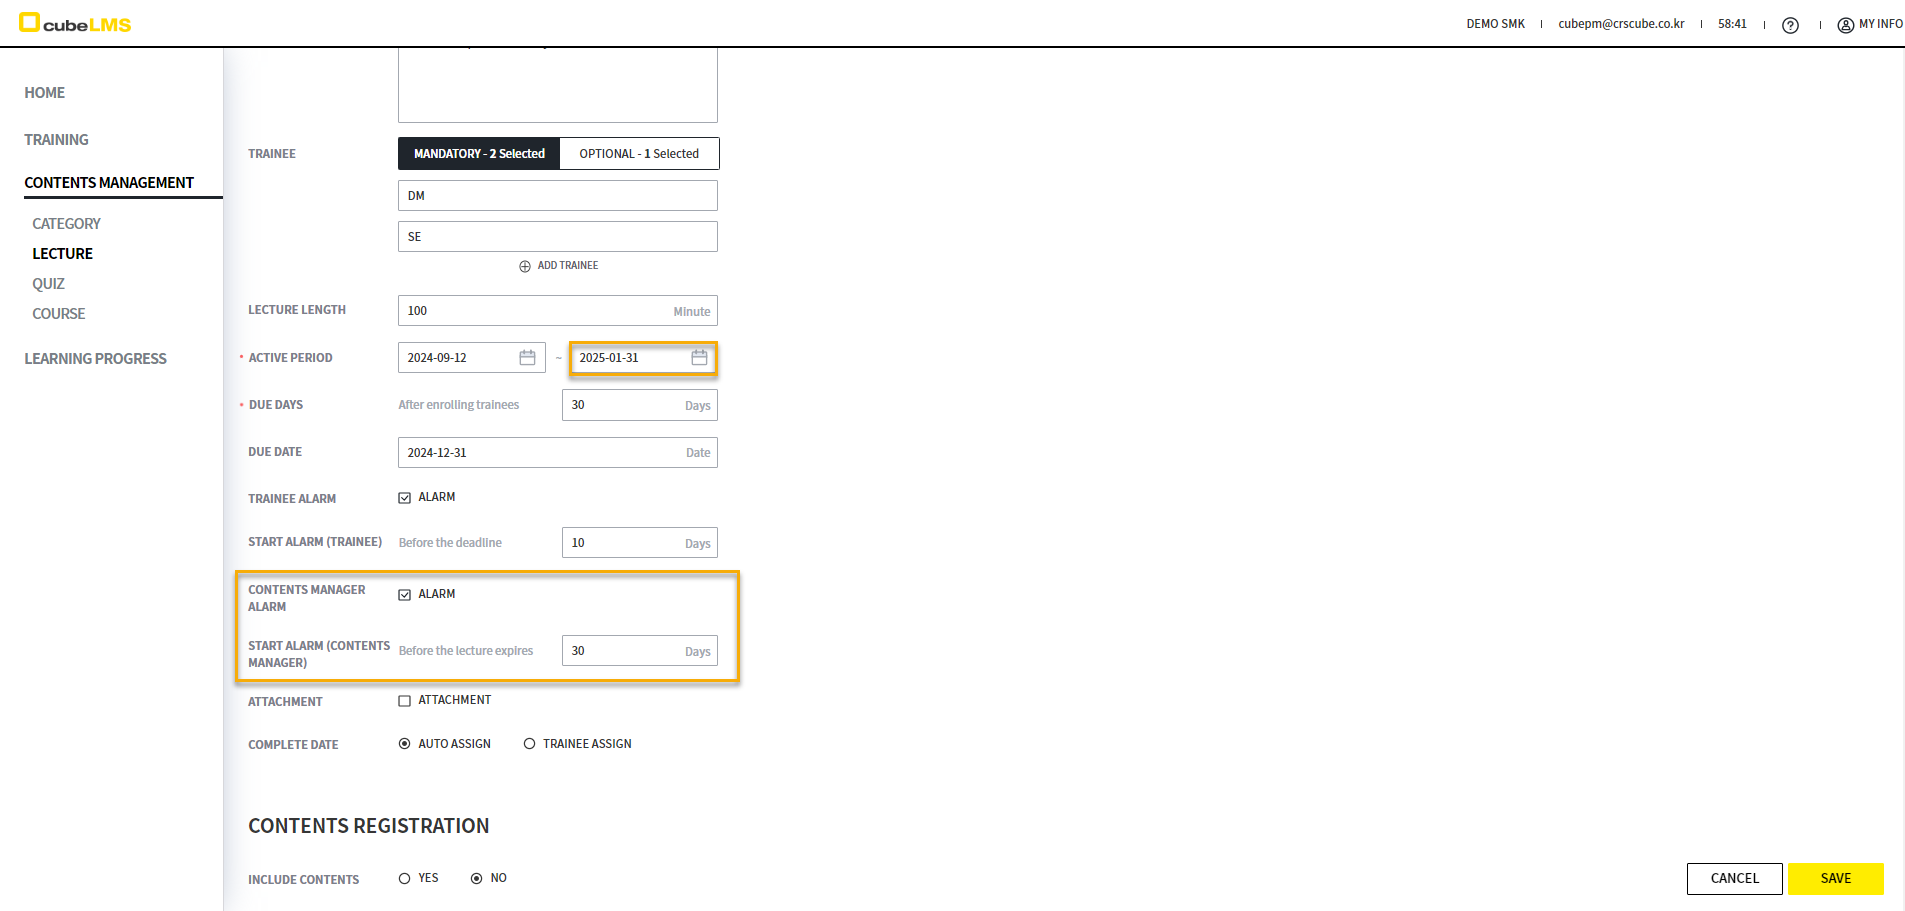
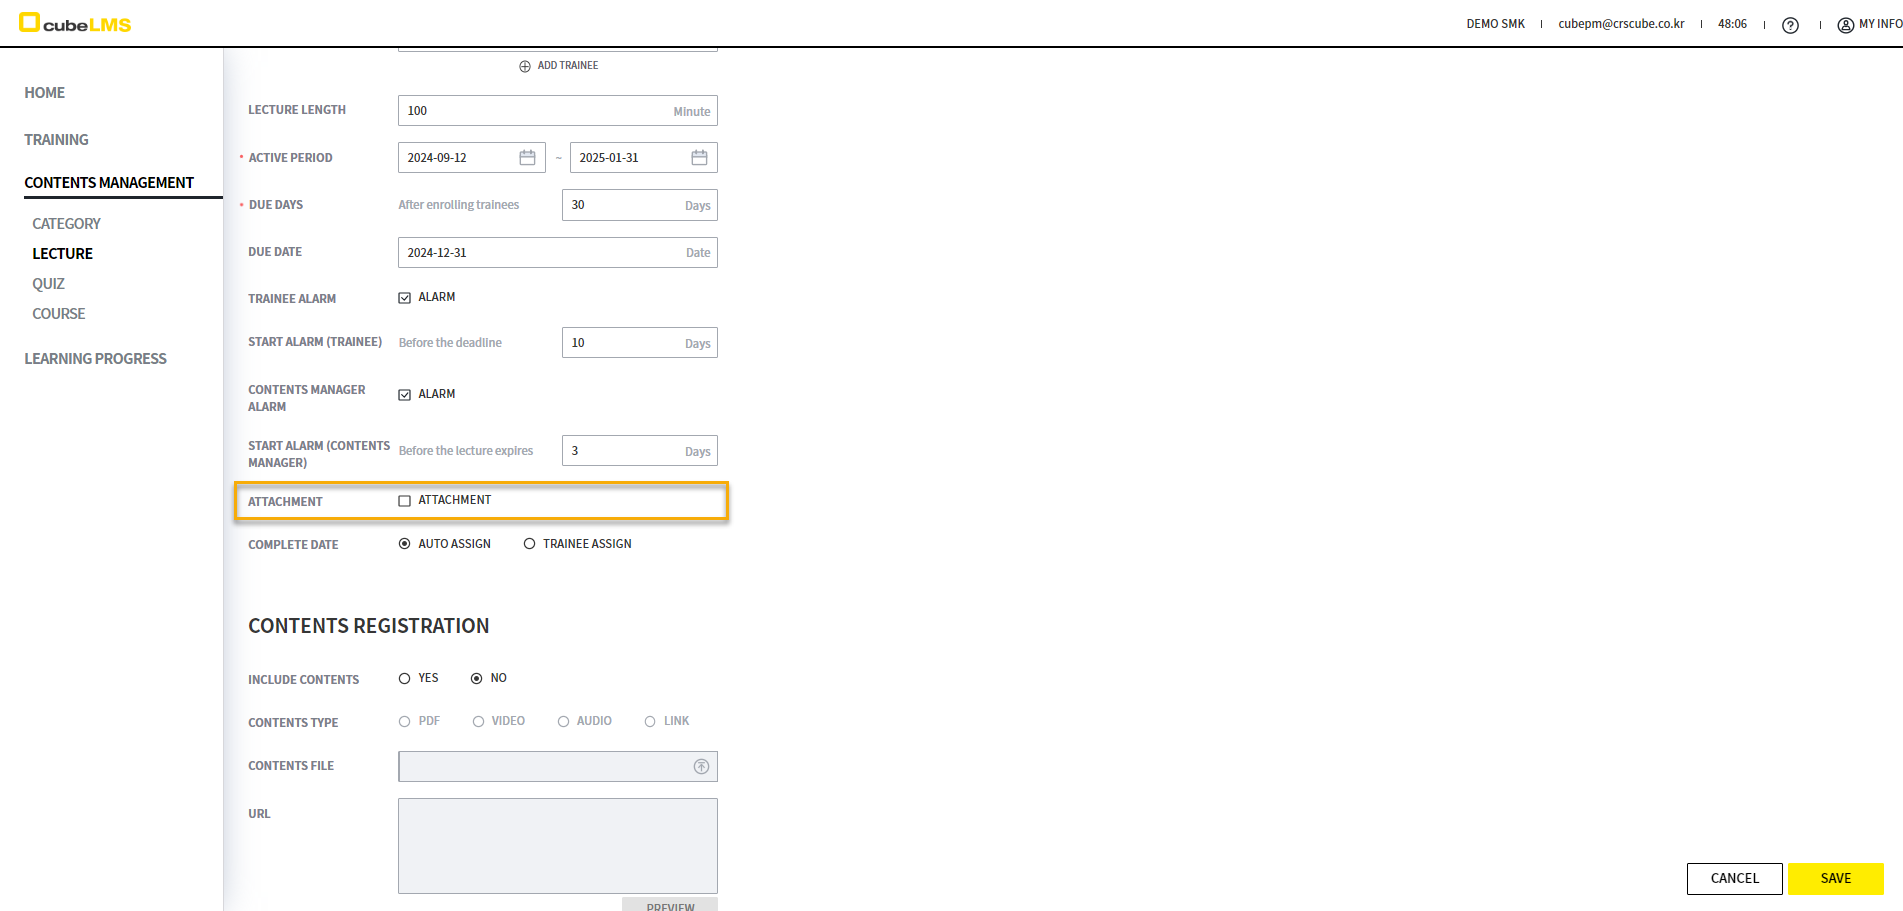
When ATTACHMENT is checked, an item is created on the Trainee's training screen for uploading documents such as certificates.
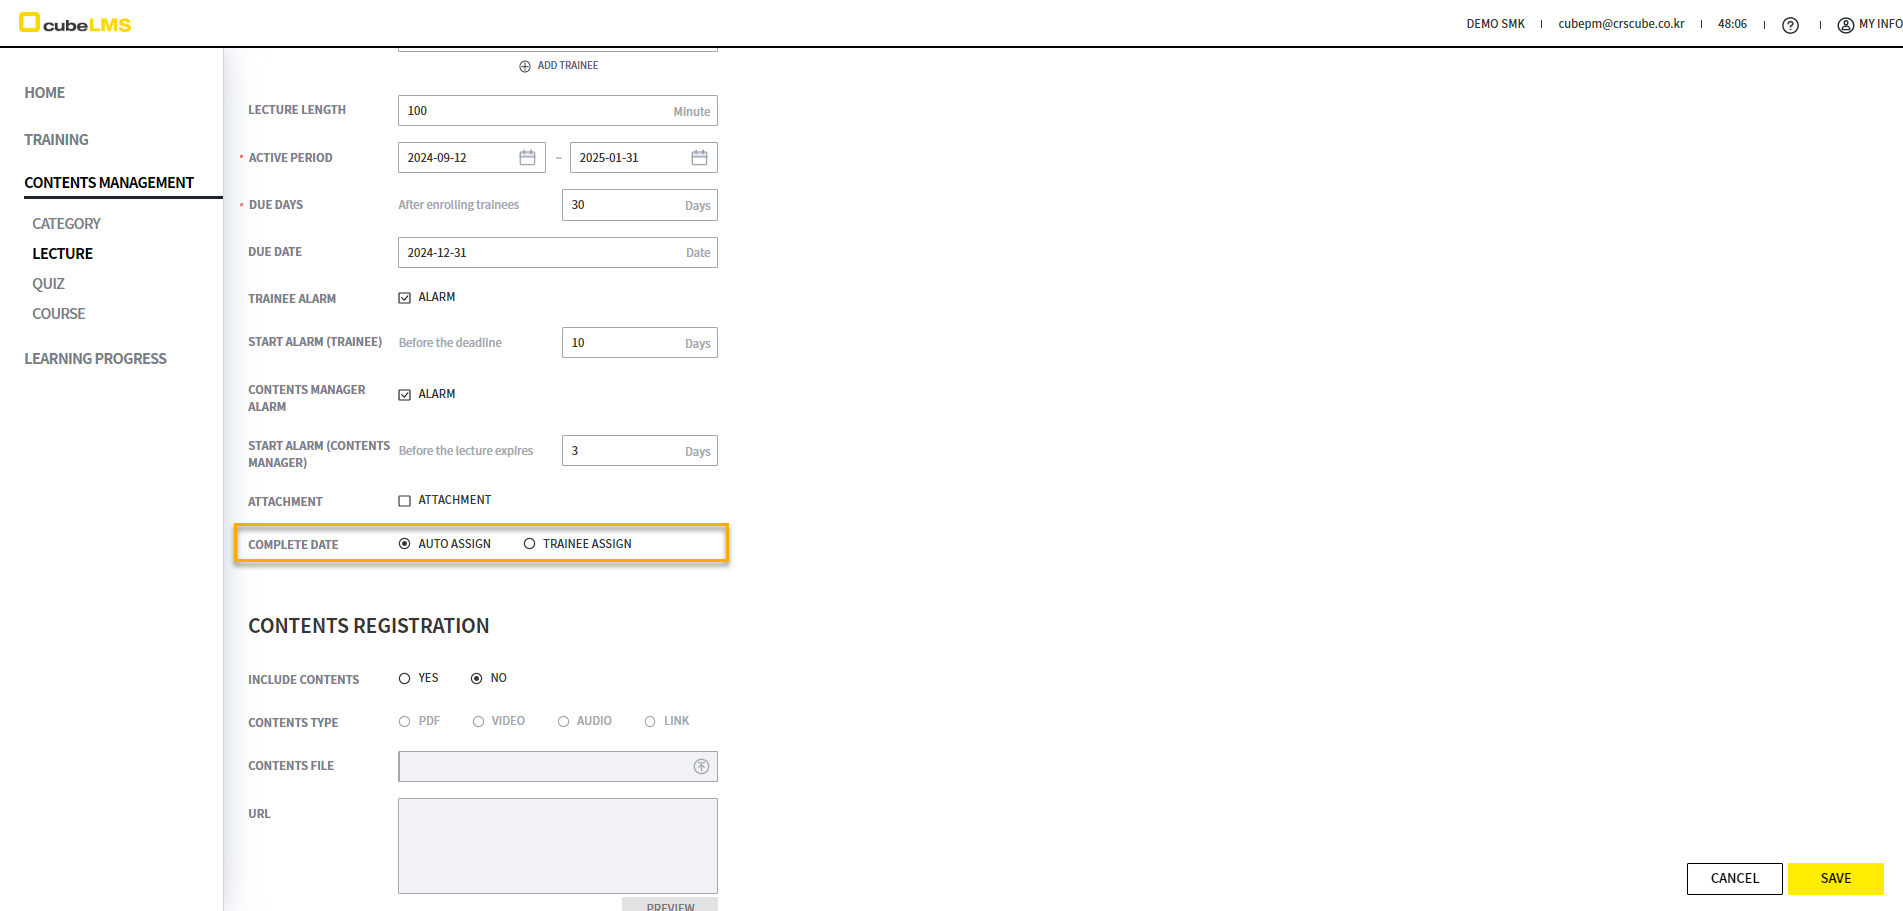
If COMPLETE DATE is set to AUTO ASSIGN, the system automatically assigns COMPLETE DATE when the lecture is COMPLETE. If it is set to TRAINEE ASSIGN, the TRAINEE must select COMPLETE DATE directly.
LECTURE-CONTENTS
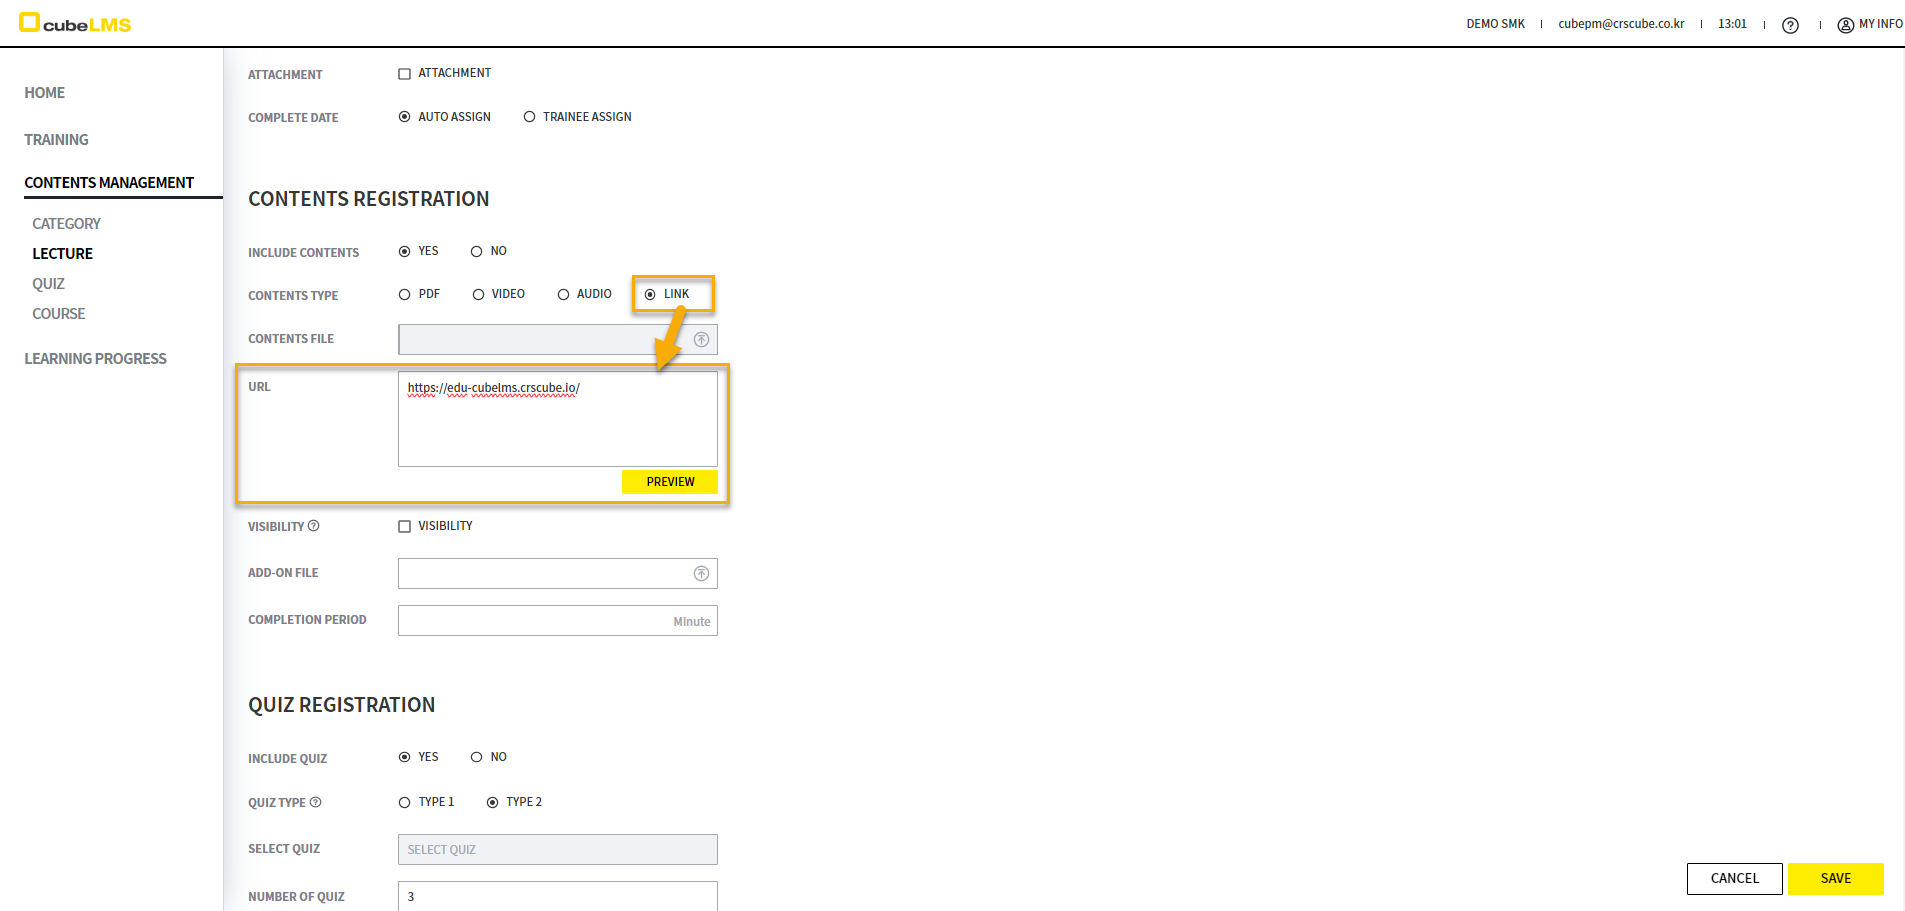
Select YES for INCLUDE CONTENTS to add Contents.
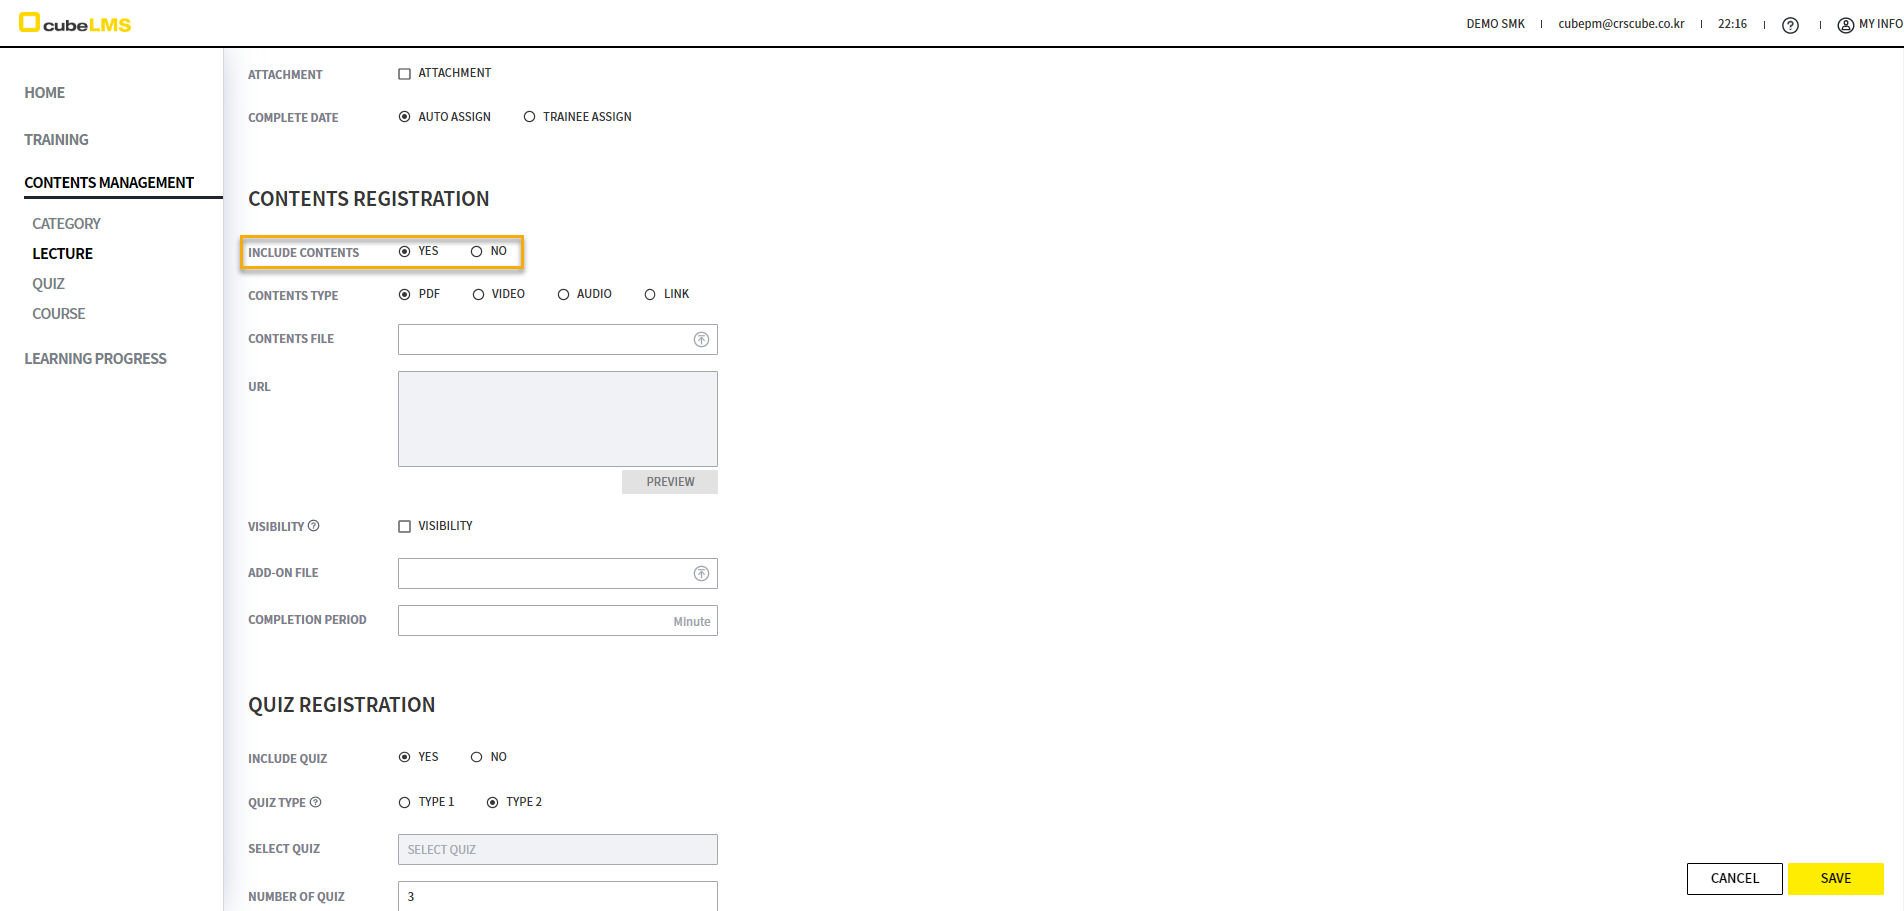
If CONTENTS TYPE is PDF, VIDEO, or AUDIO, you can Upload File in the CONTENTS FILE field.
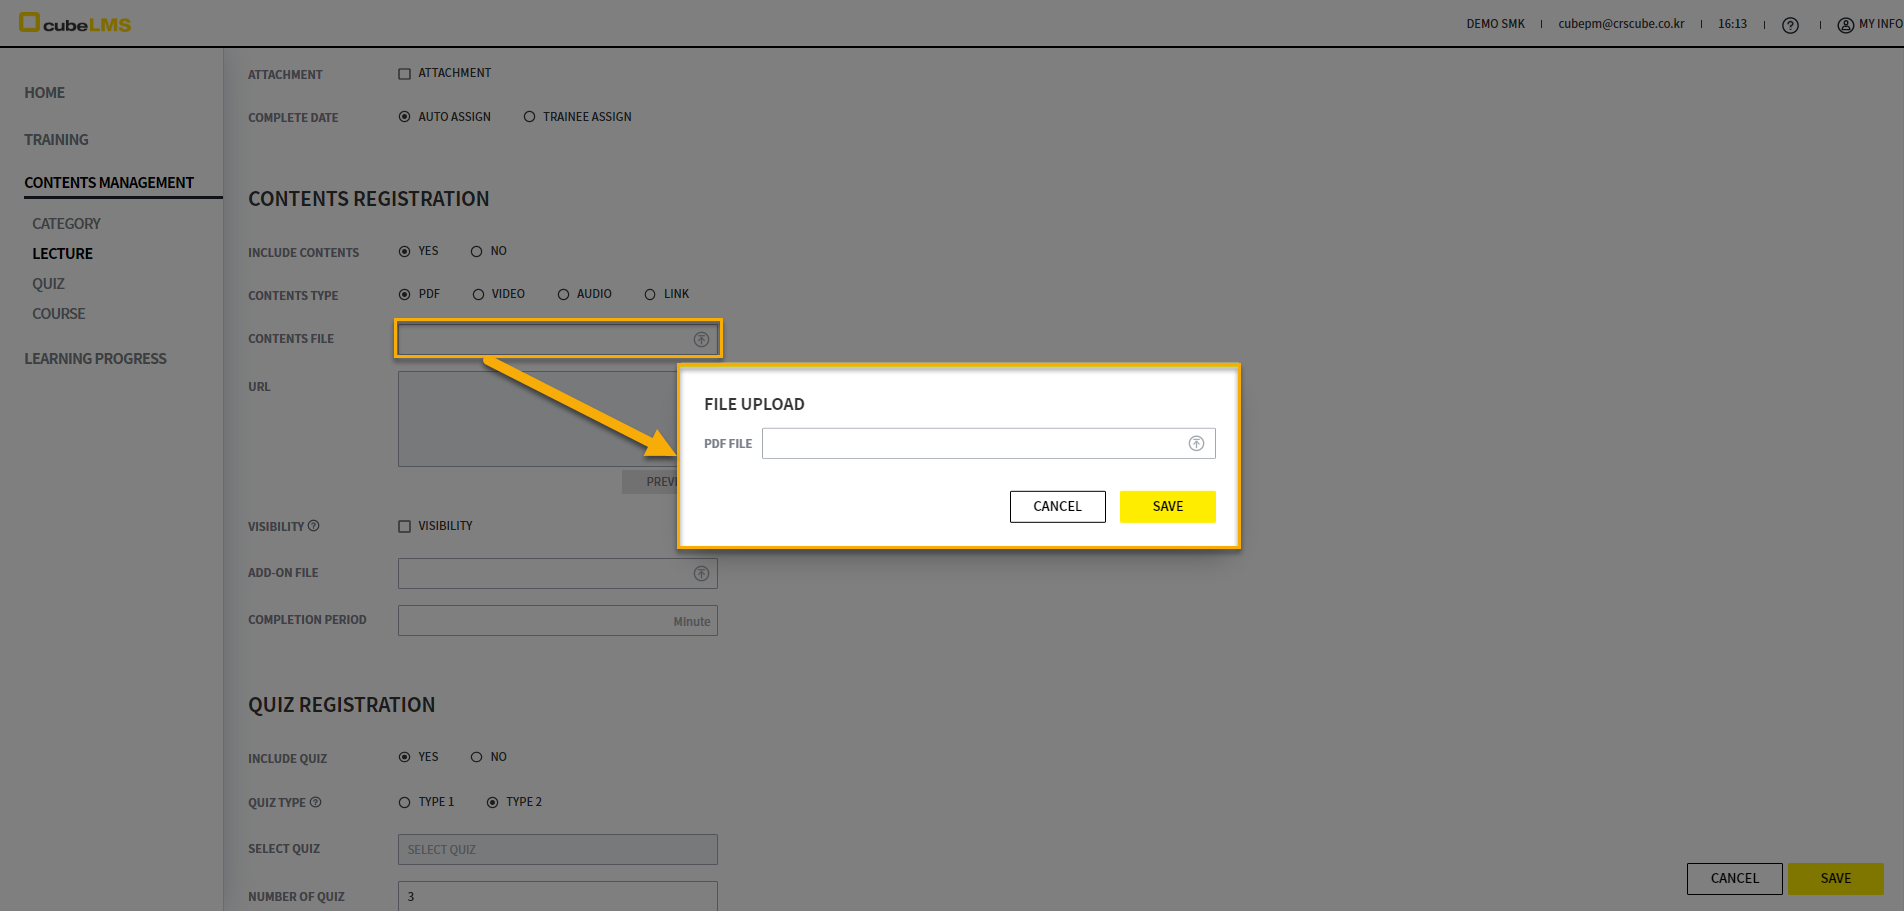
If it is a LINK, you can enter the URL in the URL field that is activated when you select LINK.
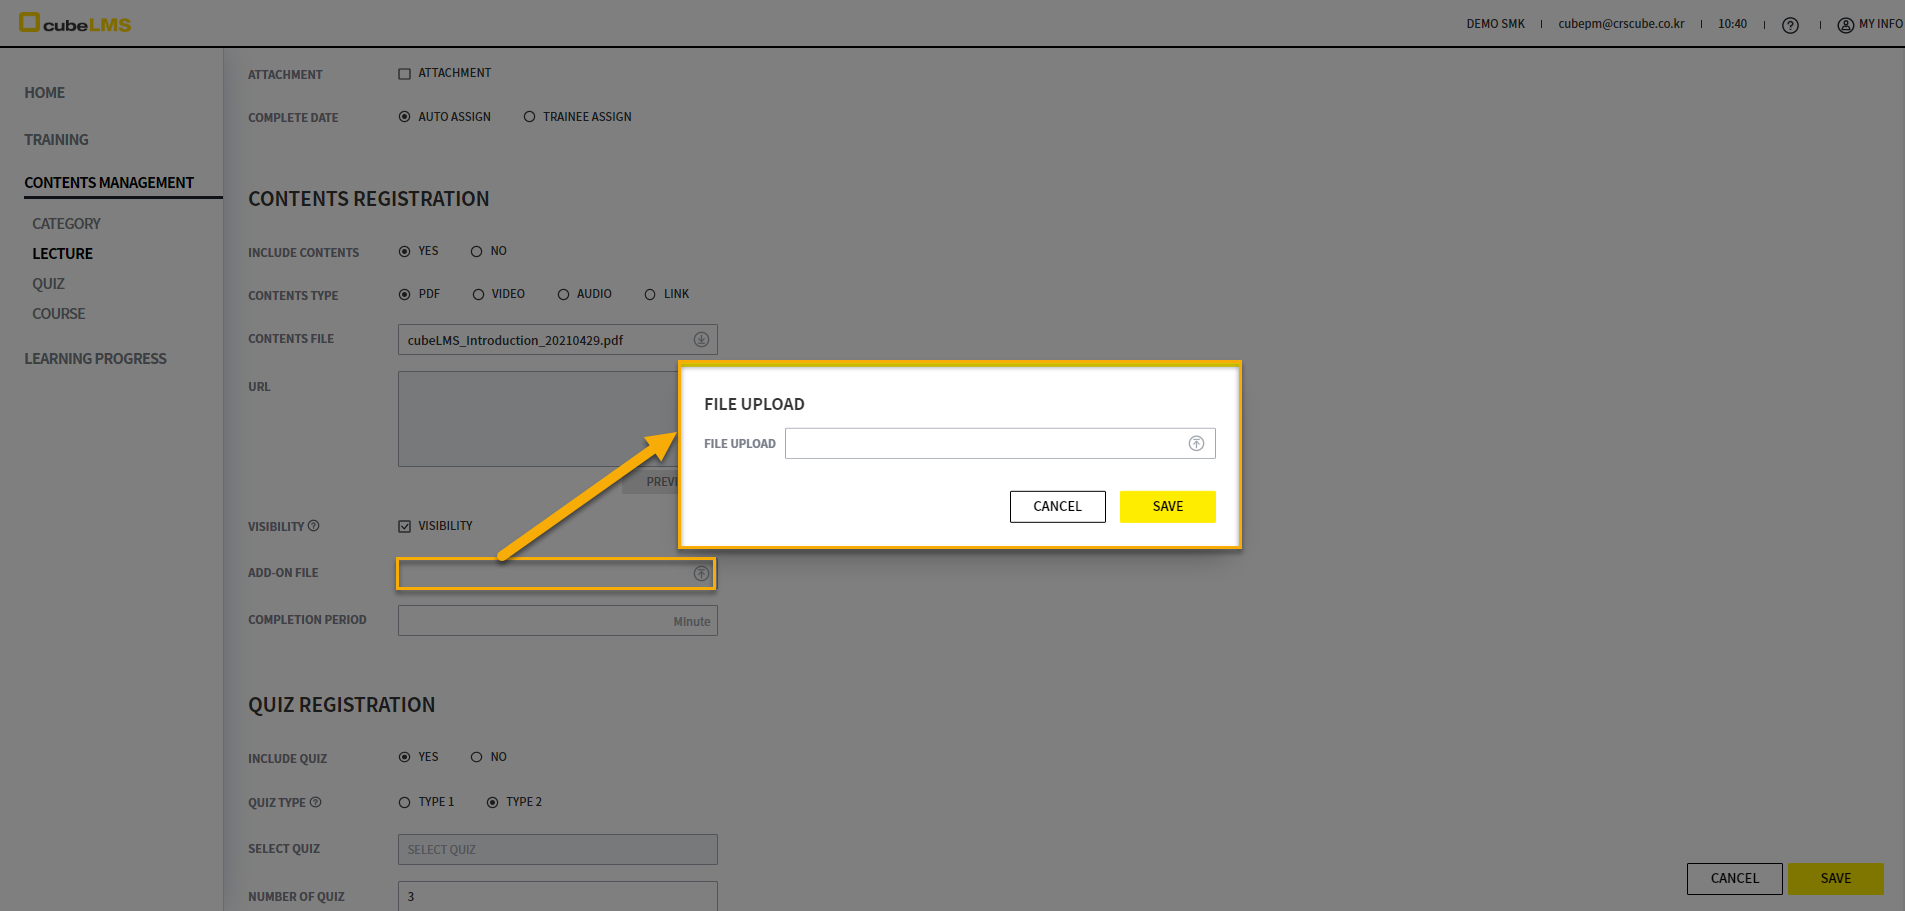
You can check VISIBILITY to specify whether additional files are visible. If you Upload an additional file to ADD-ON FILE, Trainee can Download it through the DONLOAD ADD-ON button in LECTURE DETAILS. For more details,
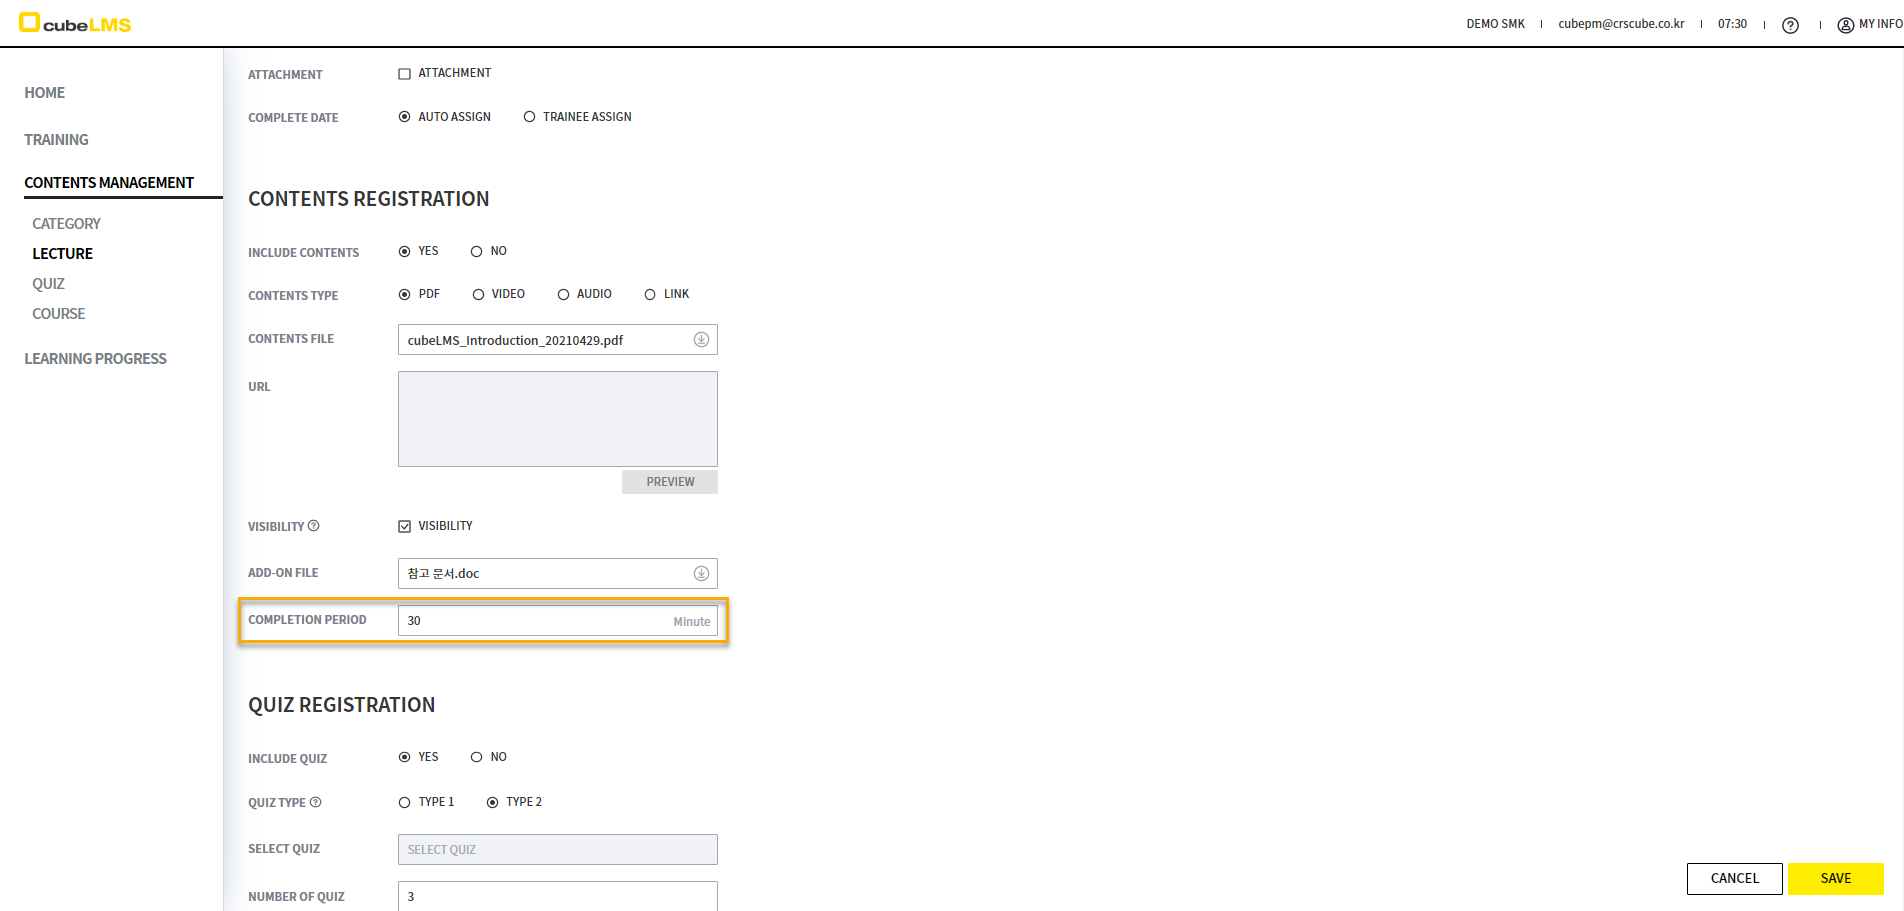
You can set the completion criteria time for Contents according to the COMPLETION PERIOD. For example, if you set it to 30 MIN, you must keep Contents active for at least 30 minutes to complete Contents.
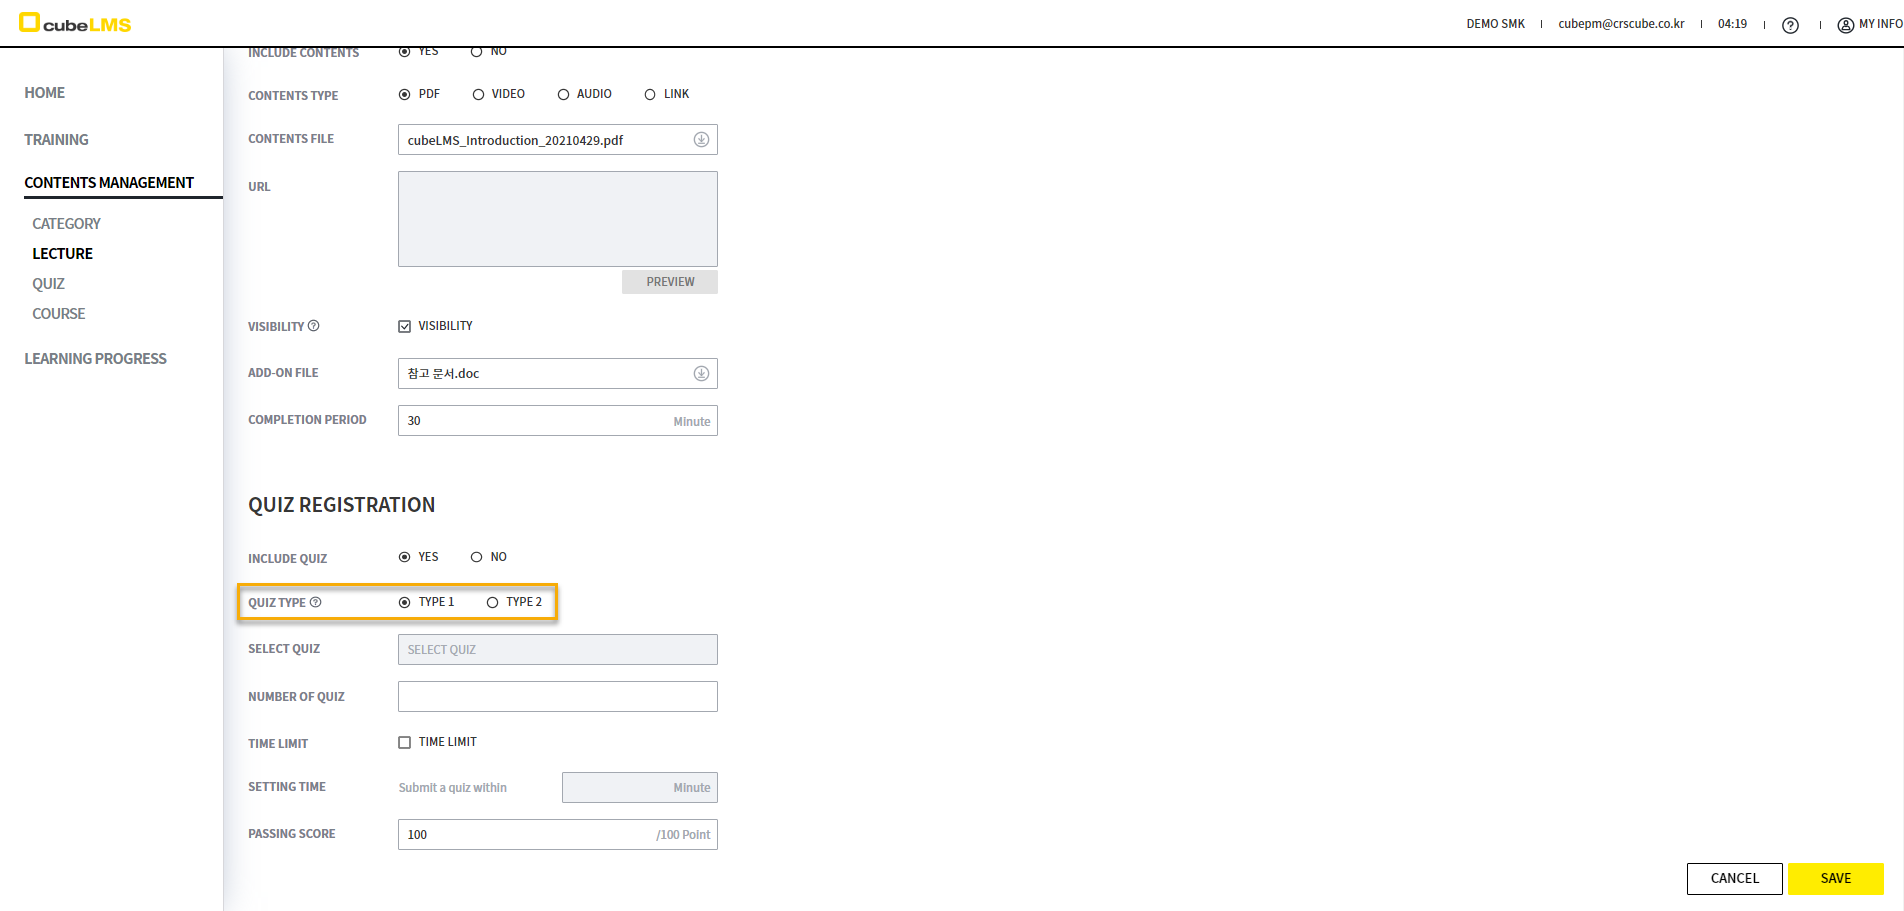
LECTURE-QUIZ
Select INCLUDE QUIZ as YES to add a Quiz.

You can set the QUIZ TYPE. For details,
-
TYPE 1: If you select an incorrect answer, you cannot move to the next question.
-
TYPE 2: If you select an incorrect answer, you can move to the next question, but if the final Score is lower than the PASSING SCORE, it is recorded as Fail, and you can retake the Quiz.
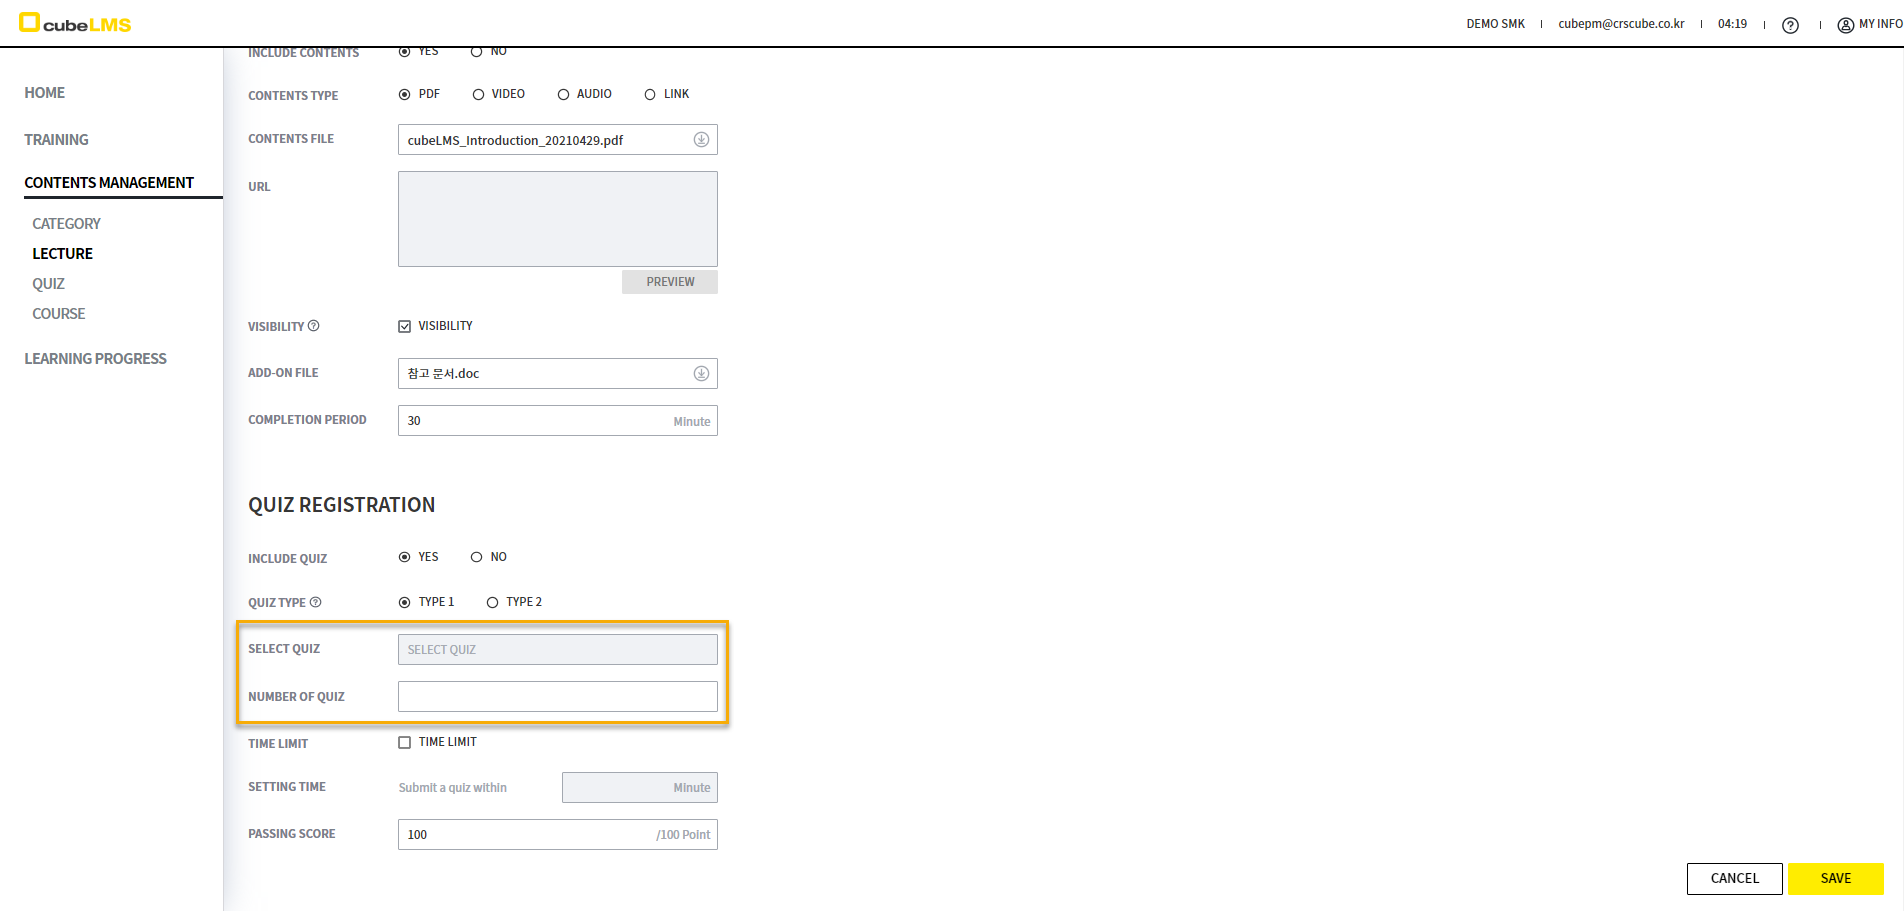
SELECT QUIZ is always disabled. You can create this item by linking it to a Lecture in the Quiz menu, and it is automatically reflected when Quiz creation is complete. For the Quiz linked to that Lecture, register Questions in a number equal to or greater than the NUMBER OF QUIZ.
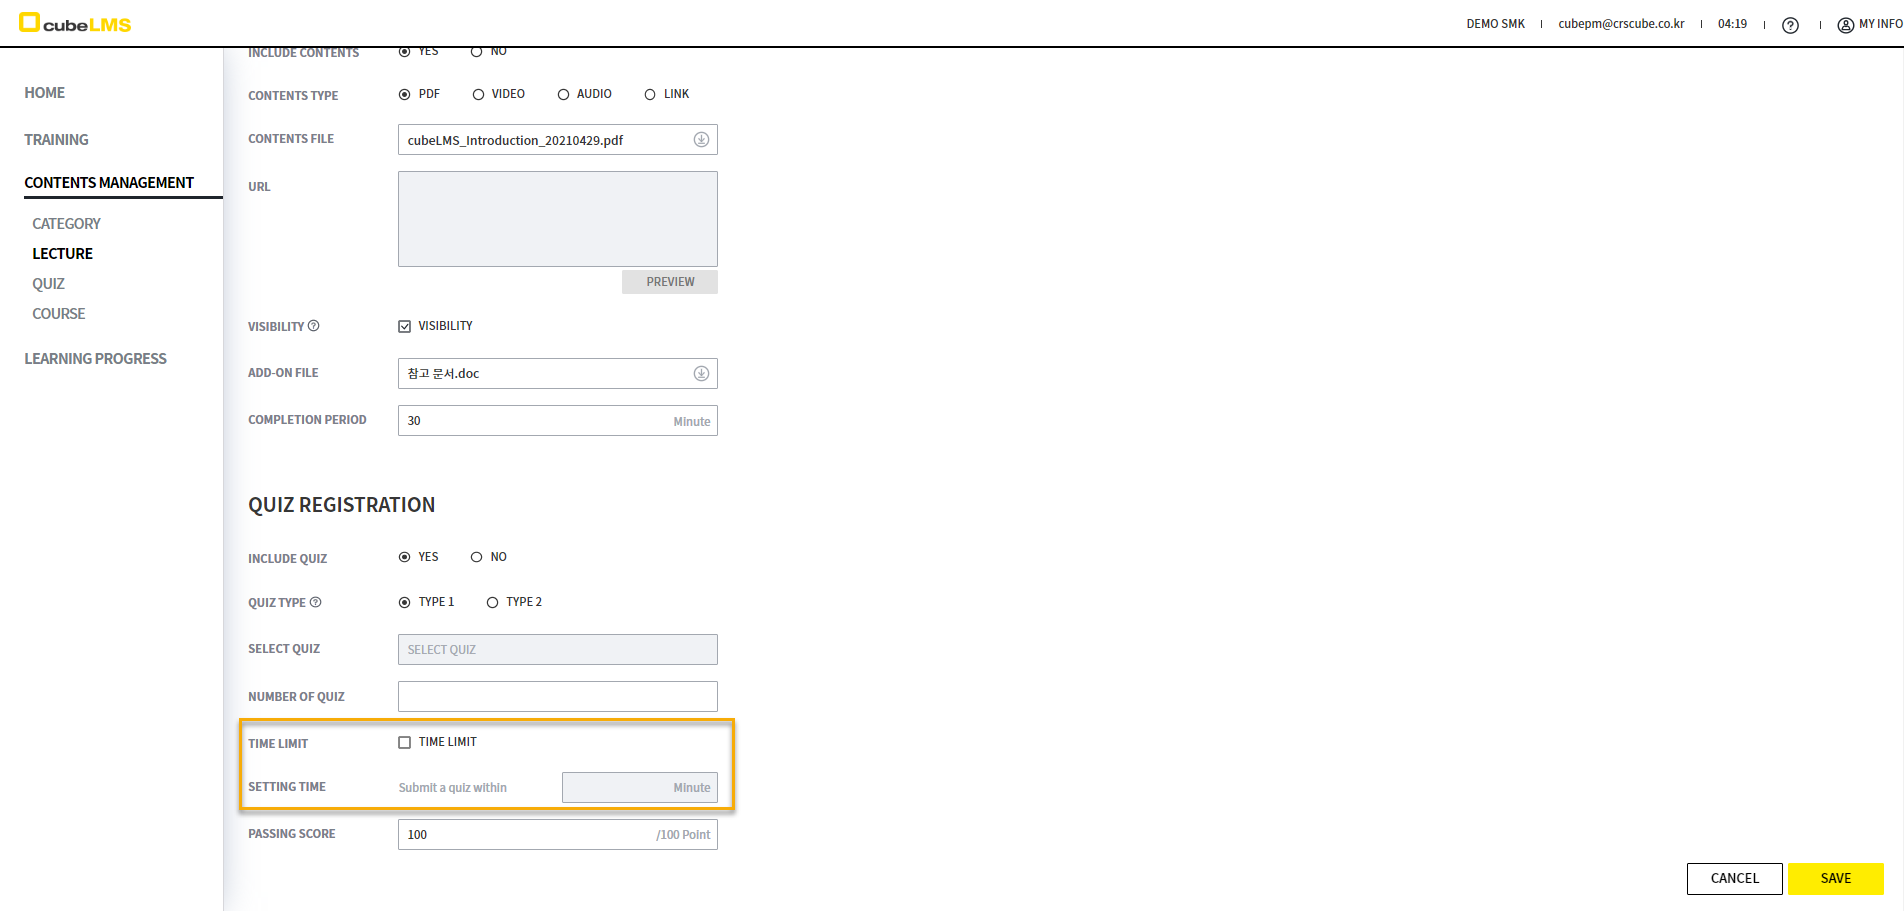
You can choose whether QUIZ has a time limit. If TIME LIMIT is checked, it becomes enabled, and you can enter the time limit in minutes for each QUIZ attempt.
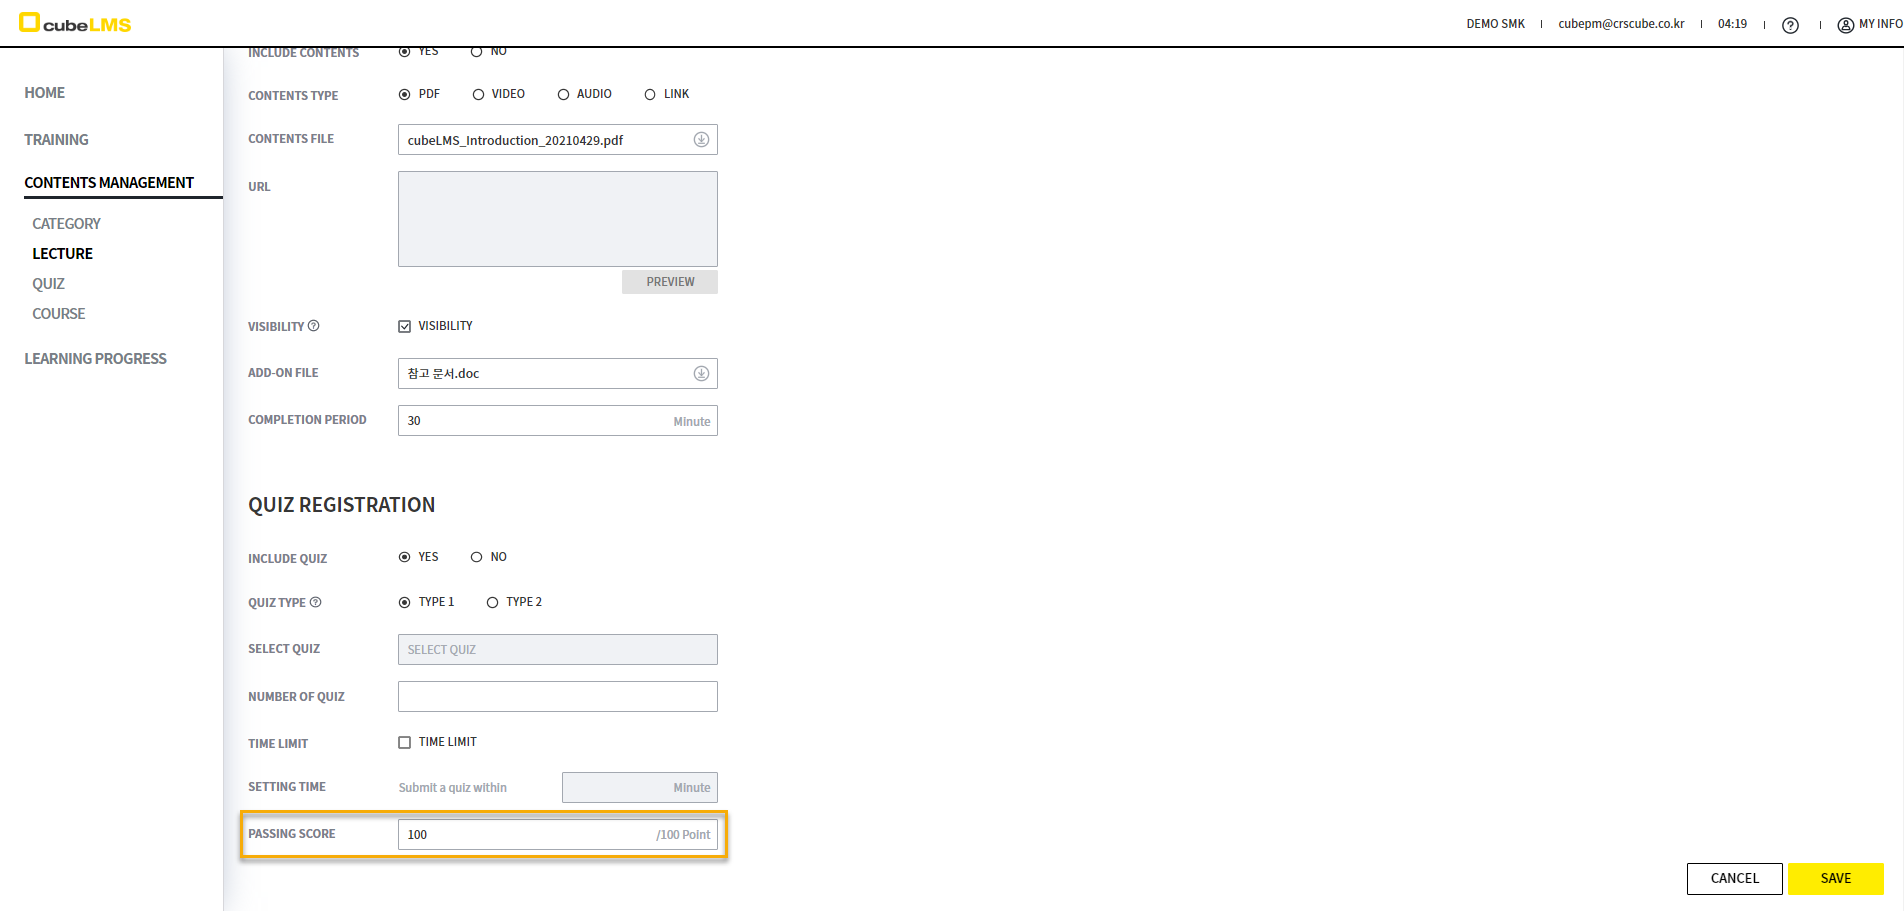
You can enter the score to be marked as PASS only when it is at or above a certain score. If QUIZ is TYPE 1, PASSING SCORE is automatically set to 100, and selecting the SAVE button below creates the Lecture.
QUIZ
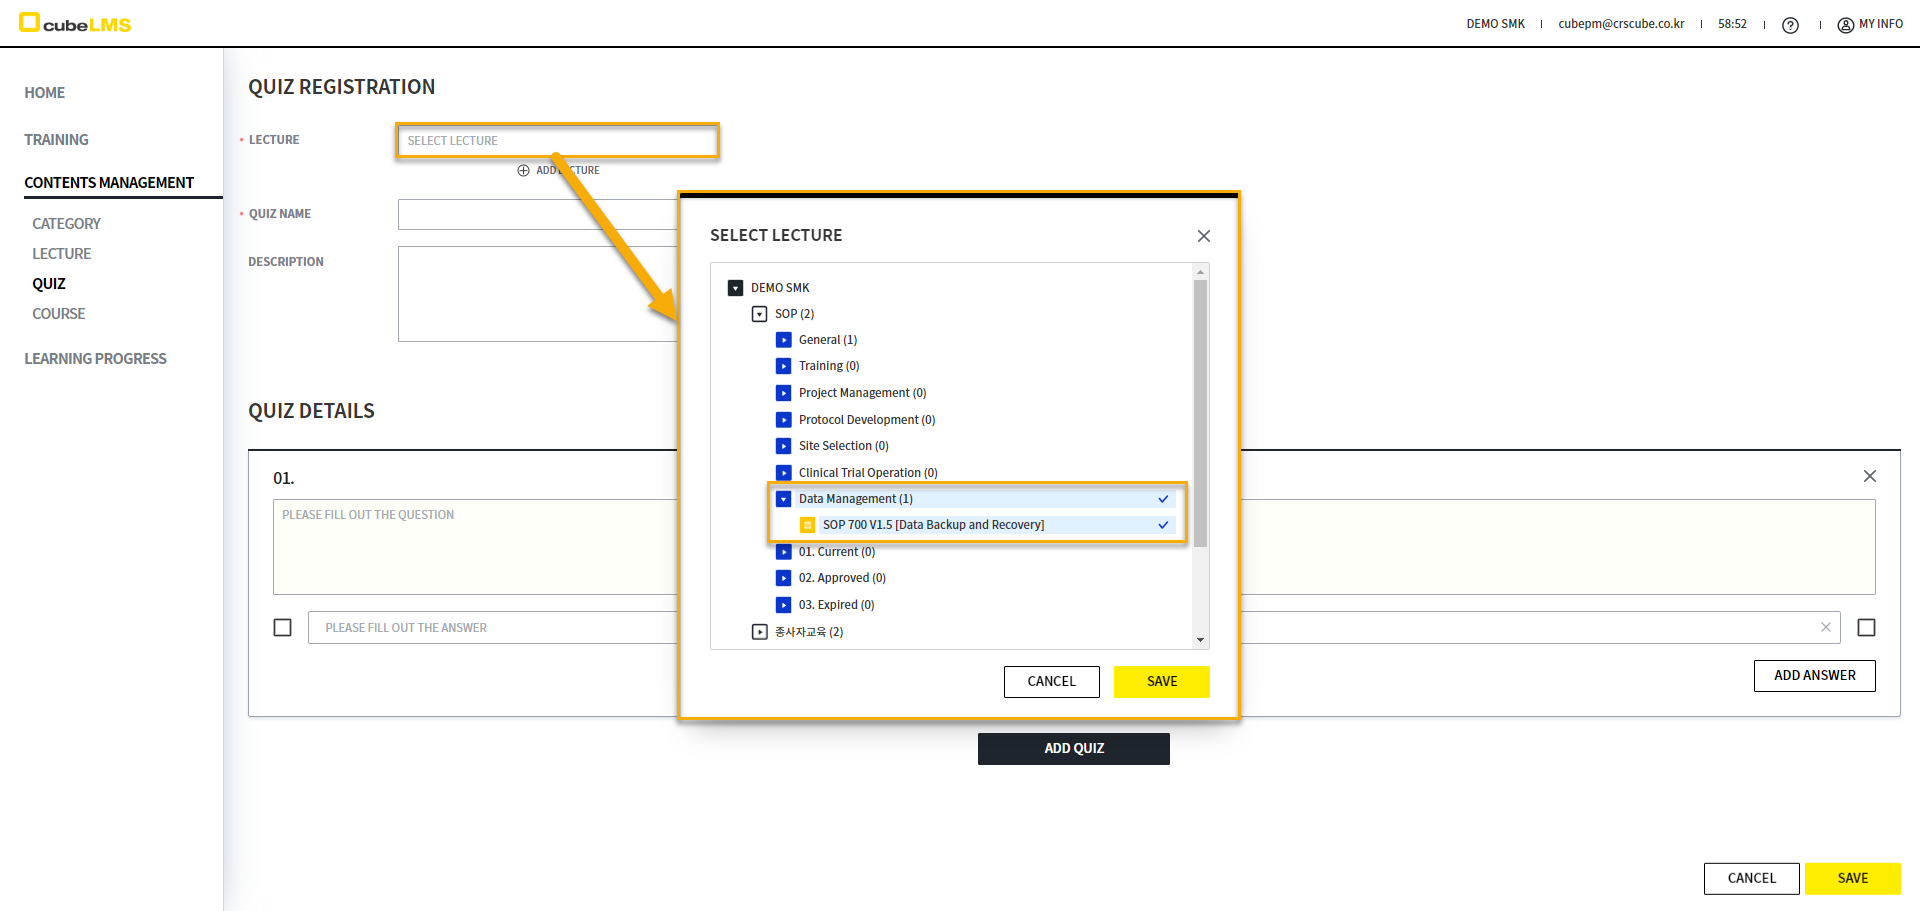
Select the ADD button in the lower right to go to the Lecture creation screen.
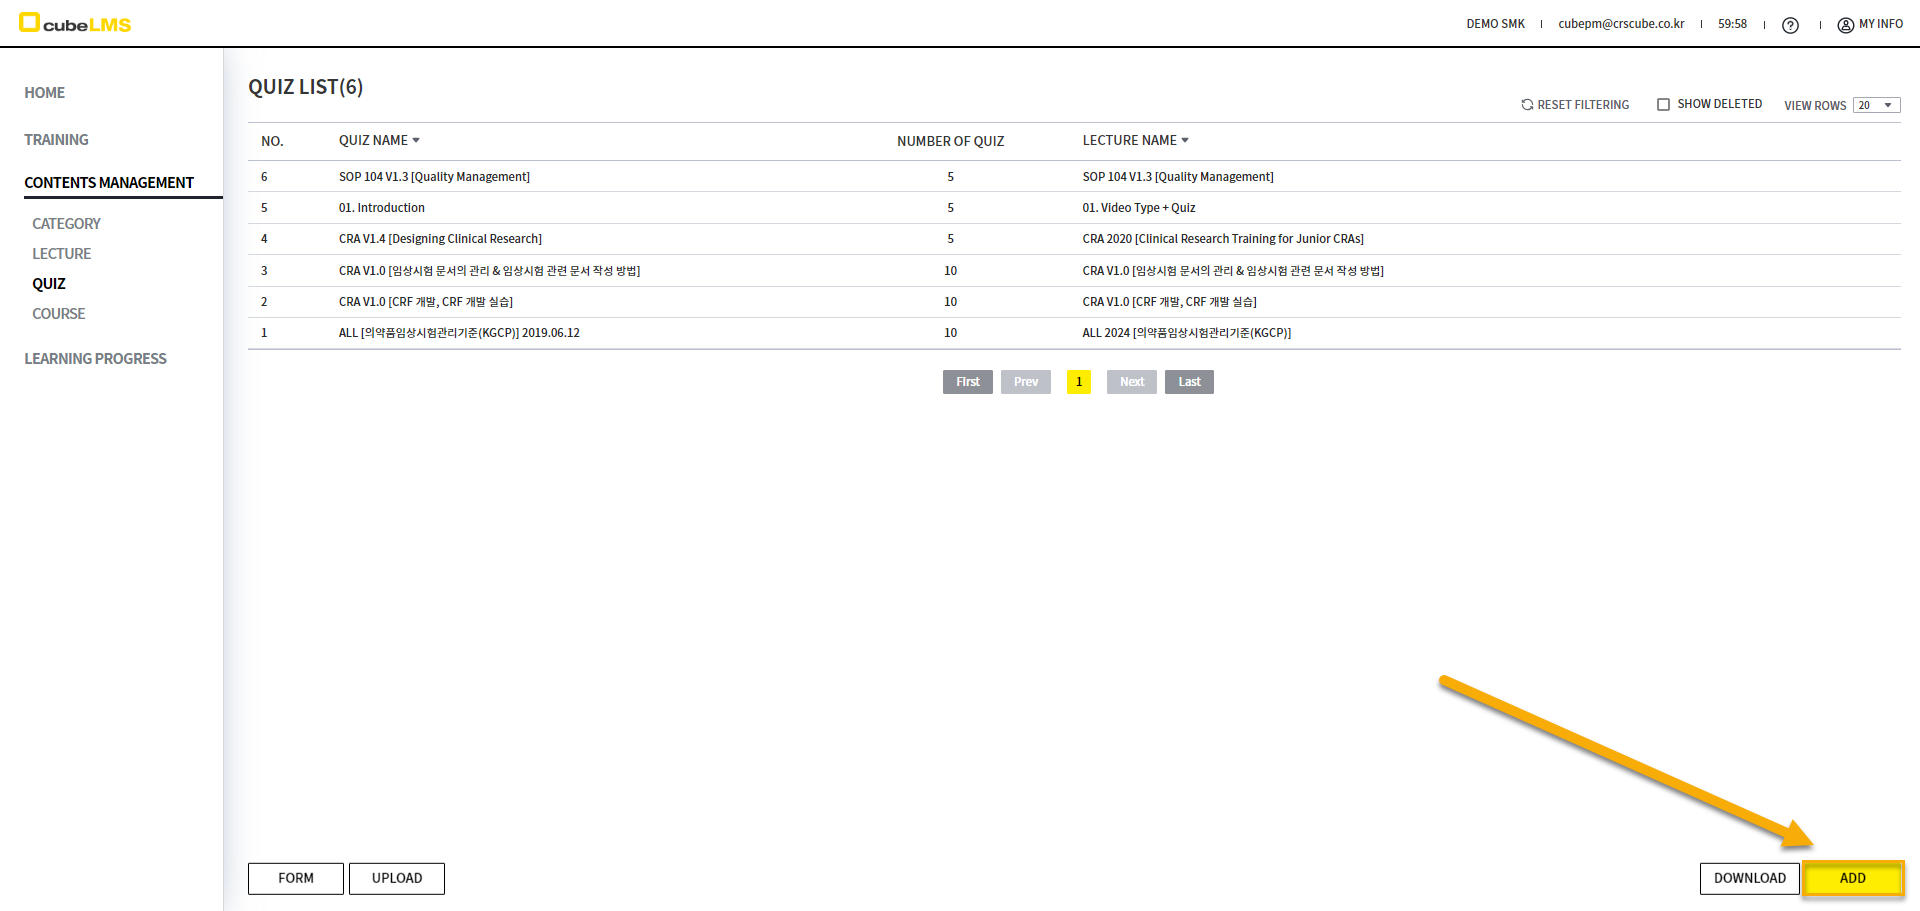
The SELECT LECTURE pop-up displayed when you select the LECTURE field lets you check Lecture items with Quiz set to Yes but no Quiz registered. Select the Lecture that matches the Quiz you want to create.
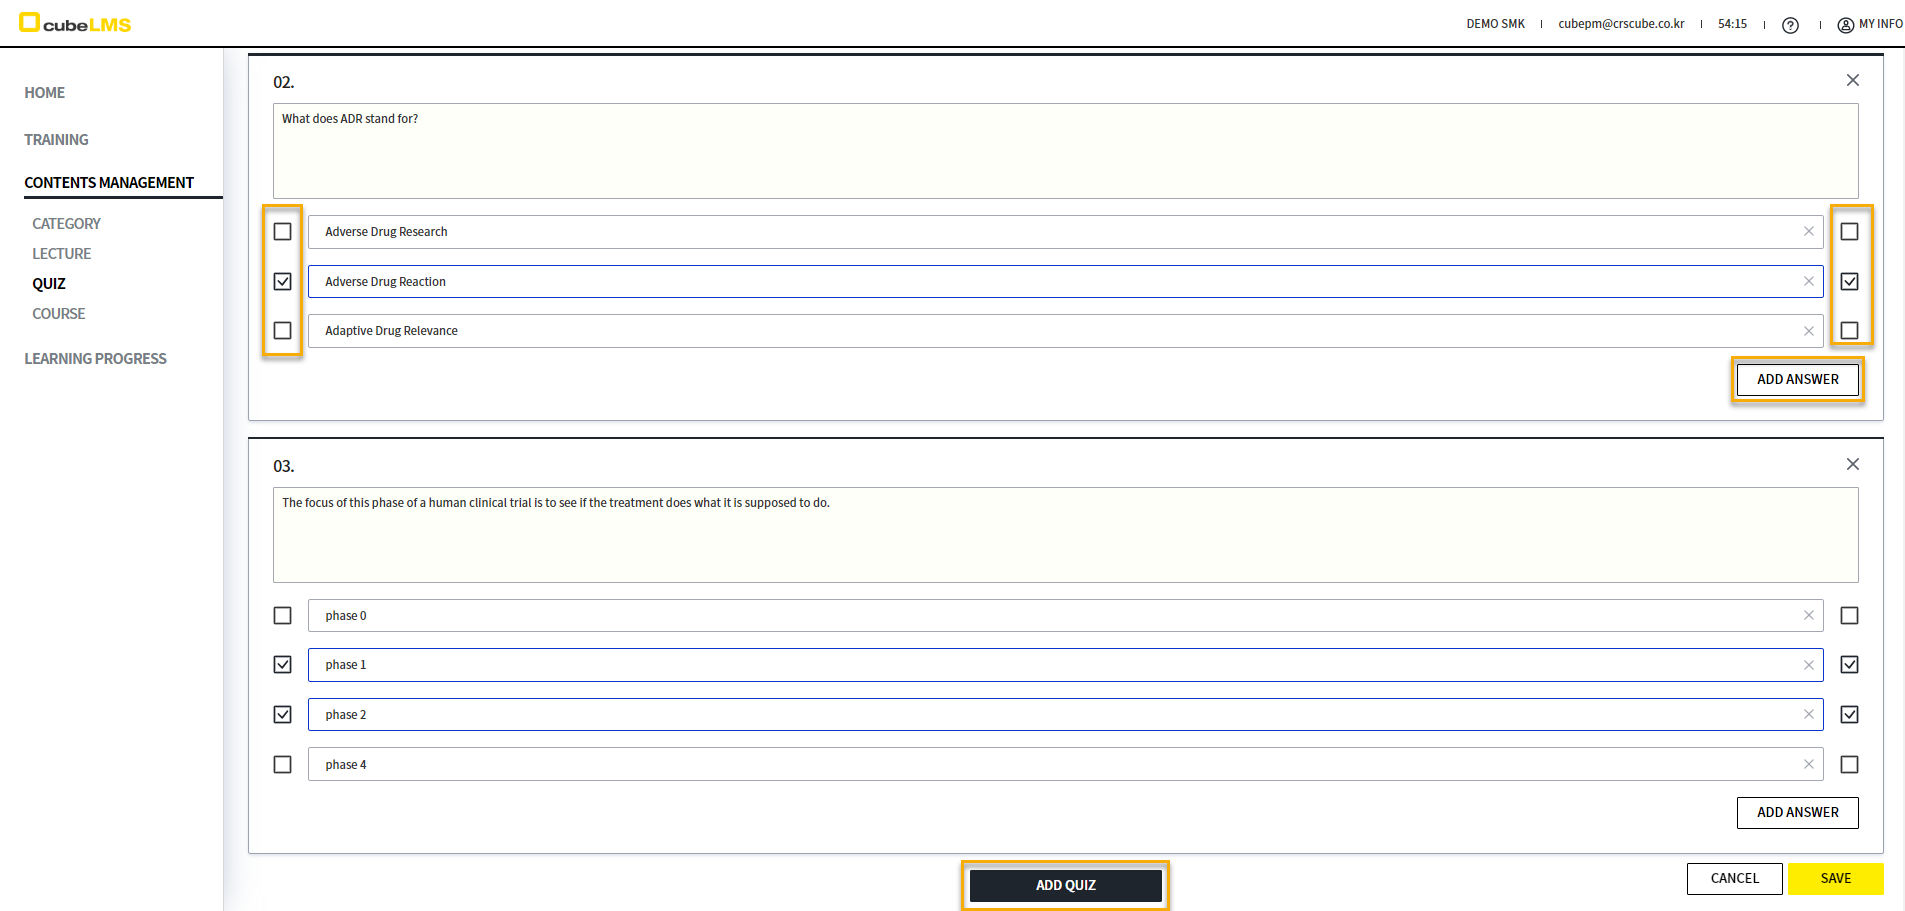
You can select the ADD QUIZ button to add questions, and select the ADD ANSWER button to add answer choices. A question can have multiple correct answers. For the correct answers, check the Check box located on either side of the choices. After entering all information for the Quiz, select the SAVE button to create the Quiz.
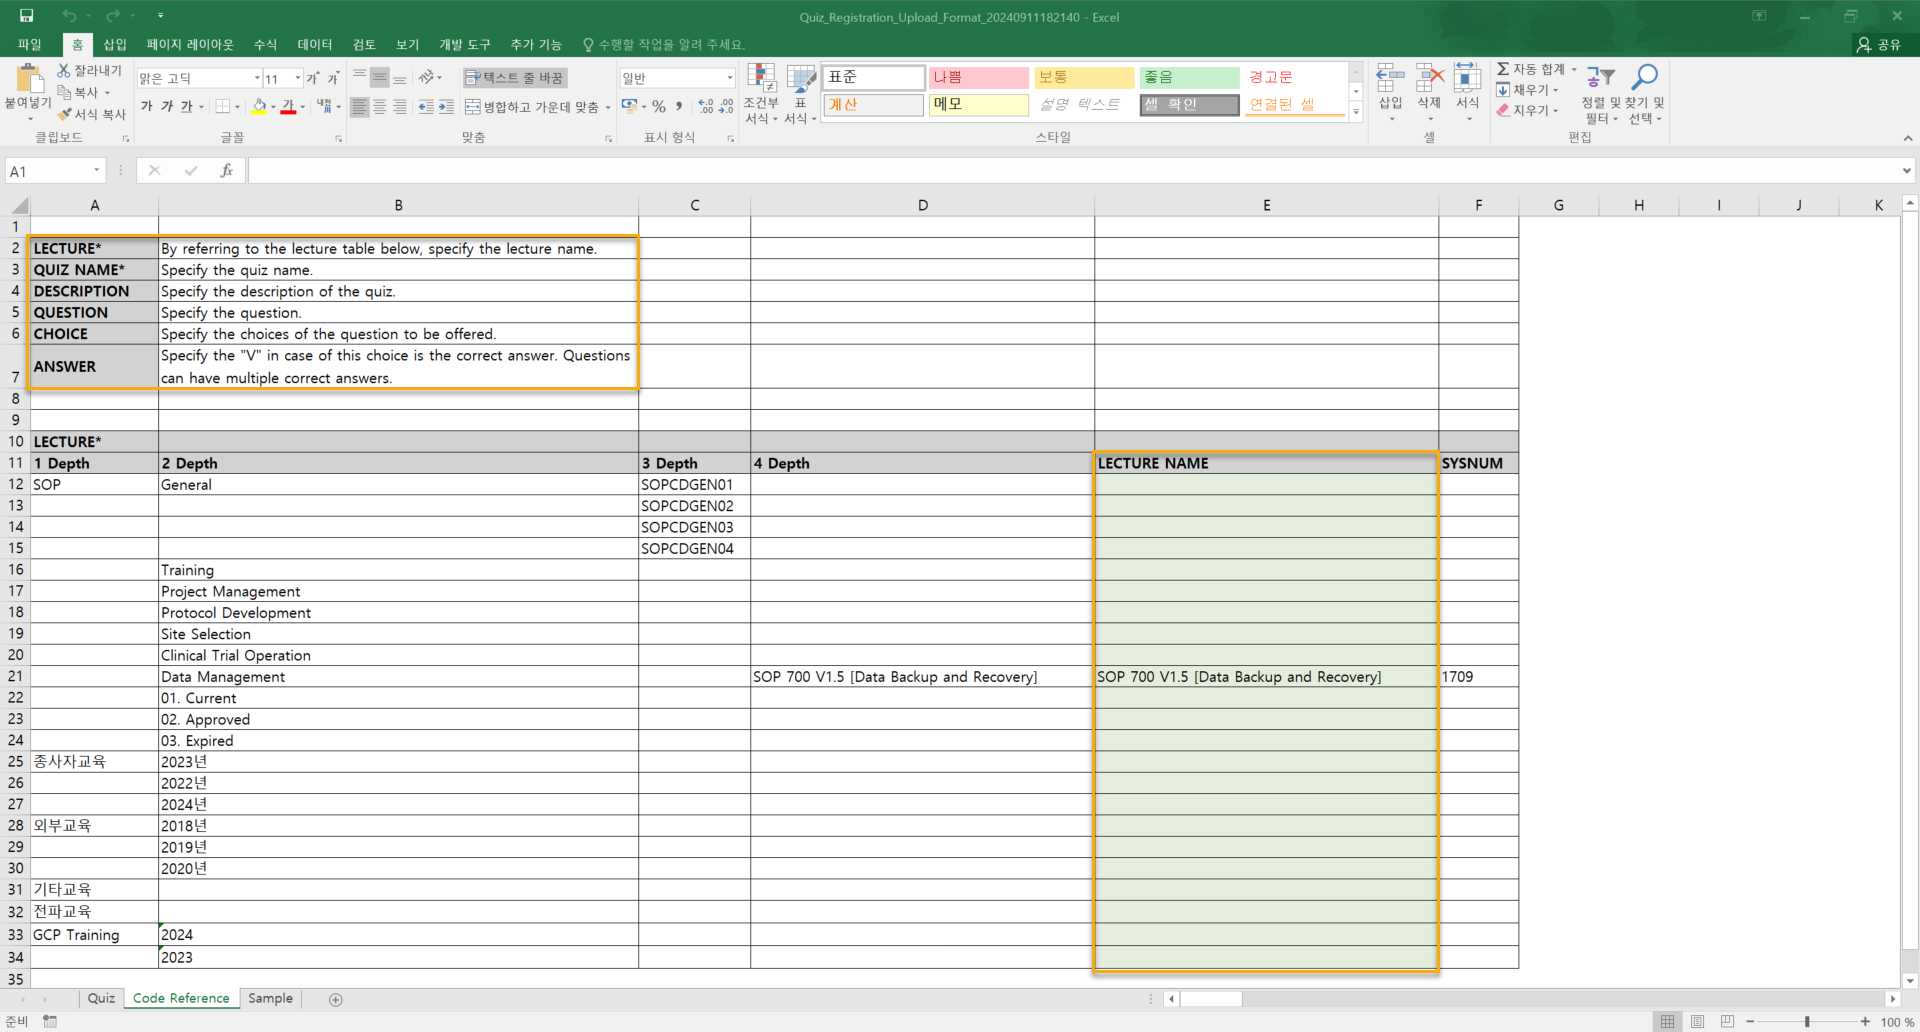
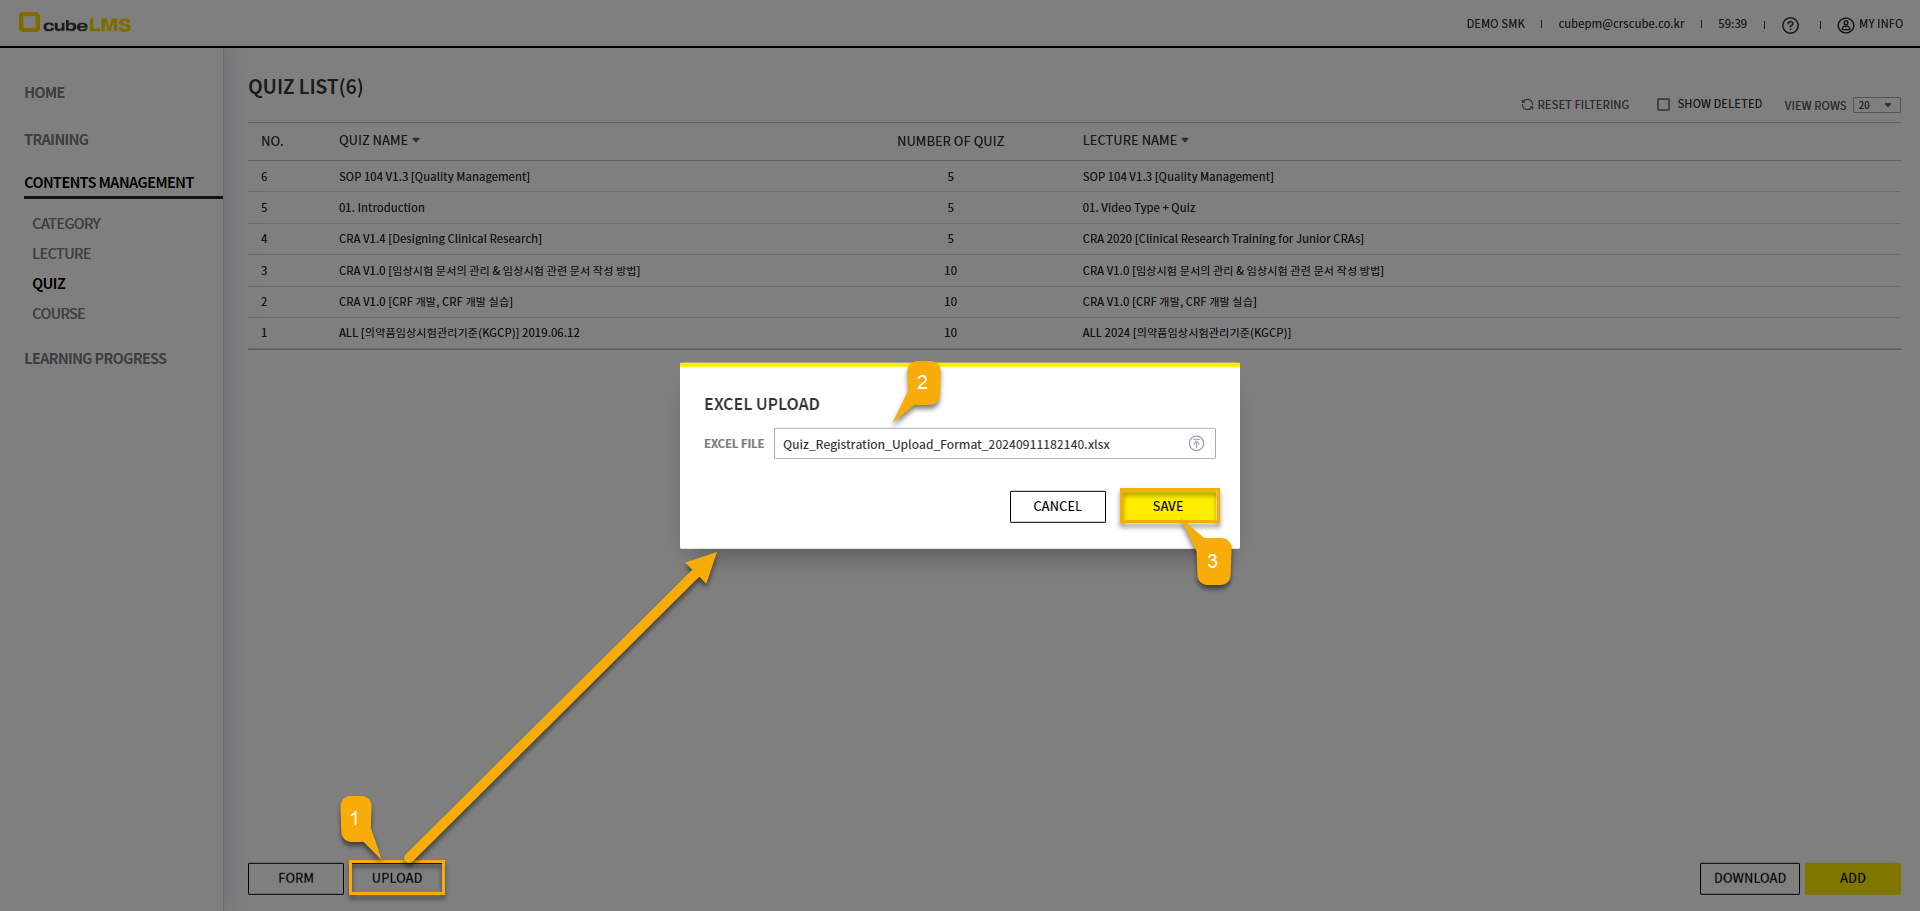
QUIZ Bulk Upload
Select the Form button to Download the Format for bulk uploading Quiz.
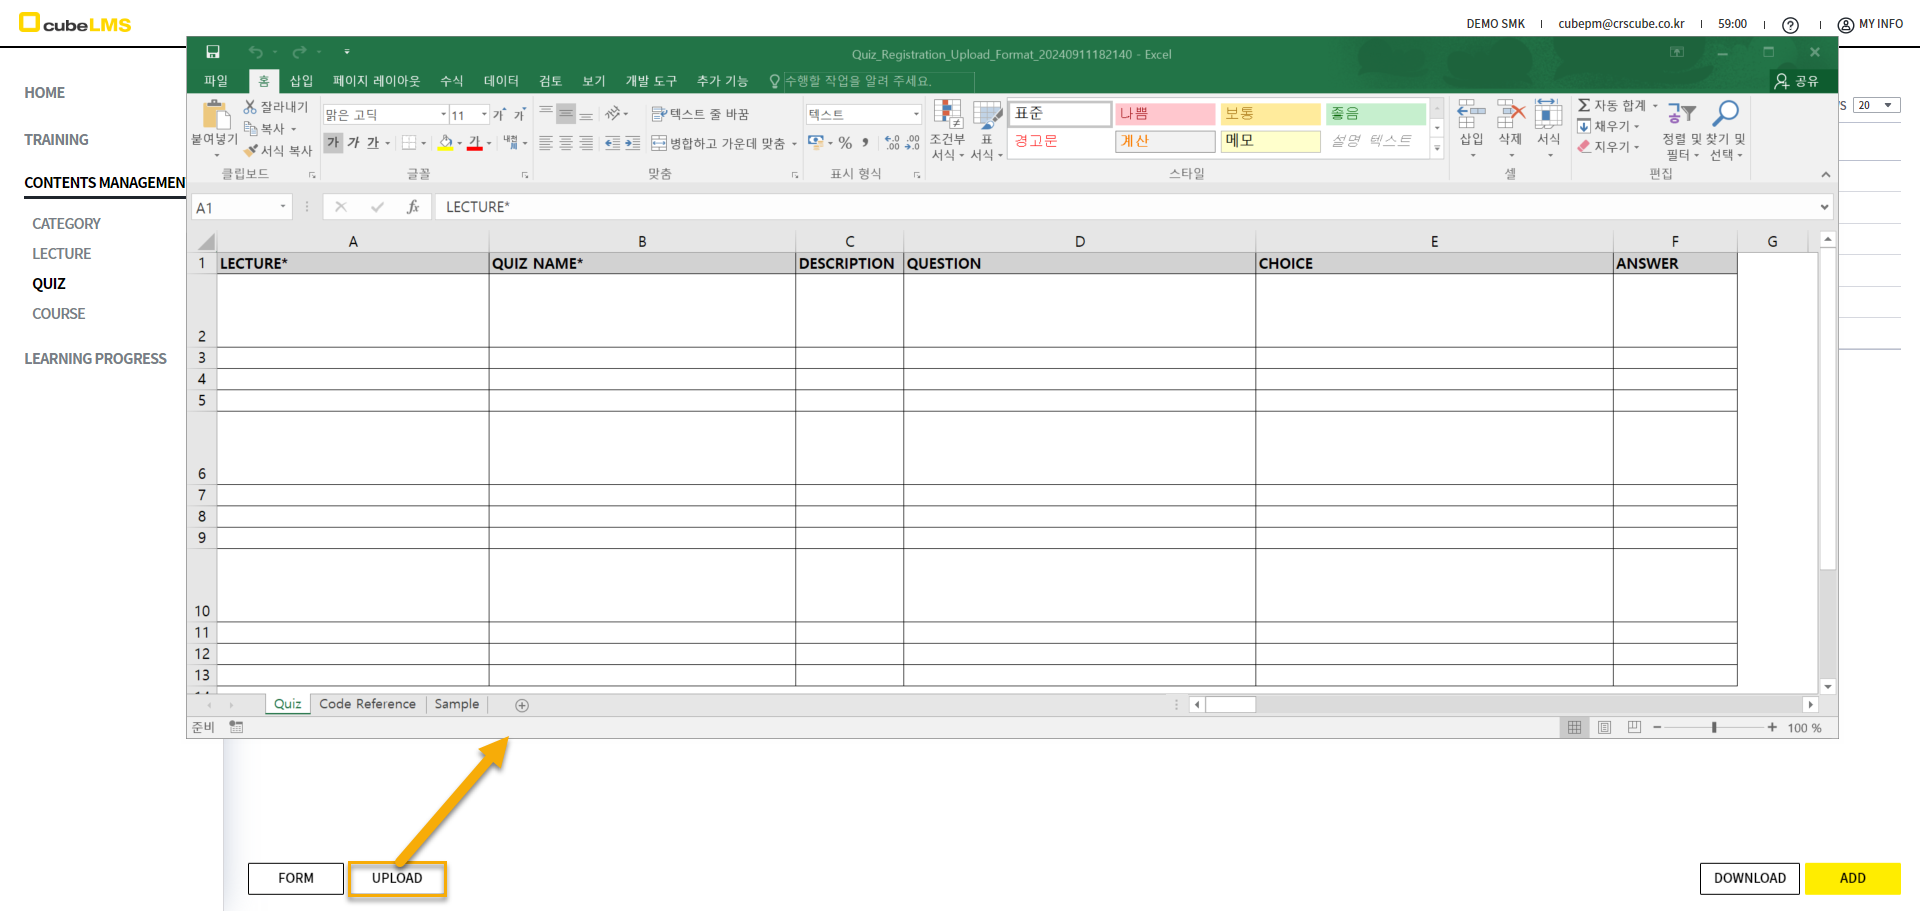
Refer to the Code Reference sheet, enter the User information you want to upload in the User sheet, and save the contents entered in Excel.
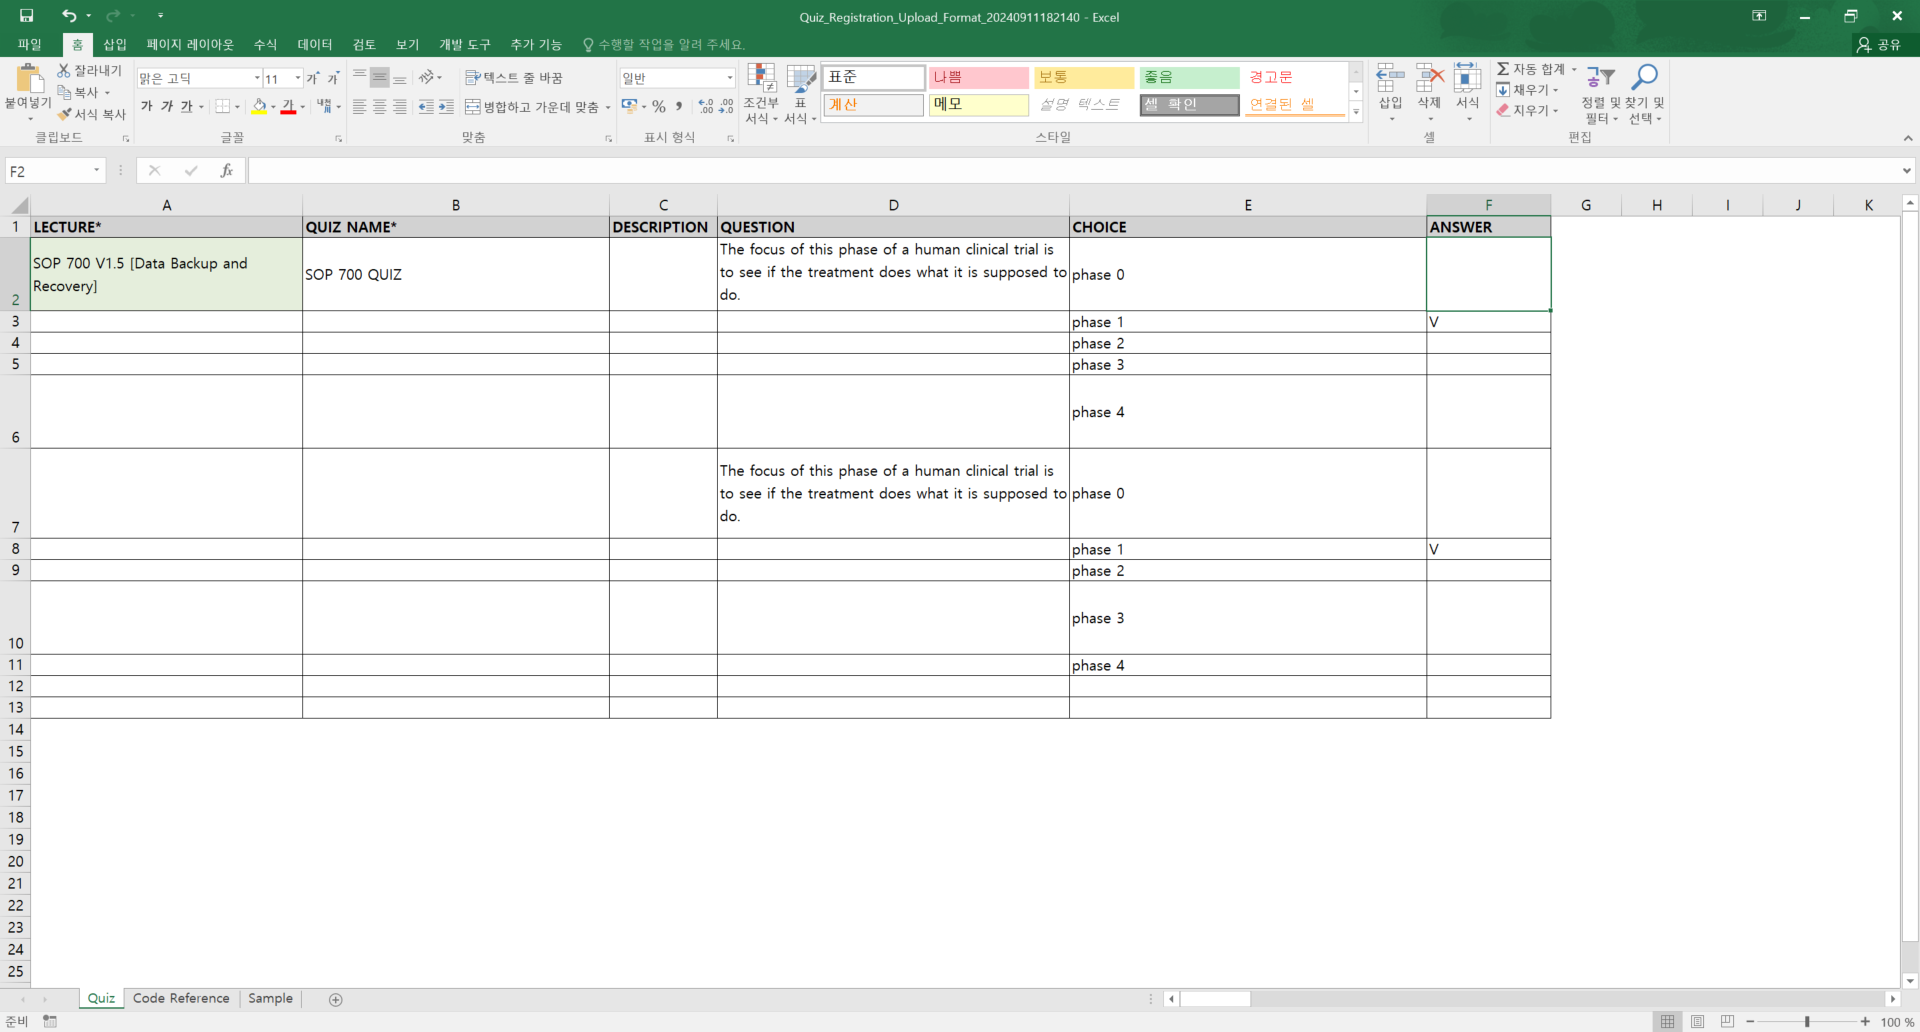
If you select the UPLOAD button, upload the Upload Format file with User information in the EXCEL UPLOAD pop-up, and then select the SAVE button, all entered User data is uploaded according to the information you entered.

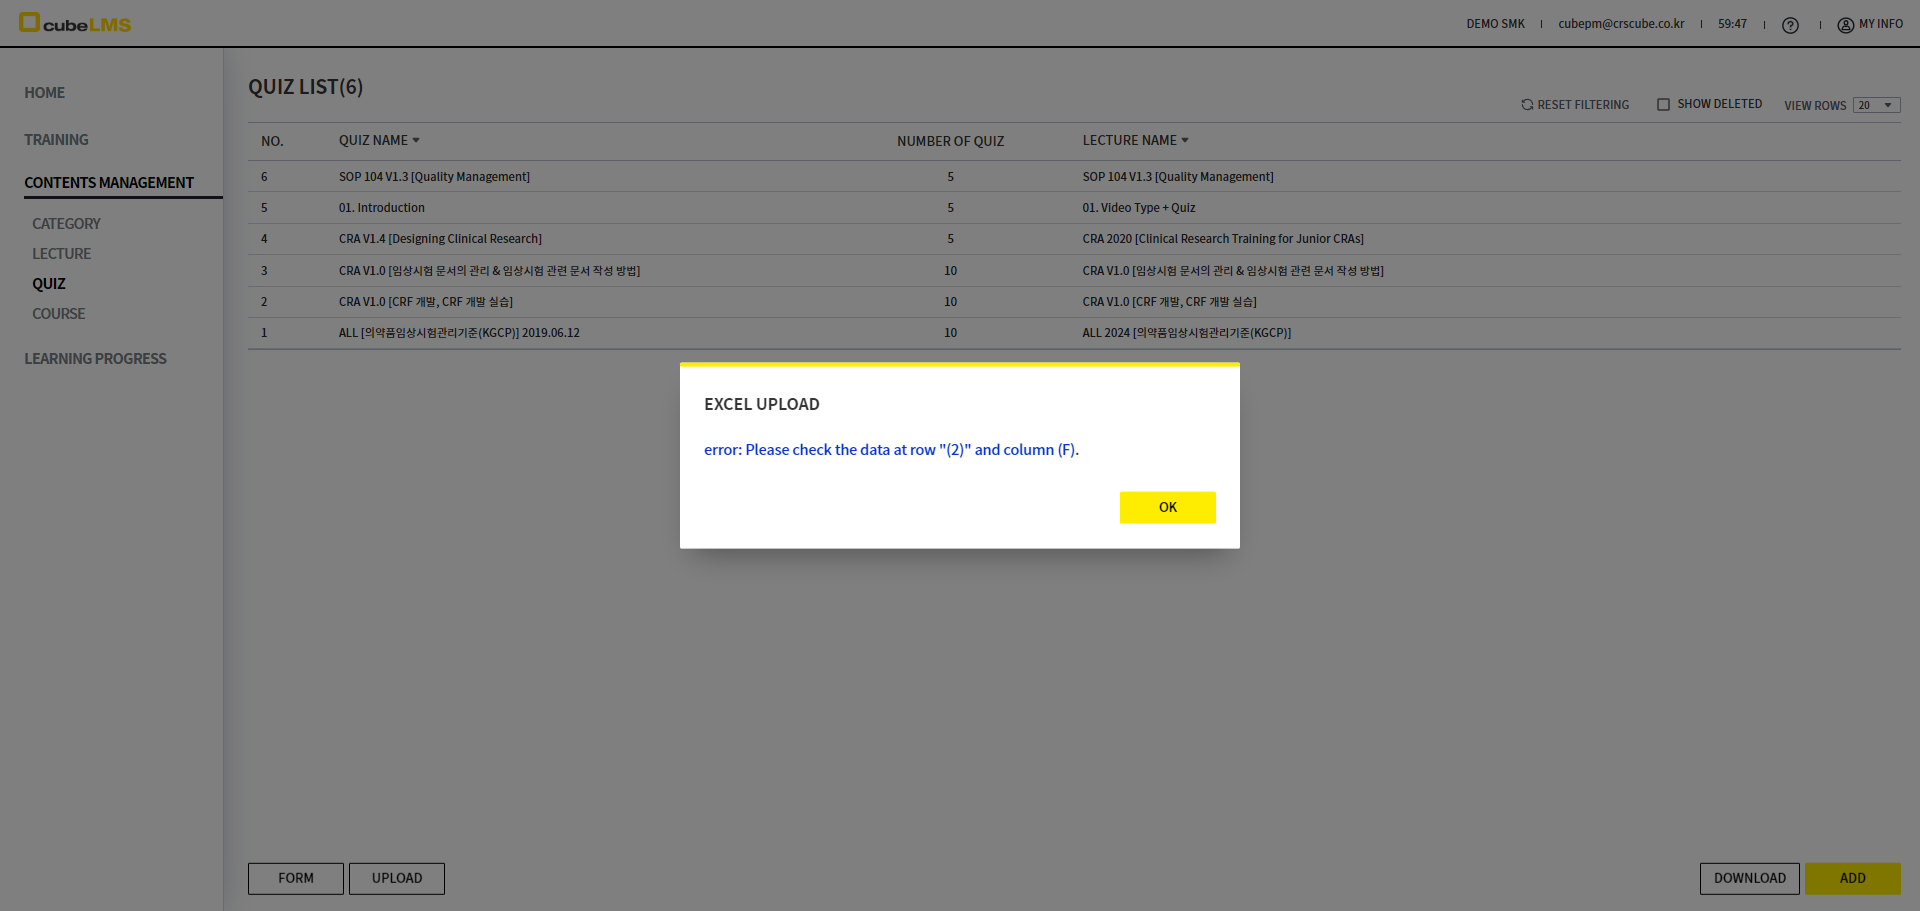
However, if the content entered in USER in the Excel file does not match the following criteria, an error message appears in a pop-up.
-
If the Upload file contains data that differs from Code Reference or required data is missing
-
If QUIZ NAME is entered more than once in the Company or Excel file
-
If it is entered in a way that does not match the data type of the item (e.g., data other than 'V' entered in the ANSWER column)
-
If the input format specified in the UPLOAD FORM is not 'General' or 'Text'
-
If the Lecture or Category is changed after downloading the UPLOAD FORM, making the Form no longer the latest version
-
If the UPLOAD FORM contains formatting or formulas that the system cannot recognize
COURSE
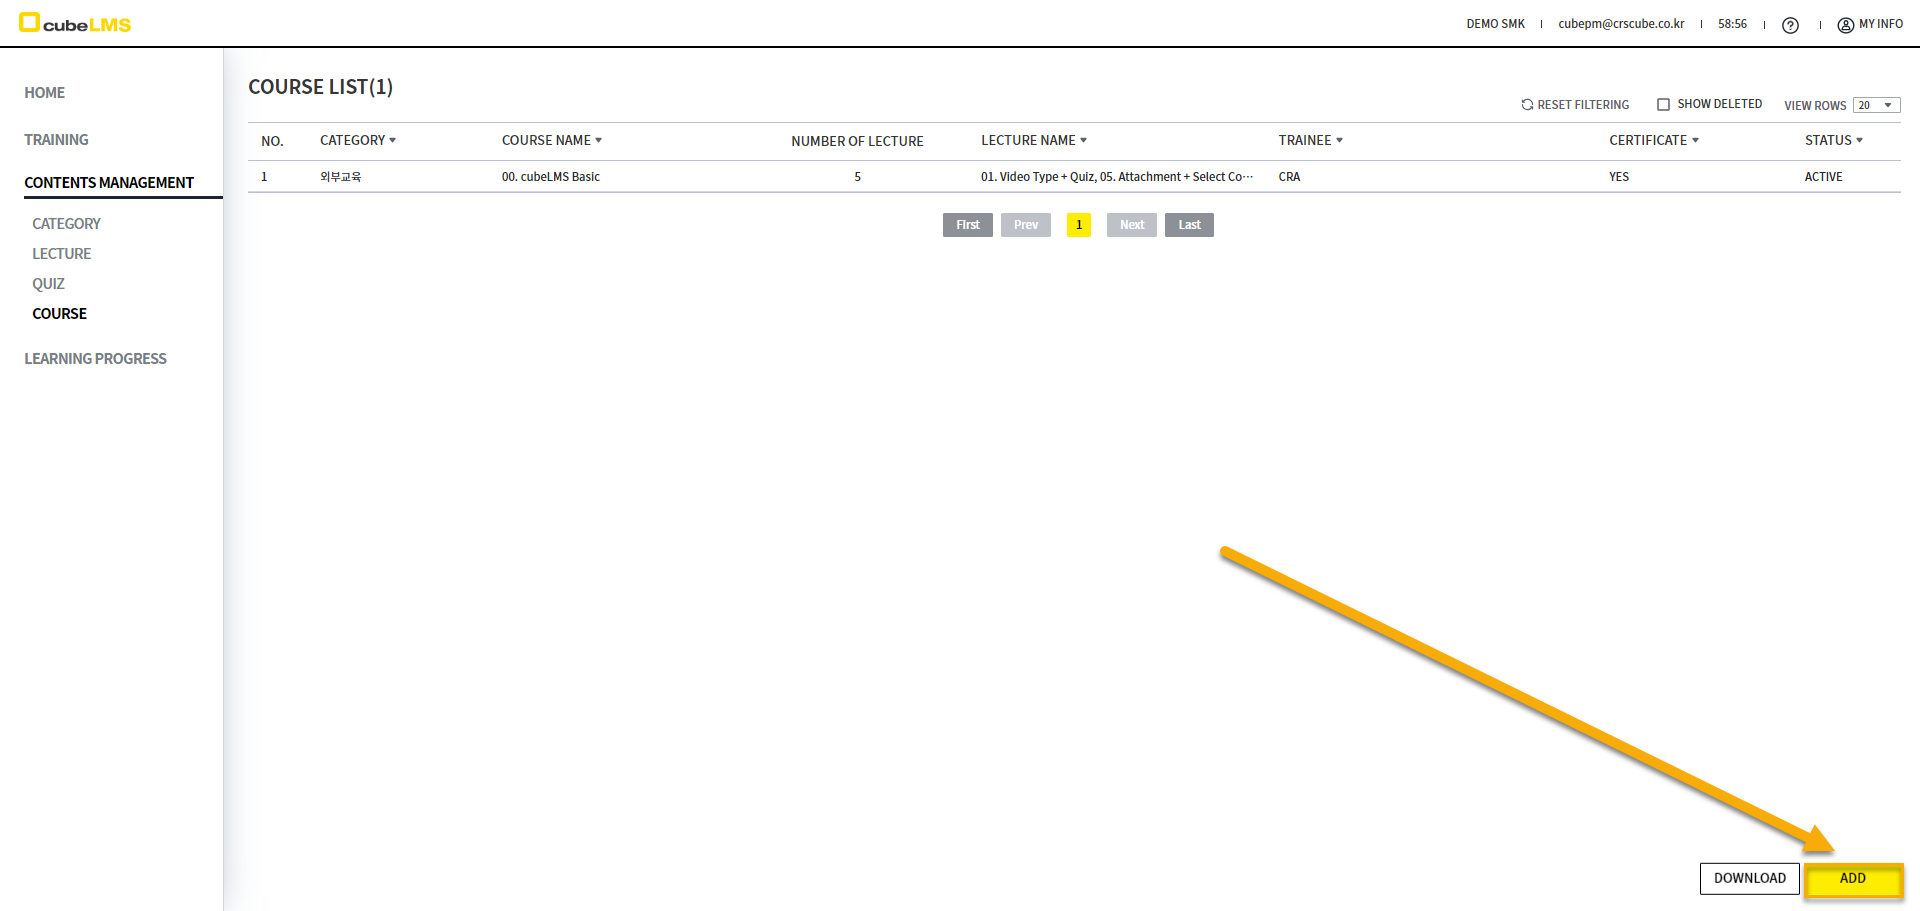
You can move to the Course creation screen by selecting the ADD button in the lower right corner.
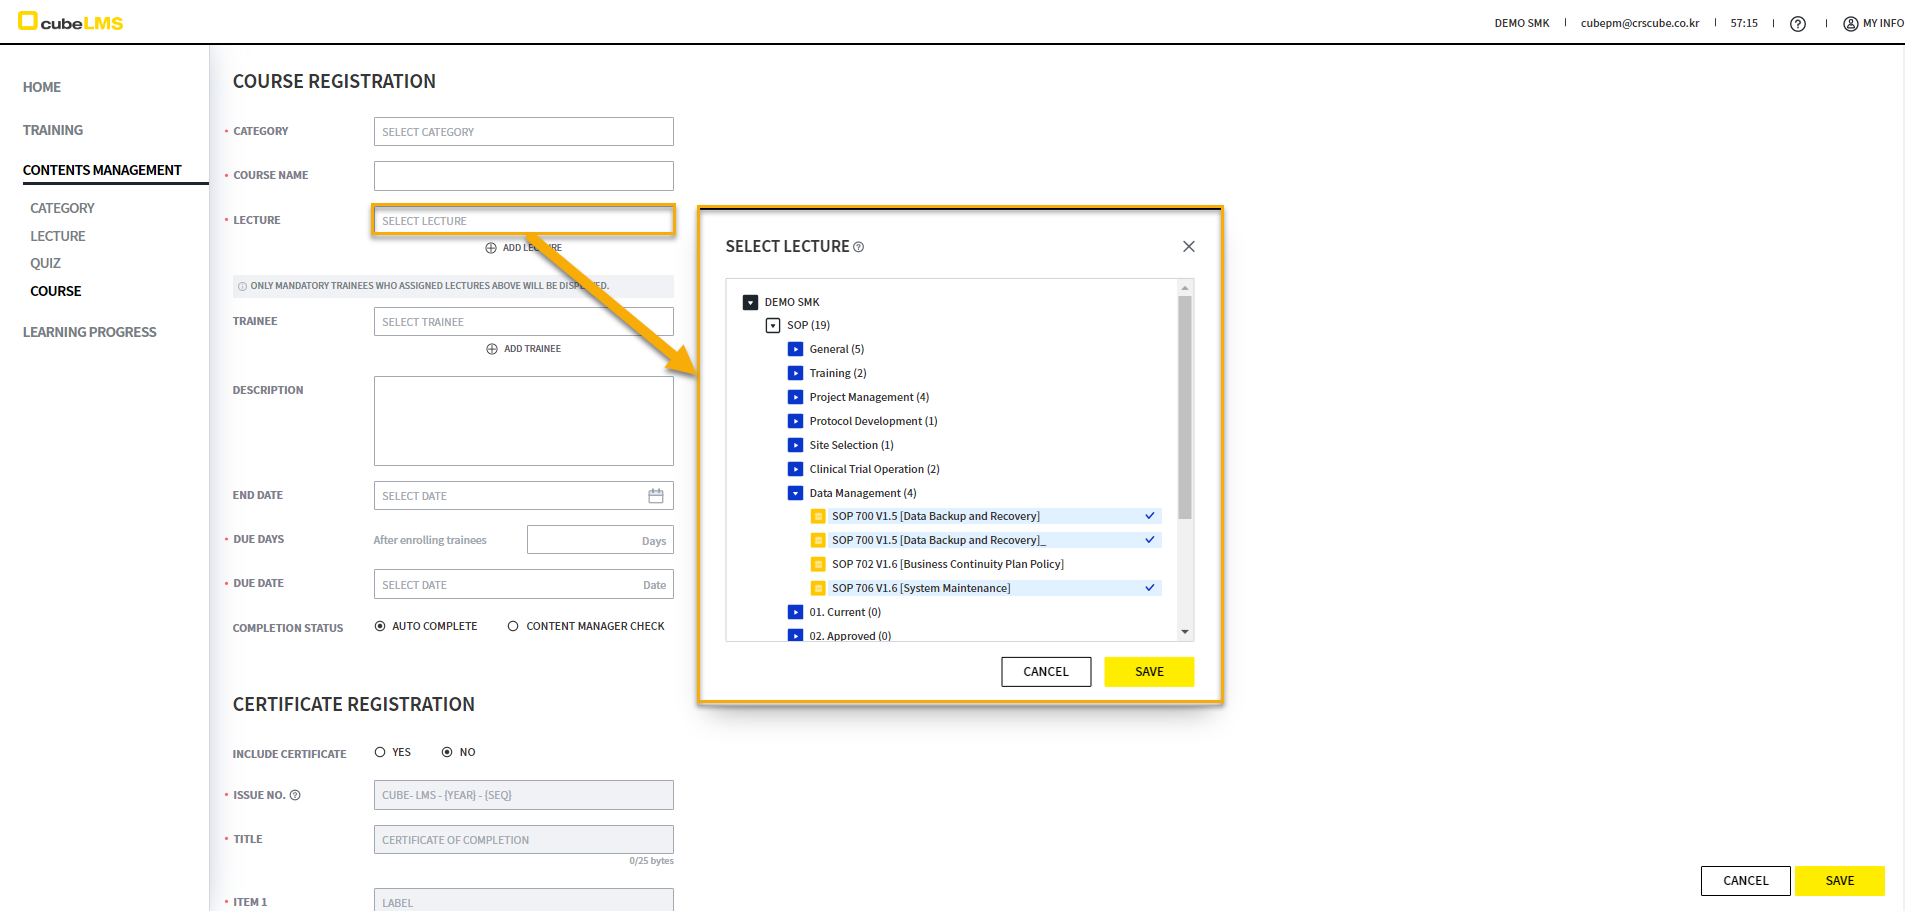
Select the Lecture to include in the COURSE. In the SELECT LECTURE popup that appears when you click the field, you can view the Lecture in each category, and only Active & Valid Lecture are displayed.
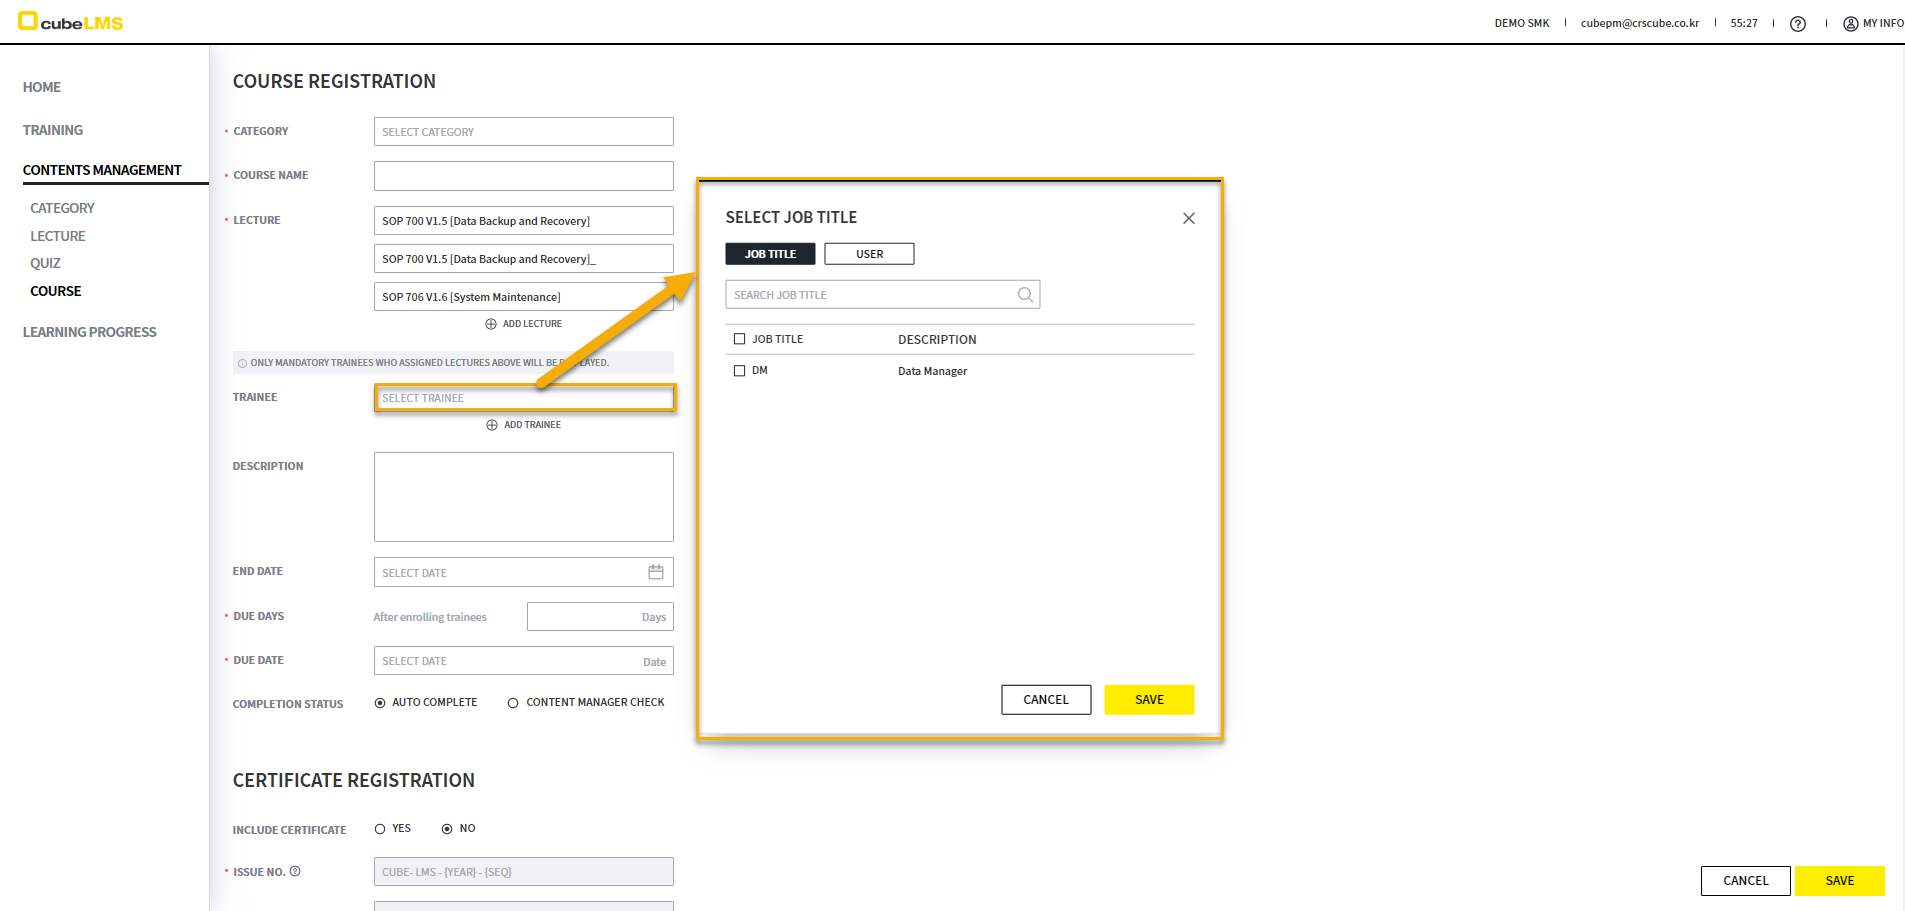
Specify the TRAINEE to assign to the COURSE. However, only the JOB TITLE and USER NAME that are the intersection of the selected LECTURE's MANDATORY tab are listed.
For example, if LECTURE 1 and LECTURE 2 are assigned JT 1+JT 2 and JT 1, respectively, in the MANDATORY tab, only the common TRAINEE, JT 1, will be listed.
END DATE can be entered using Calendar. Based on Today, you cannot enter a past date or a date after the END DATE of the selected Lectures. After the entered END DATE, the Course is not assigned to the Lecture.
Detailed explanation of Course status according to END DATE is as follows.
-
ACTIVE: COURSE creation date <= TODAY <= END DATE, and the COURSE is active. This COURSE is assigned to TRAINEE.
-
EXPIRED: END DATE < TODAY, and this COURSE is no longer assigned to TRAINEE.
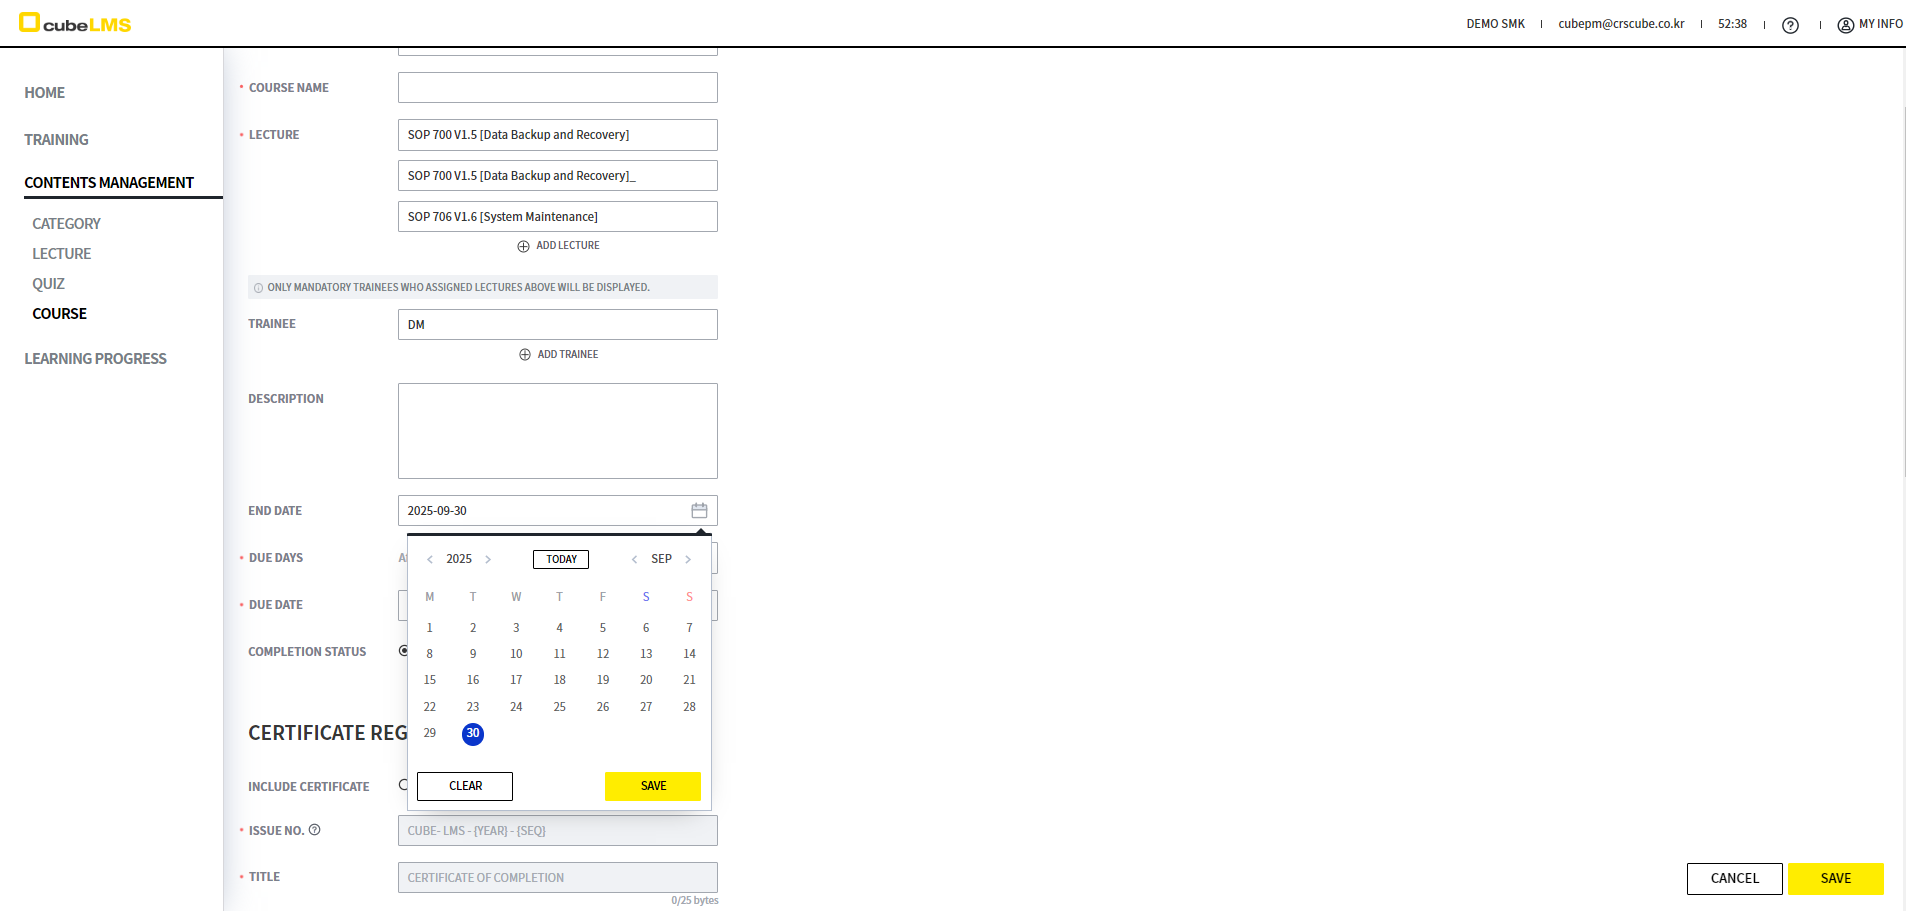
You can set whether to complete the COURSE immediately when the LECTUREs included in the COURSE are completed, or have the CONTENT MANAGER check and complete it.
-
AUTO COMPLETE : The COURSE is completed immediately when all LECTUREs are completed.
-
CONTENT MANAGER CHECK : Even after all LECTUREs are completed, the COURSE is not completed until the CONTENT MANAGER checks it.
The other items are the same as Lecture, and Course is created when you select the SAVE button.
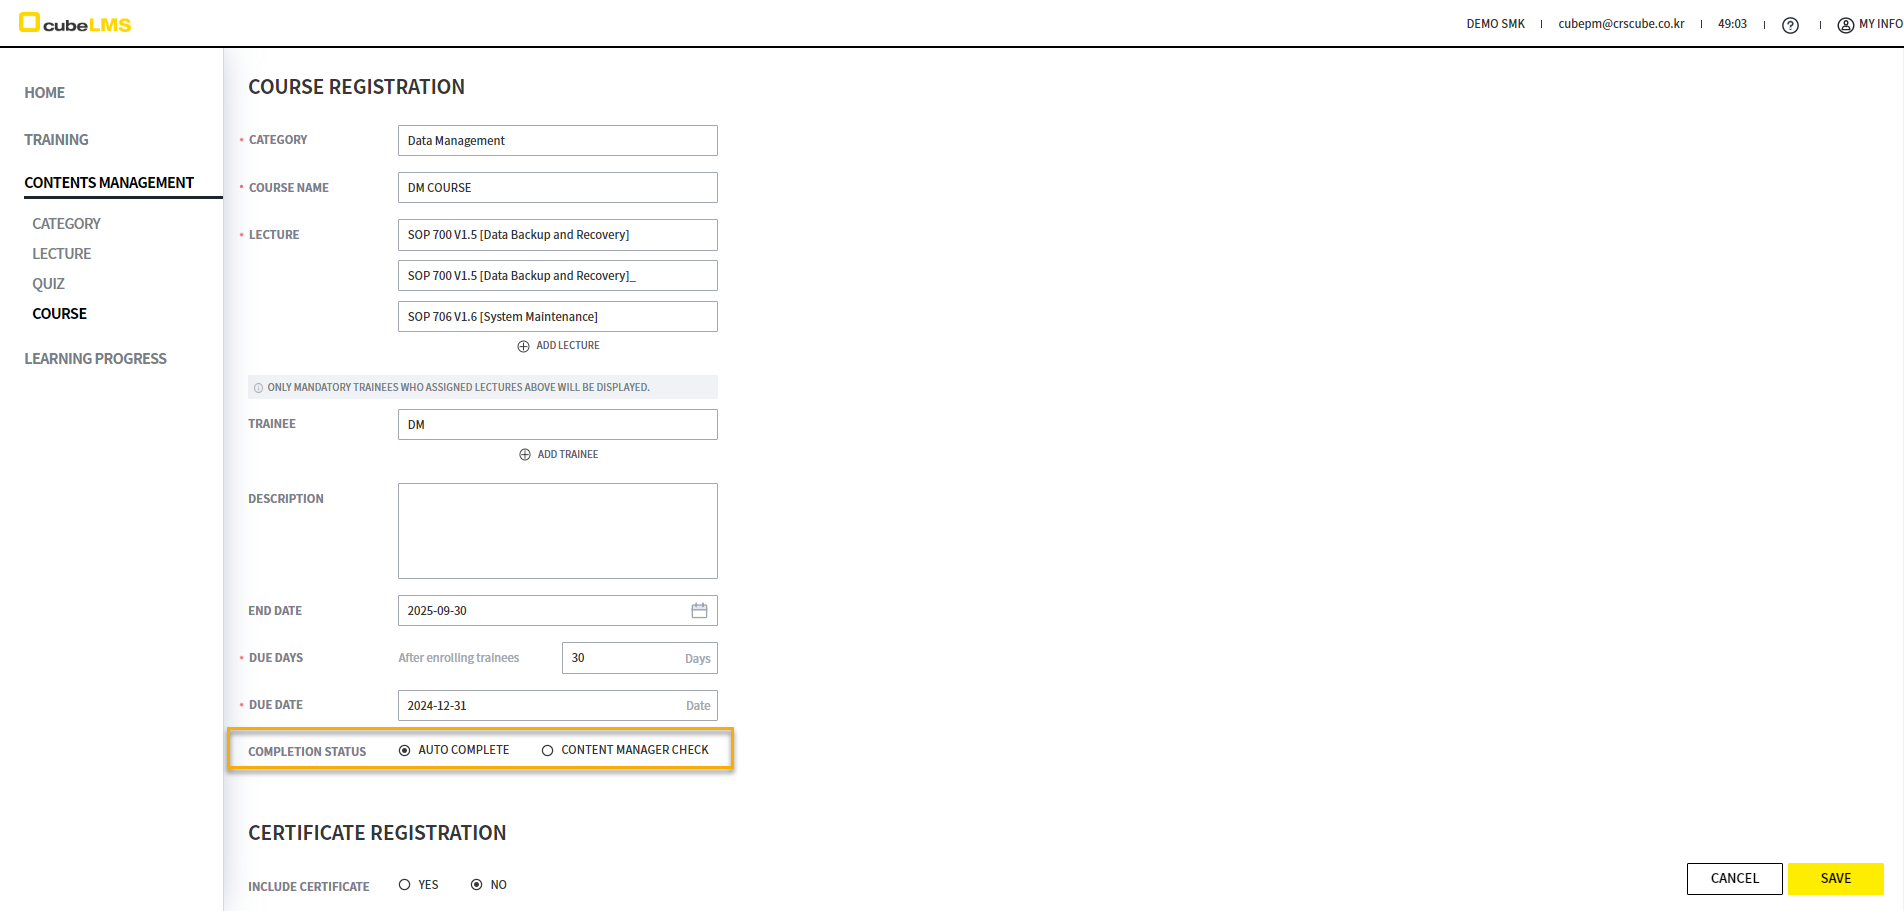
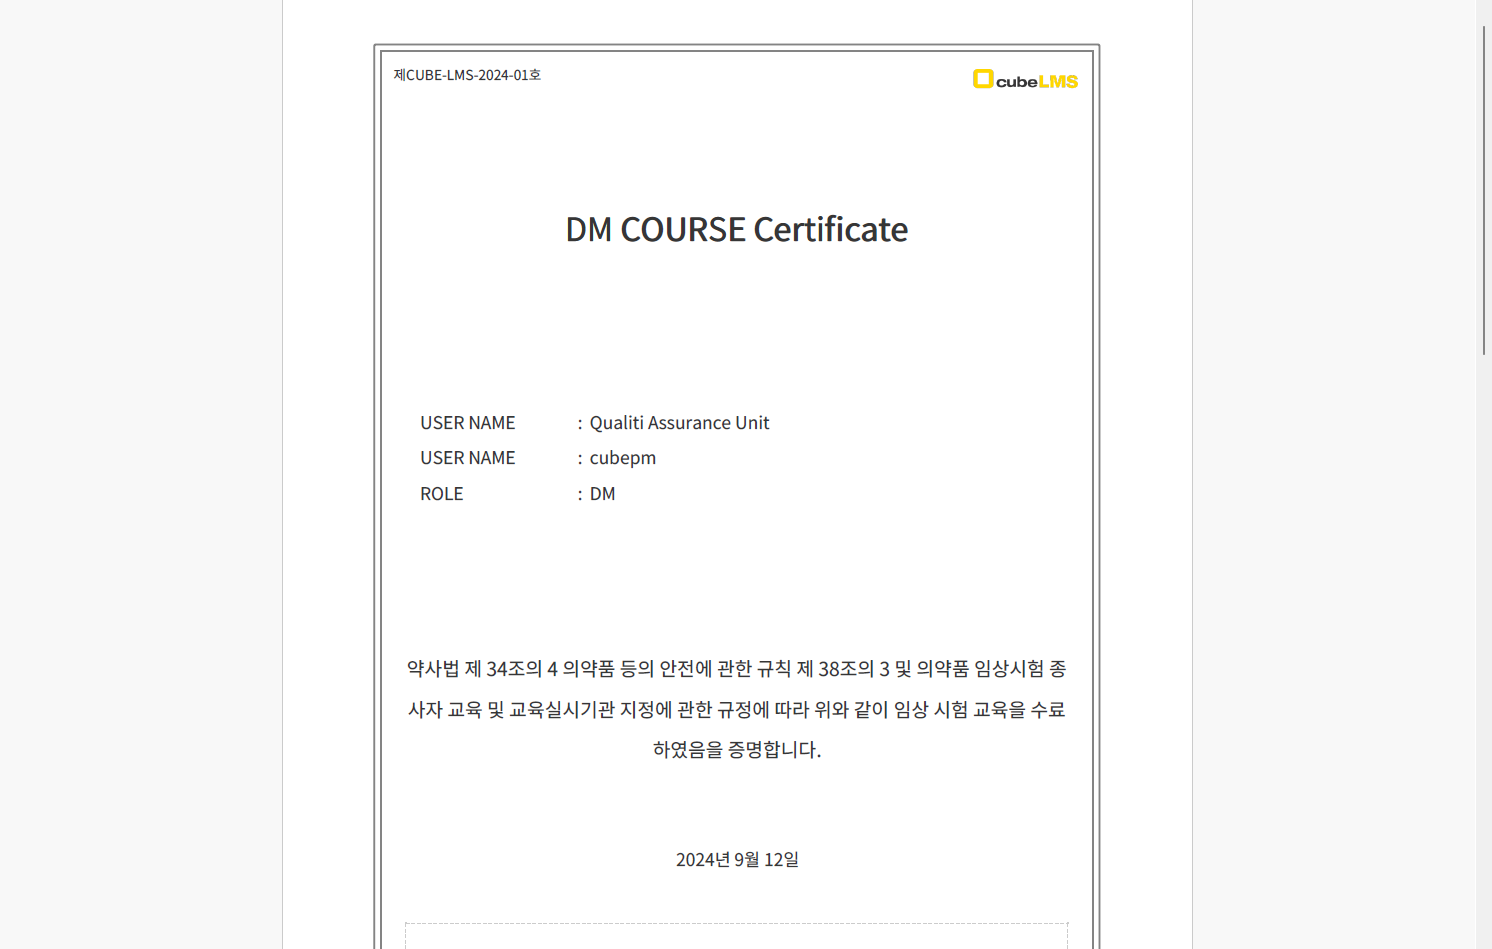
COURSE-CERTIFICATE
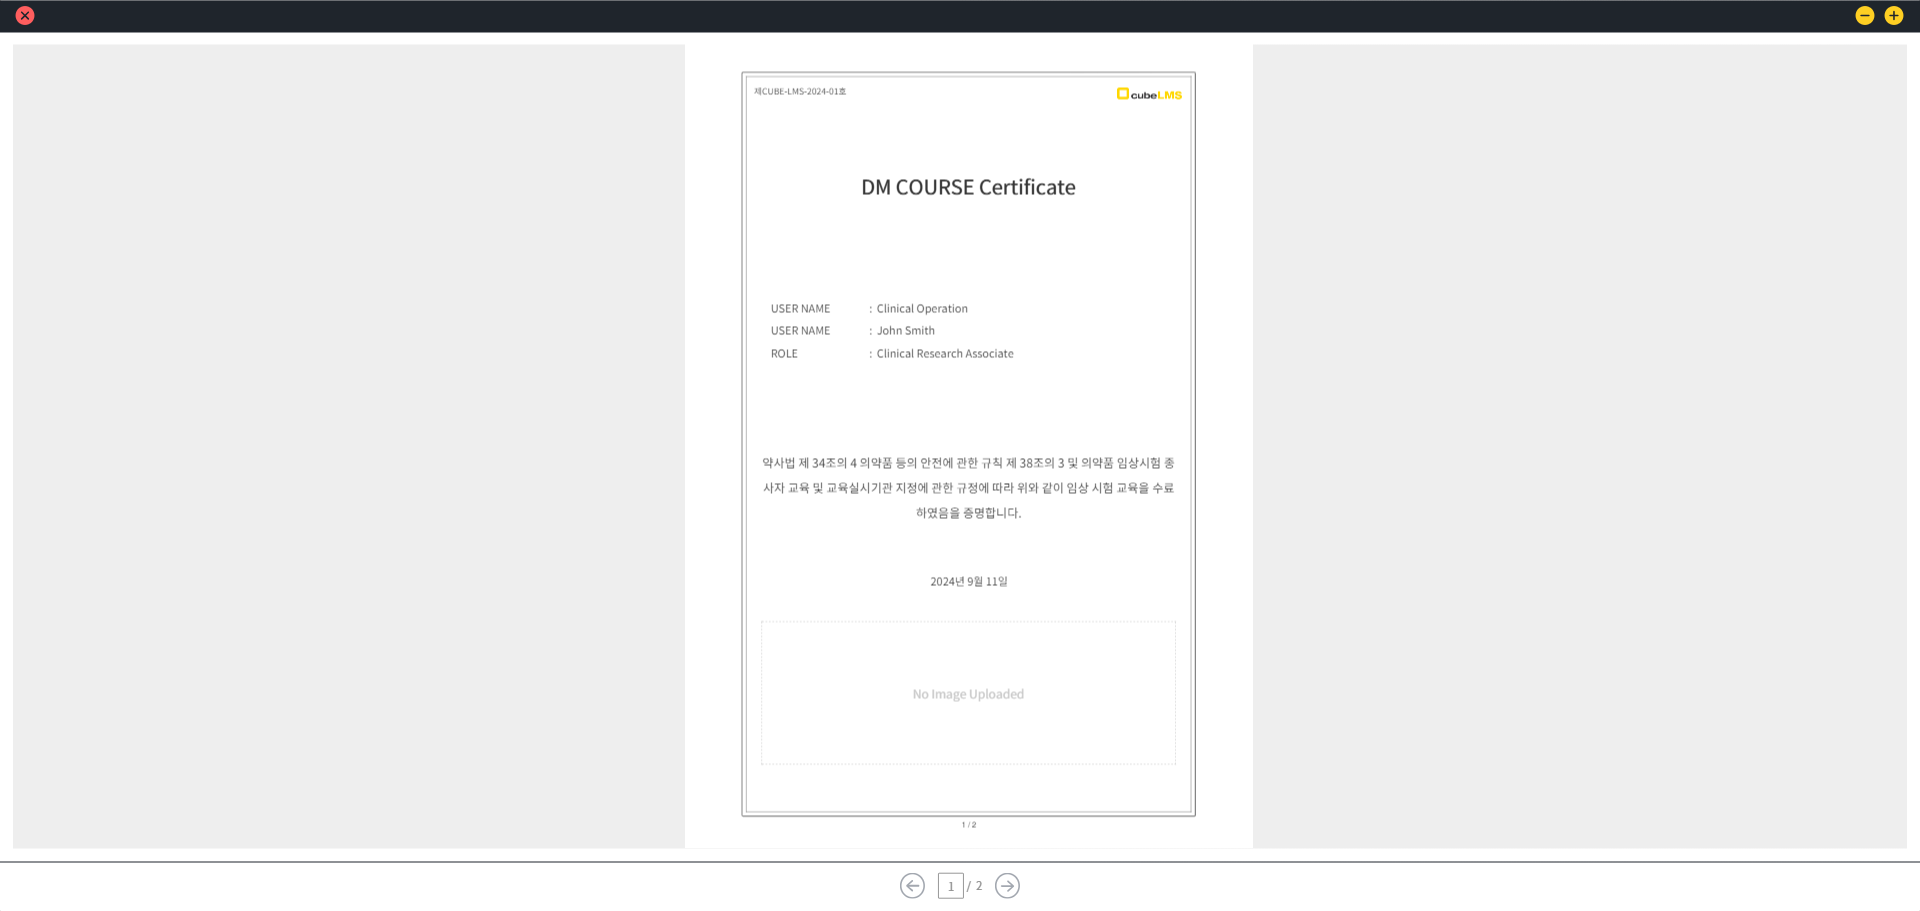
You can add a Certificate by selecting YES for INCLUDE CERTIFICATE.
Note: If even one TRAINEE has been issued a Certificate, it is not possible to change INCLUDED CERTIFICATE to NO. Please be careful when registering the Certificate in actual registration.
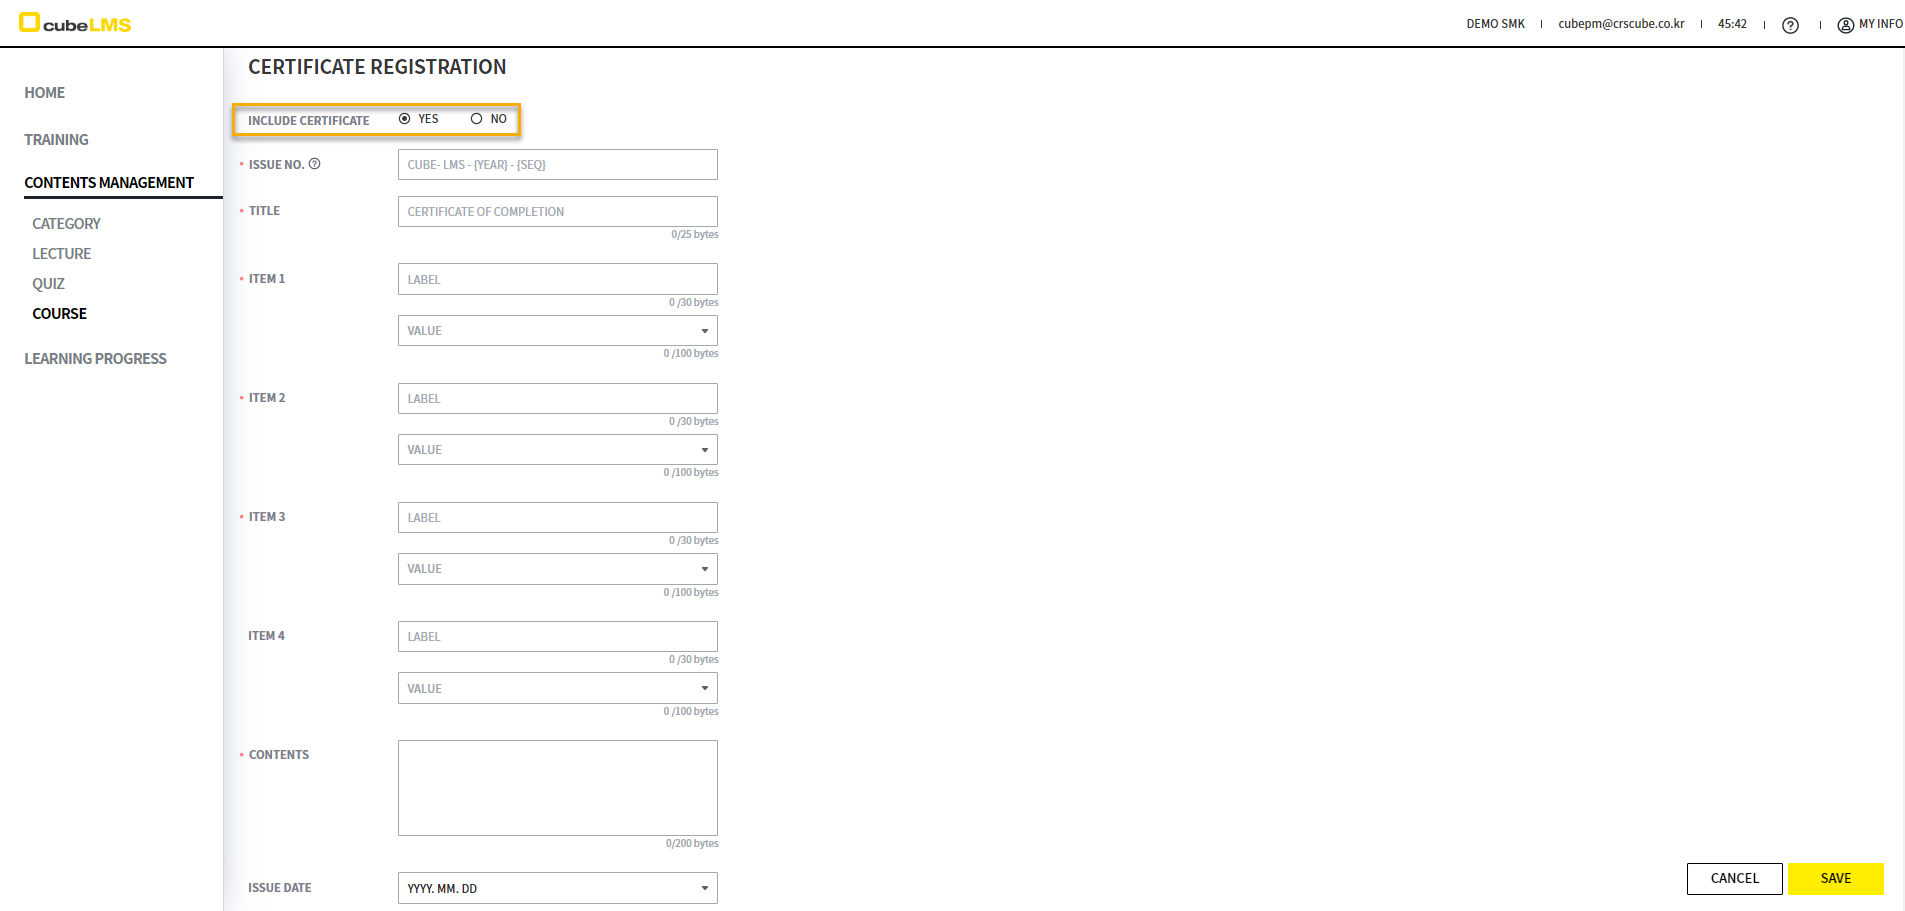
You can set the ISSUE NO. of the CERTIFICATE to be included in the COURSE. Duplicate ISSUE NO. entries are not allowed, and deleted COURSEs are also included.
-
{SEQ} : The CERTIFICATE issuance number is displayed. It is written as 01, 02, 03... in the order of TRAINEE who took the COURSE.
-
{YEAR}: The year the CERTIFICATE was issued is displayed. If the year changes, the existing issuance SEQUENCE is reset.
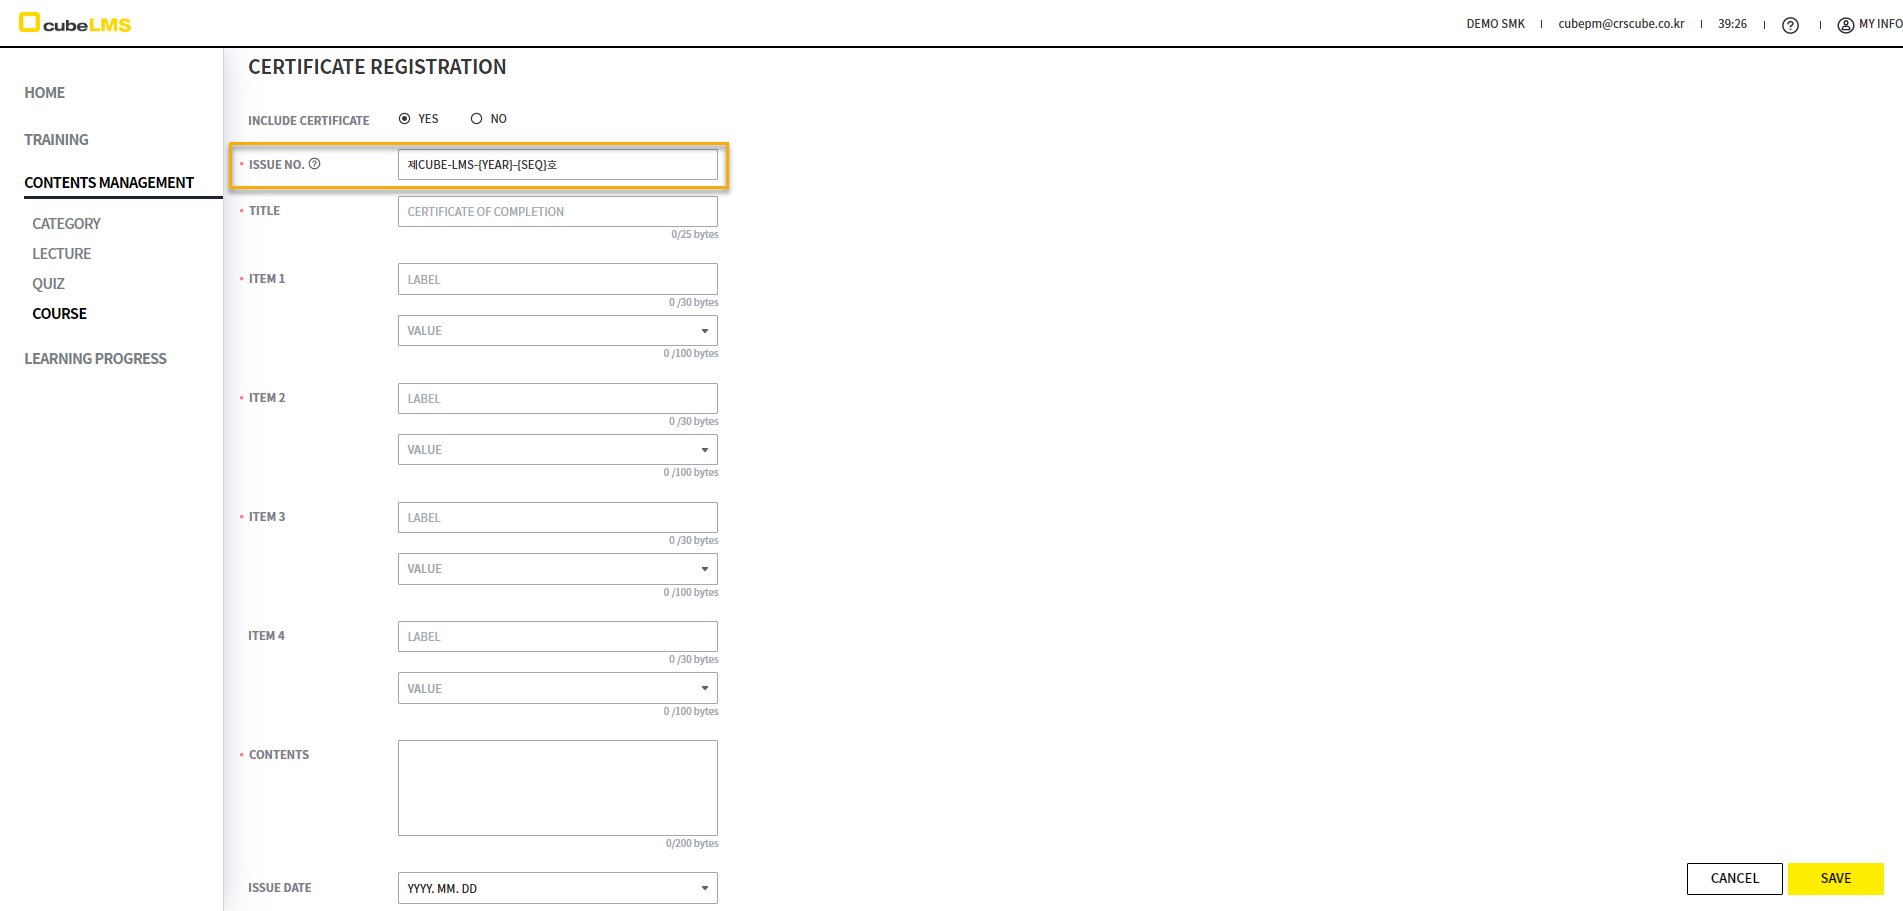
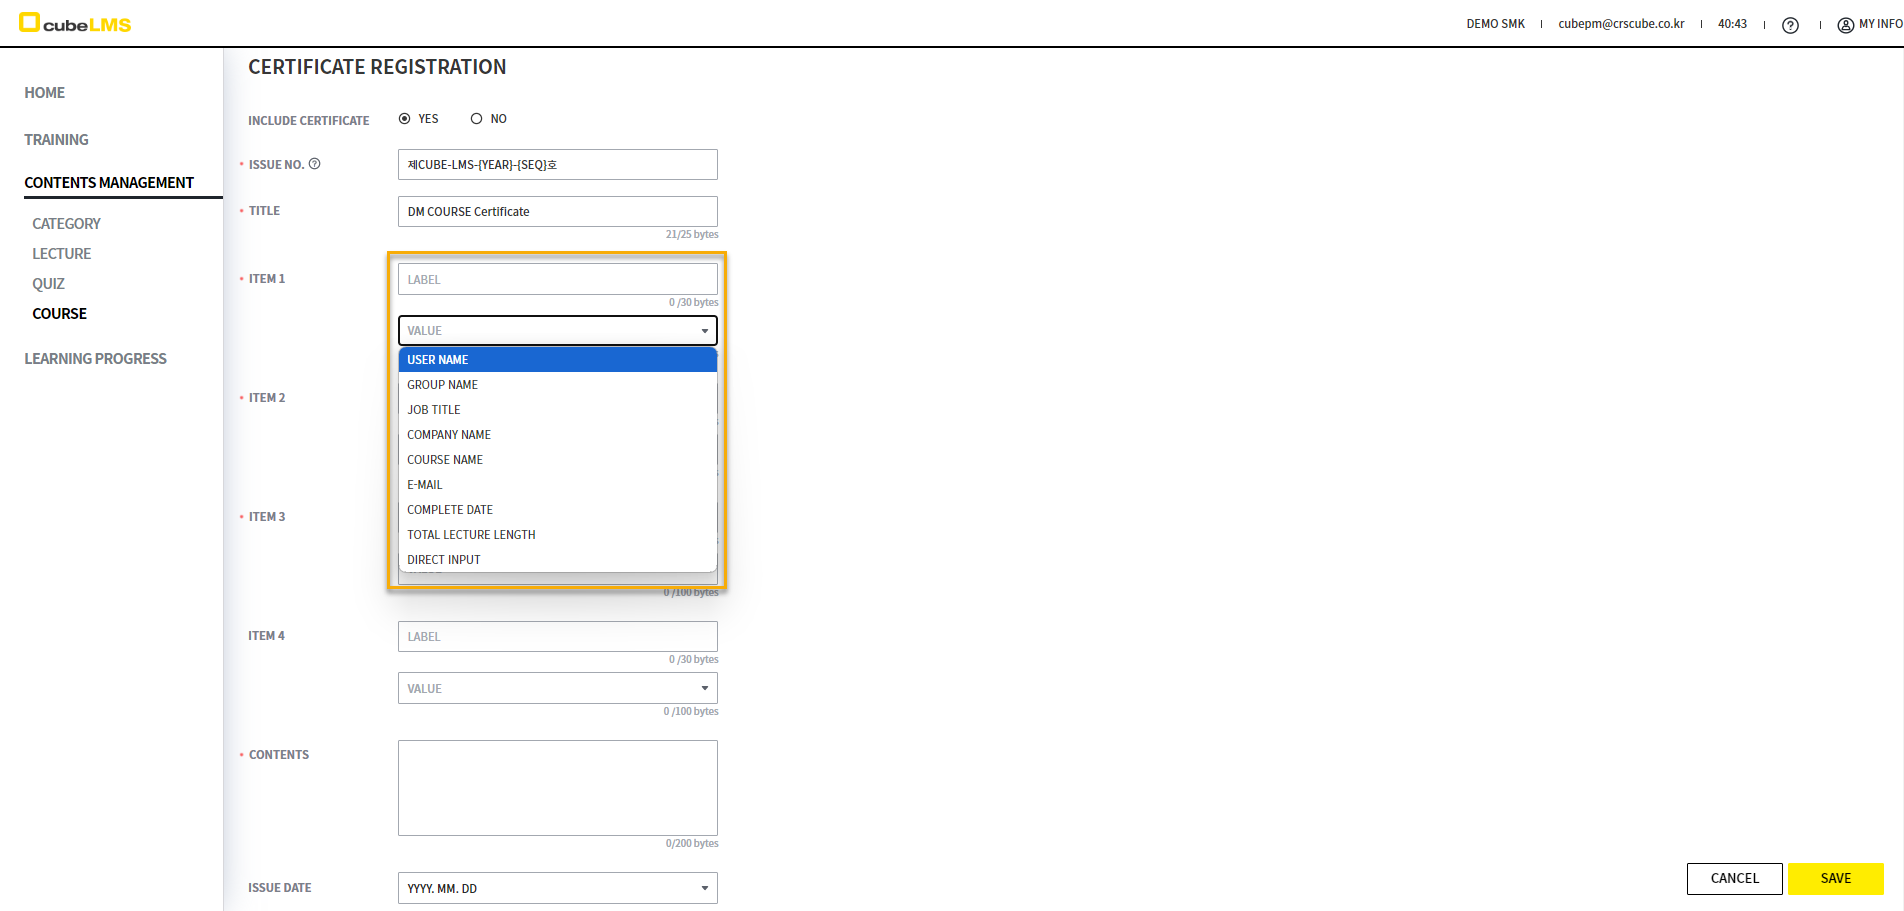
You can enter up to 4 item entries in Certificate. Enter Label and Value for each Item. In DIRECT INPUT, you can freely enter text in the VALUE area other than the specified value. When selected, an additional field appears at the bottom.
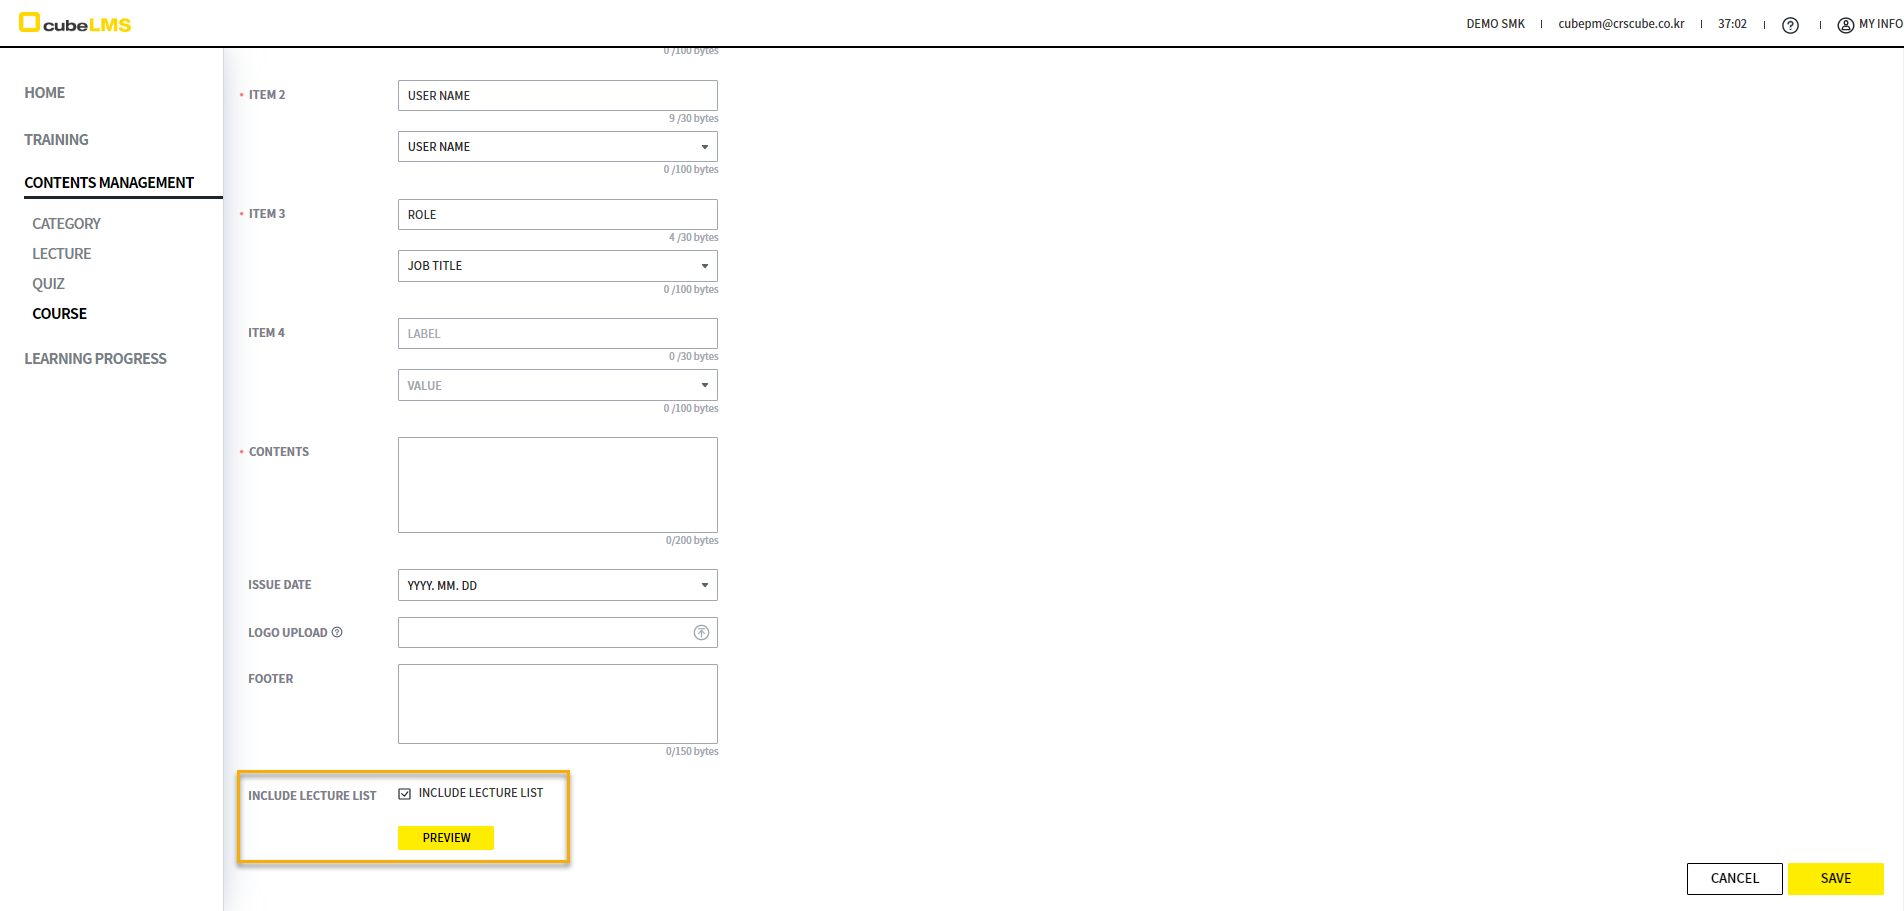
If you check INCLUDED LECTURE LIST, the list of LECTURE items that serve as the completion criteria is issued together with the CERTIFICATE, and you can preview the configured CERTIFICATE by clicking PREVIEW.
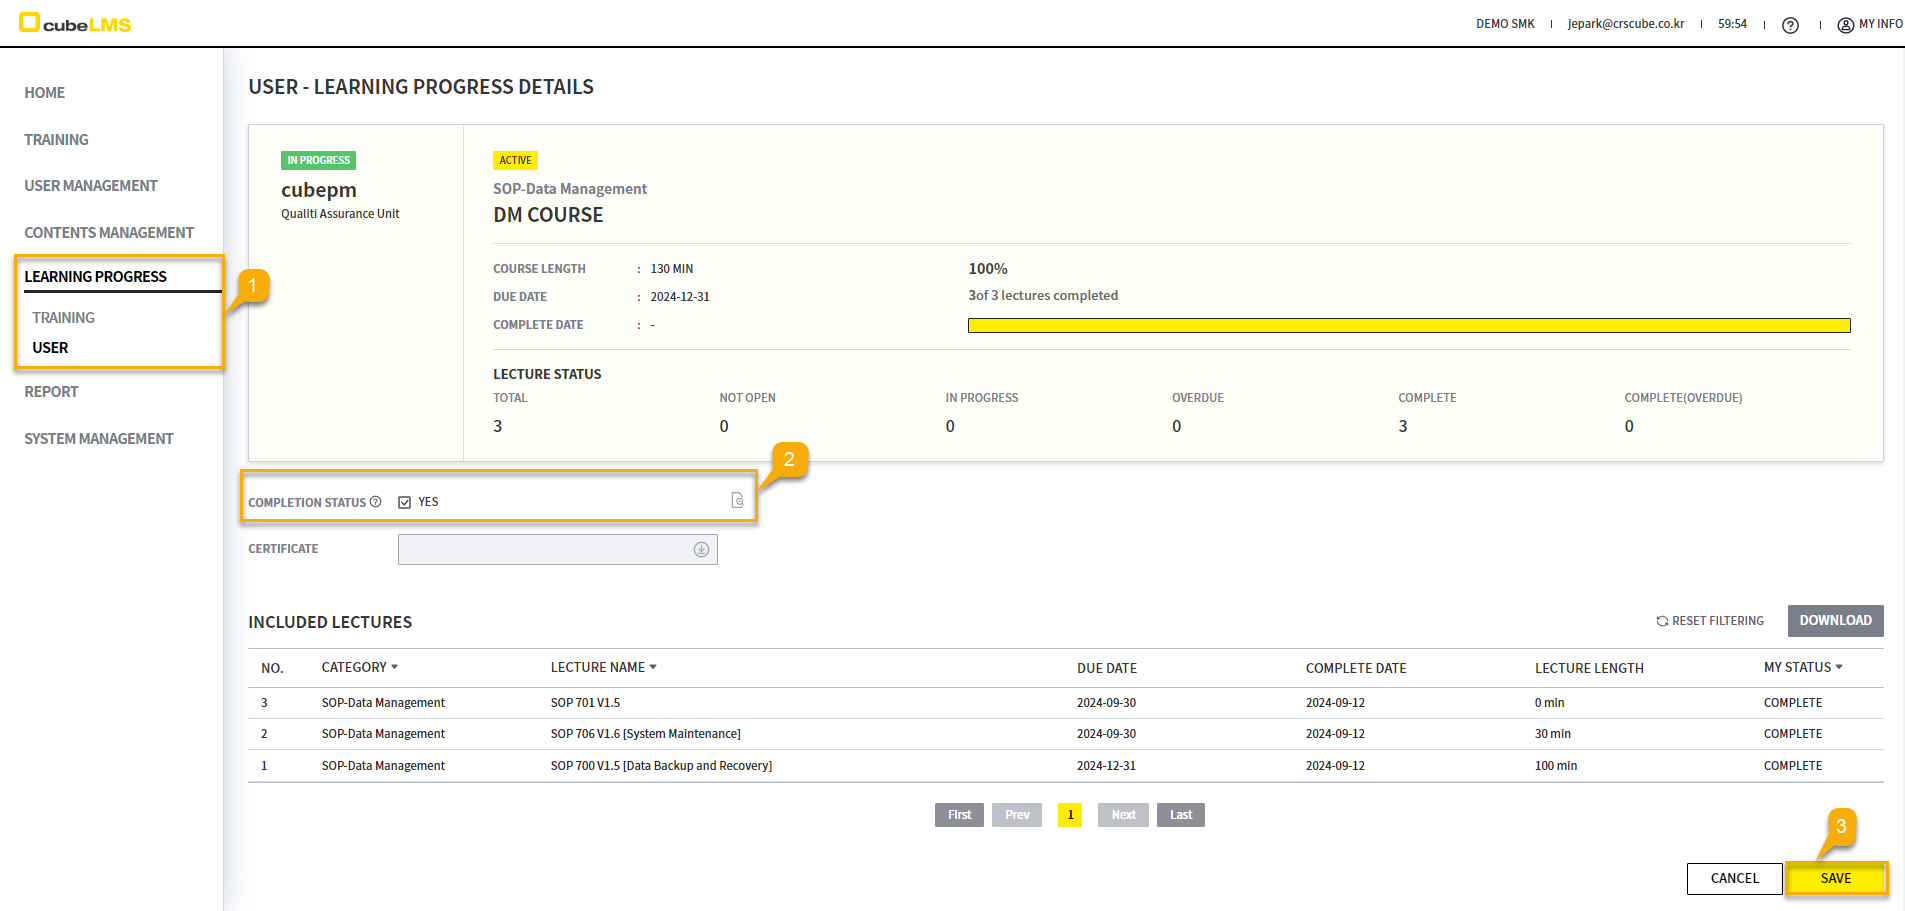
[LEARNING PROGRESS]
TRAINING
You can check the progress of your training history for each Training. (Please refer to the link for the display conditions for each R&P. )
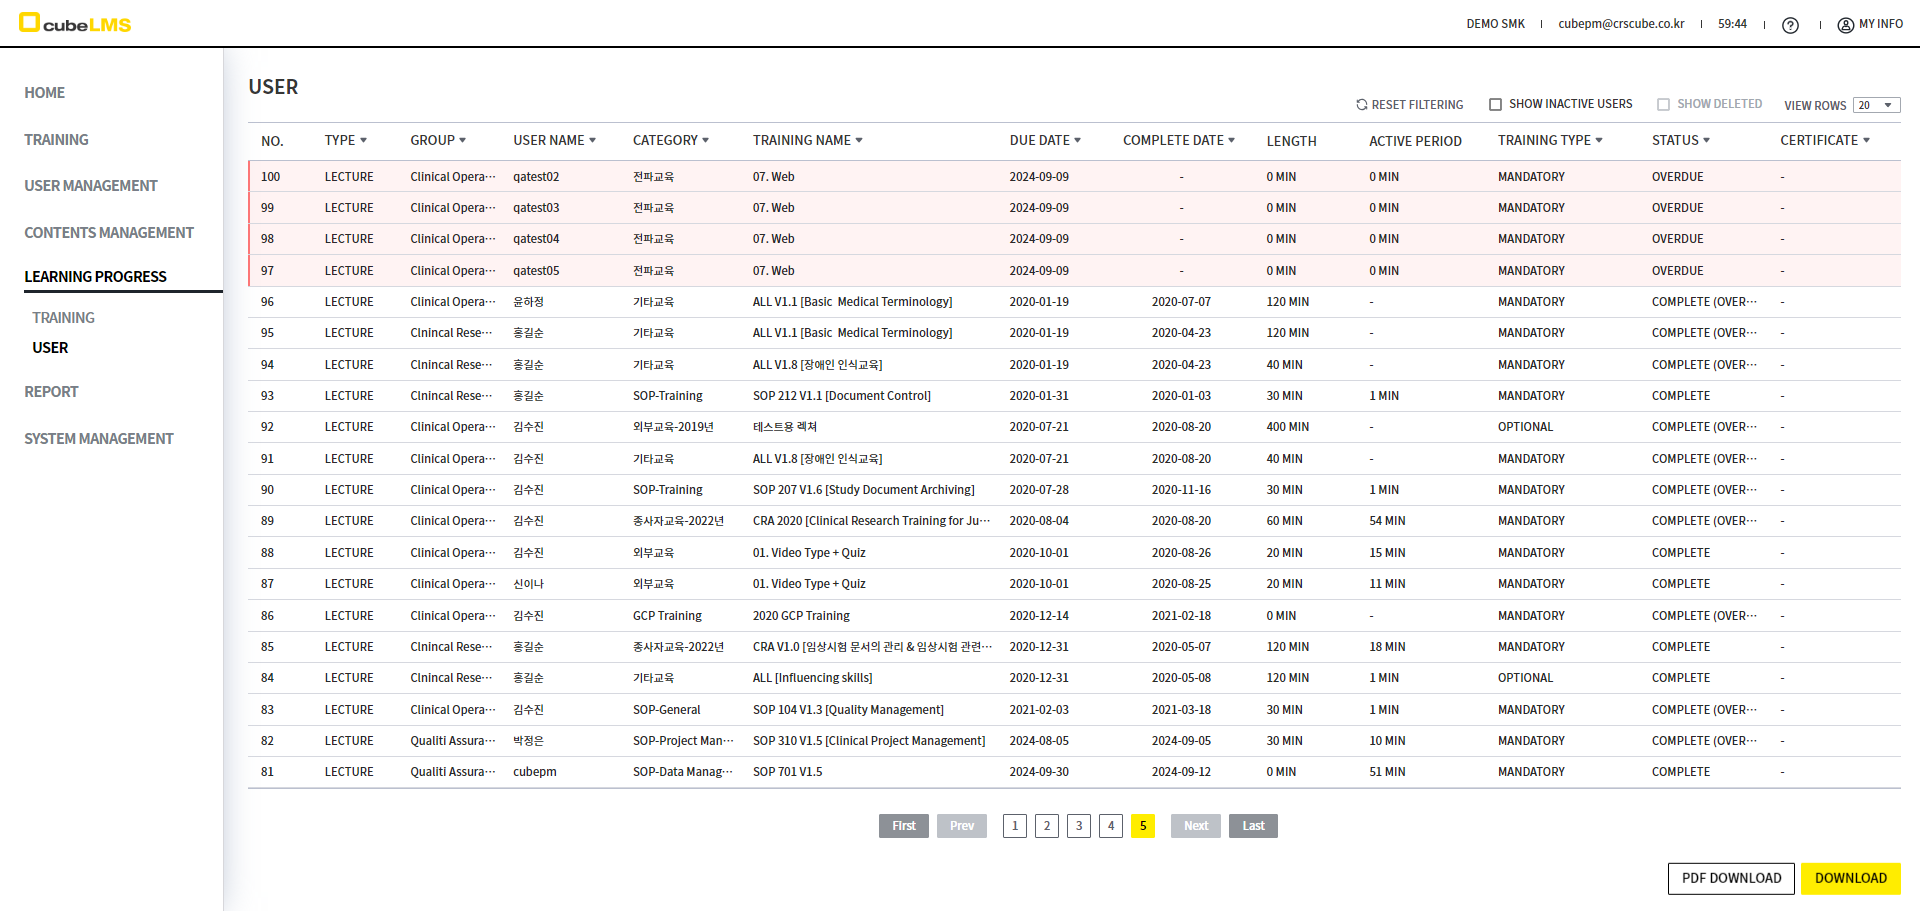
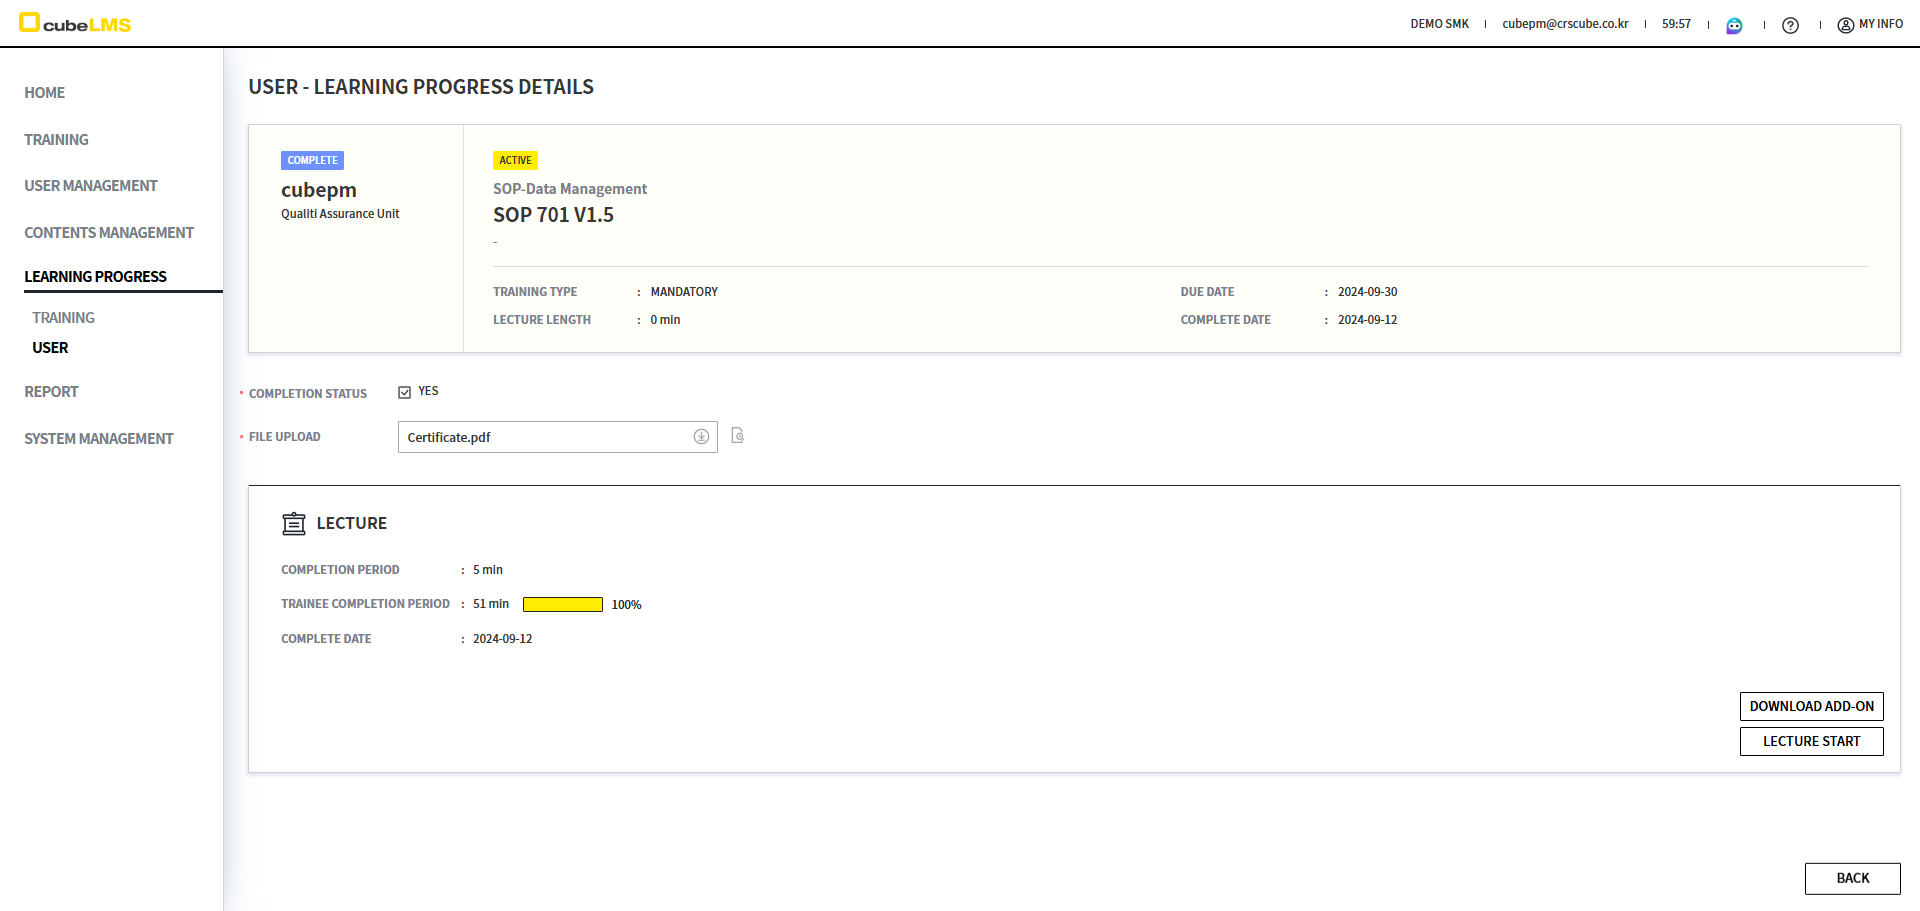
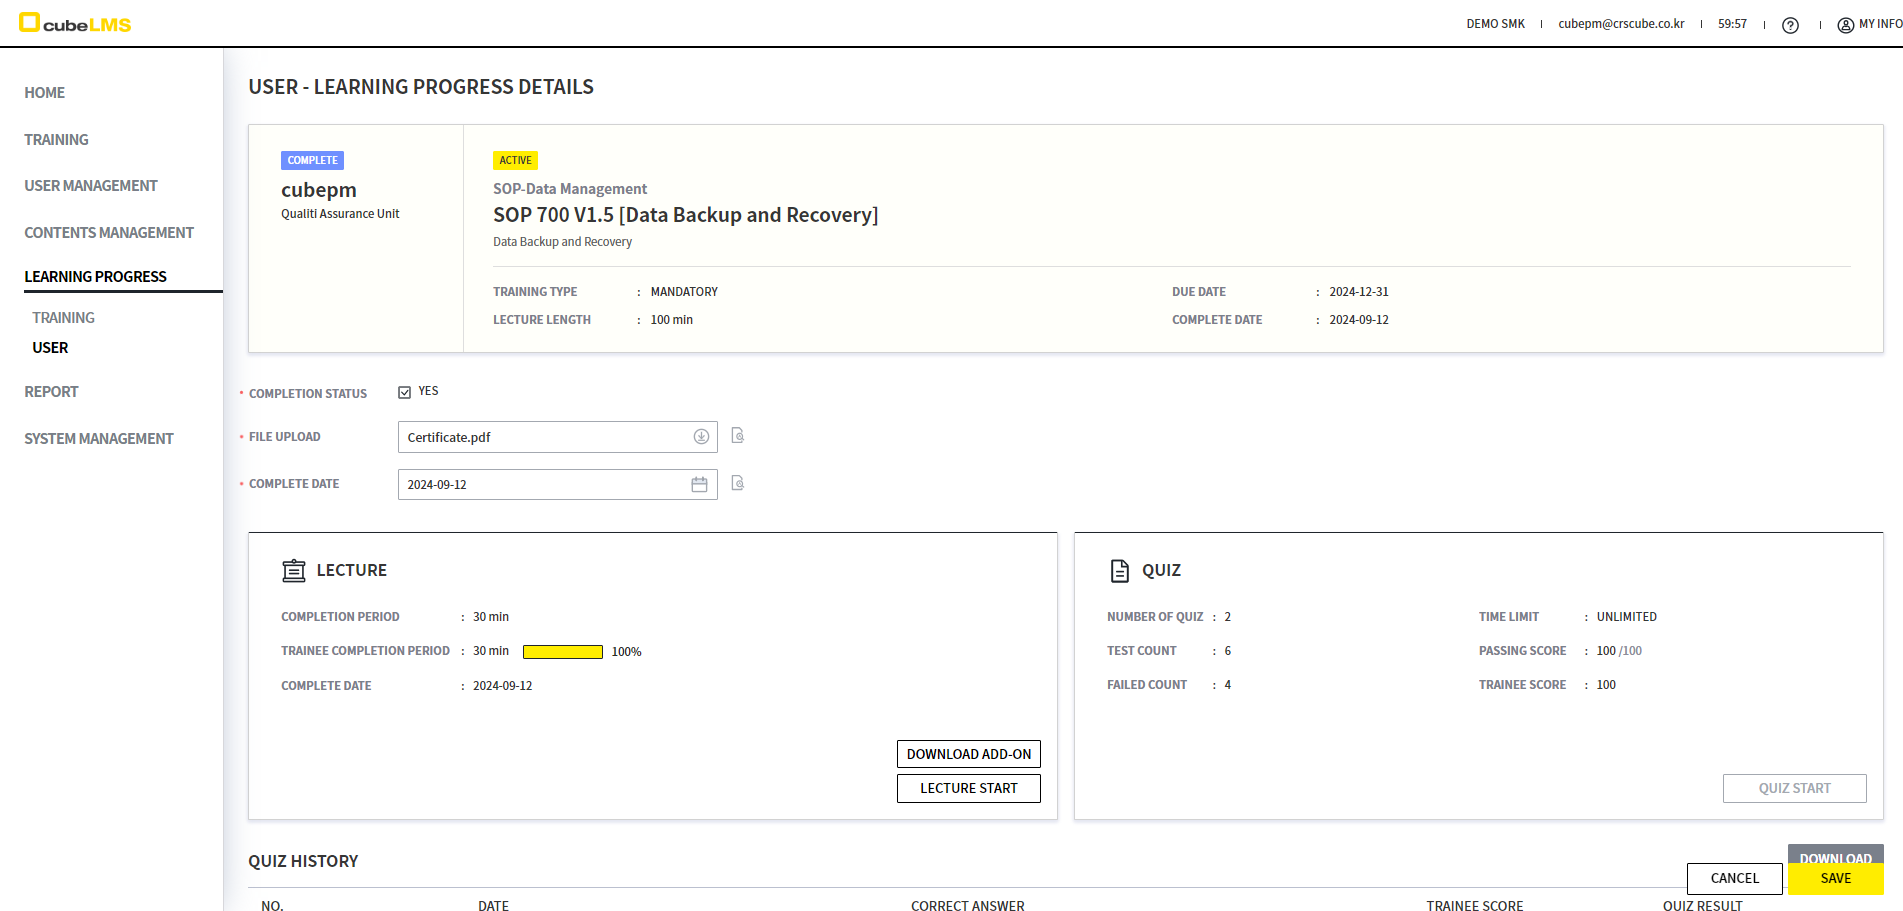
USER
You can view additional information such as DUE DATE and COMPLETE DATE along with your training history. Click a specific row to view detailed training history. (Please refer to the corresponding link for the conditions displayed for each R&P. )
TRAINEE
[TRAINING]
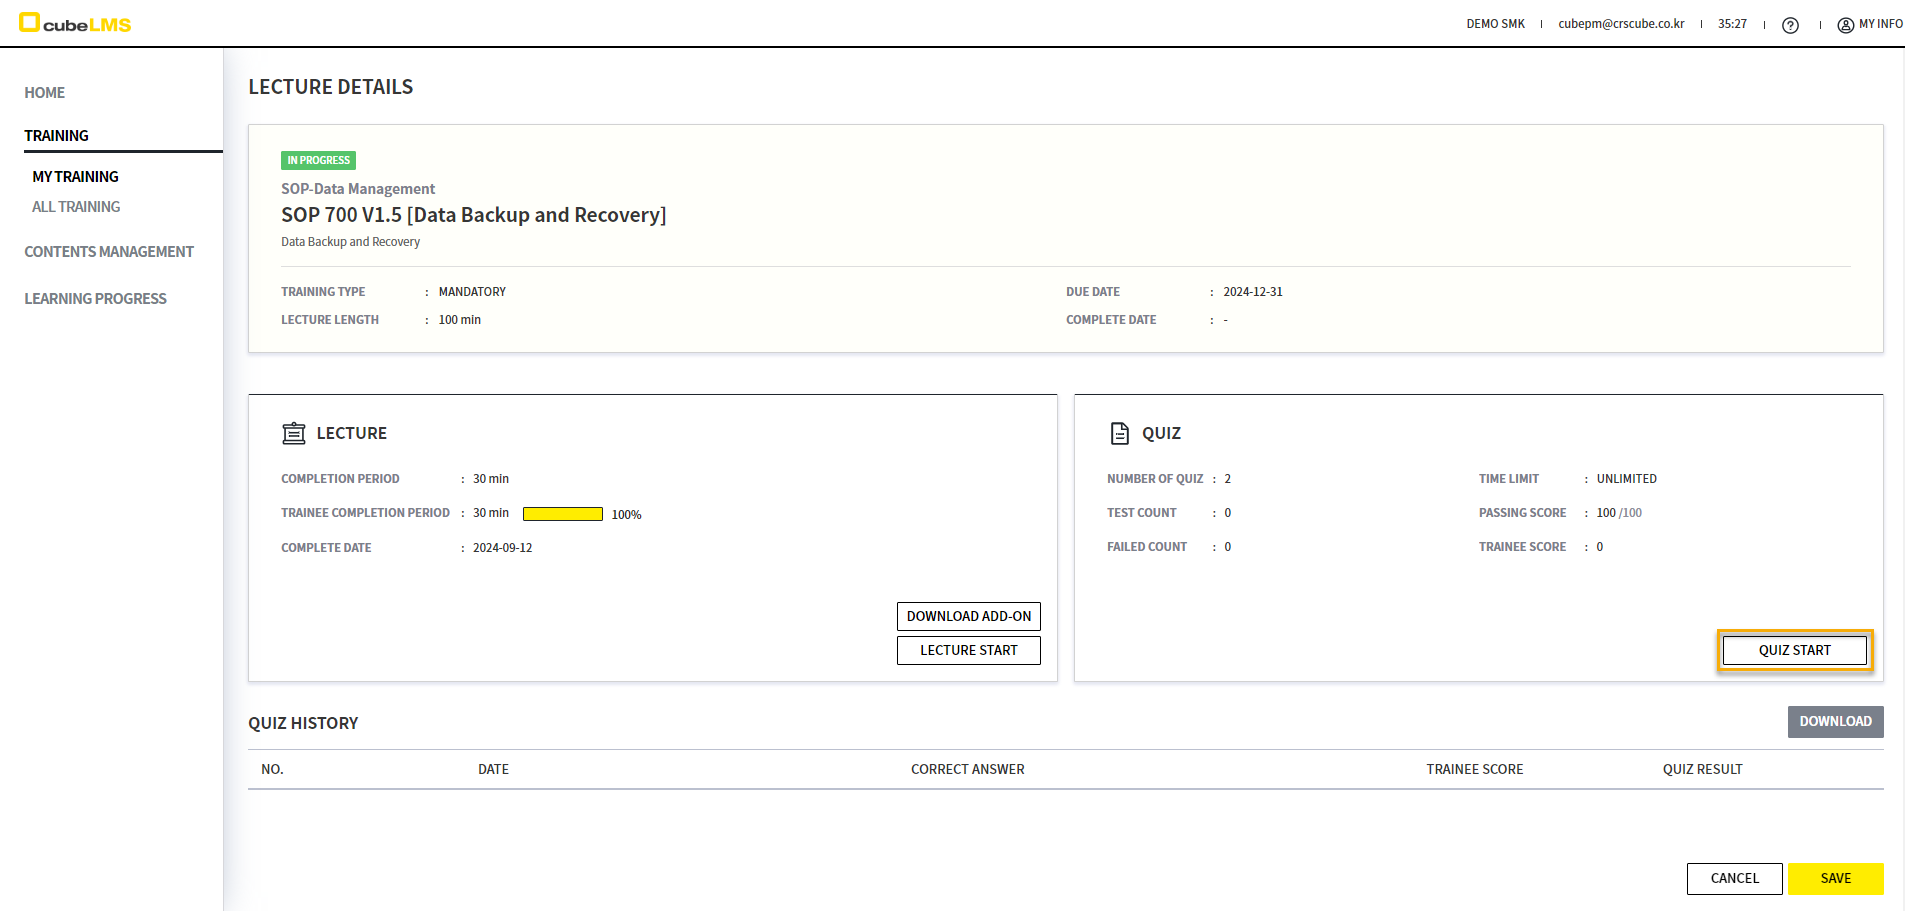
You can take Lecture and Course.
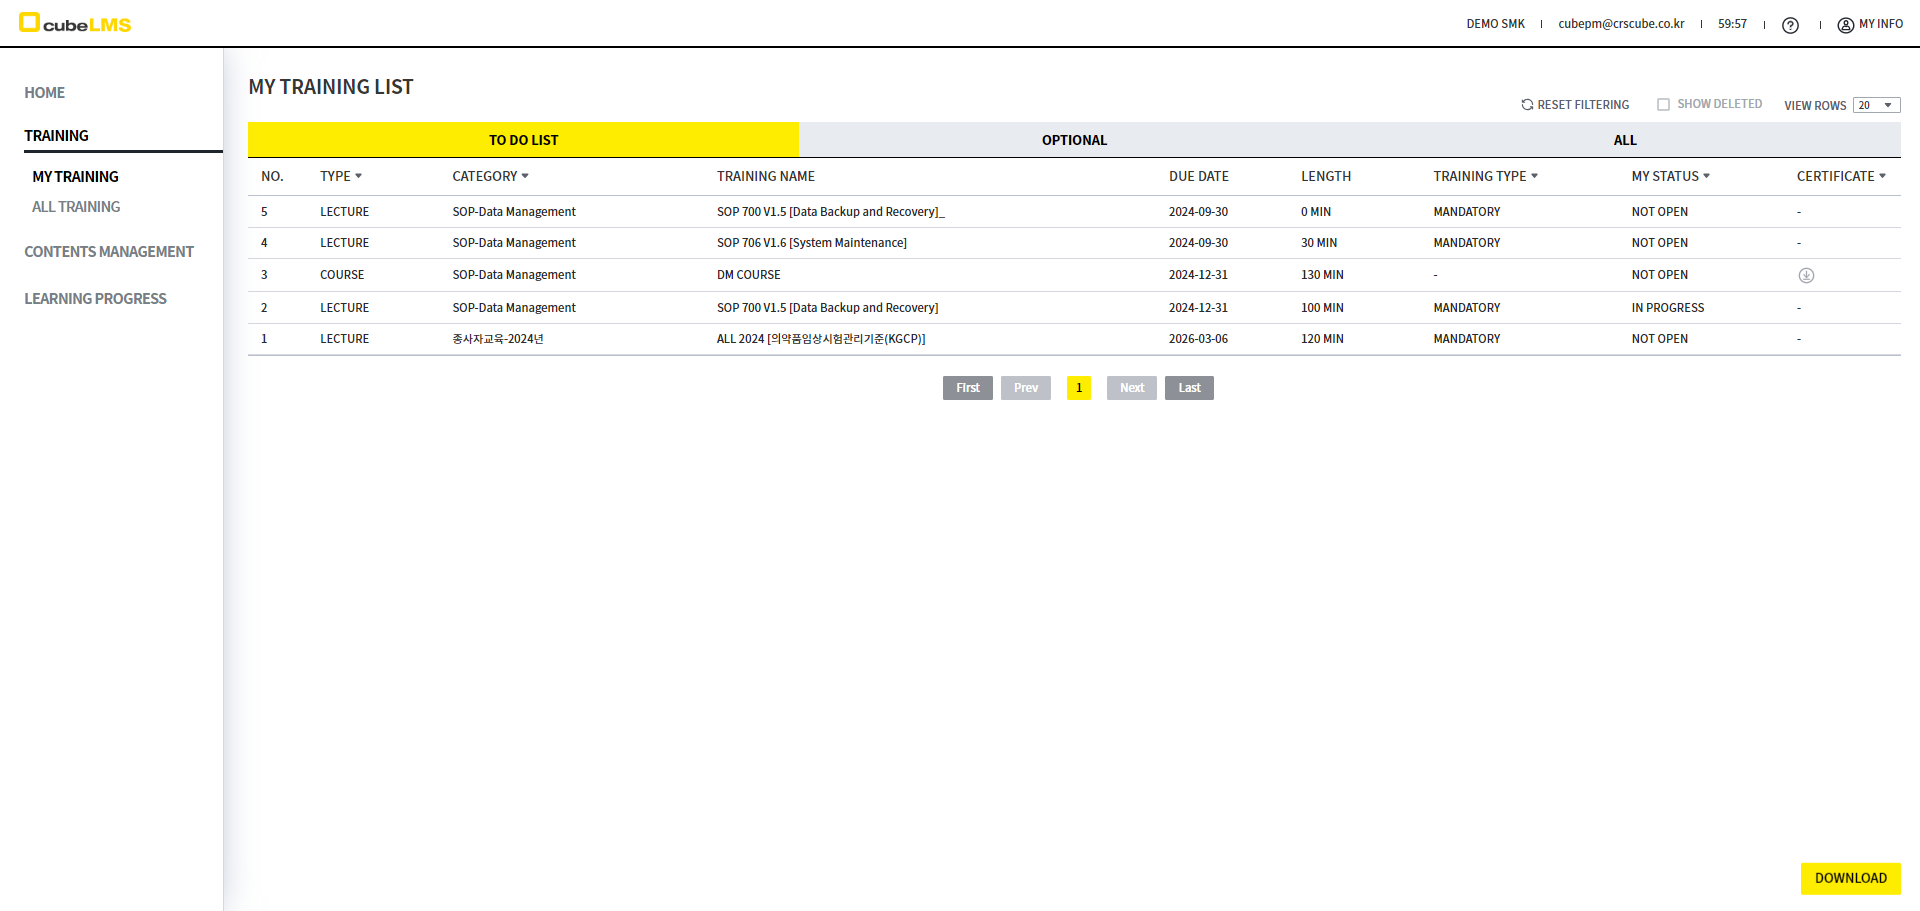
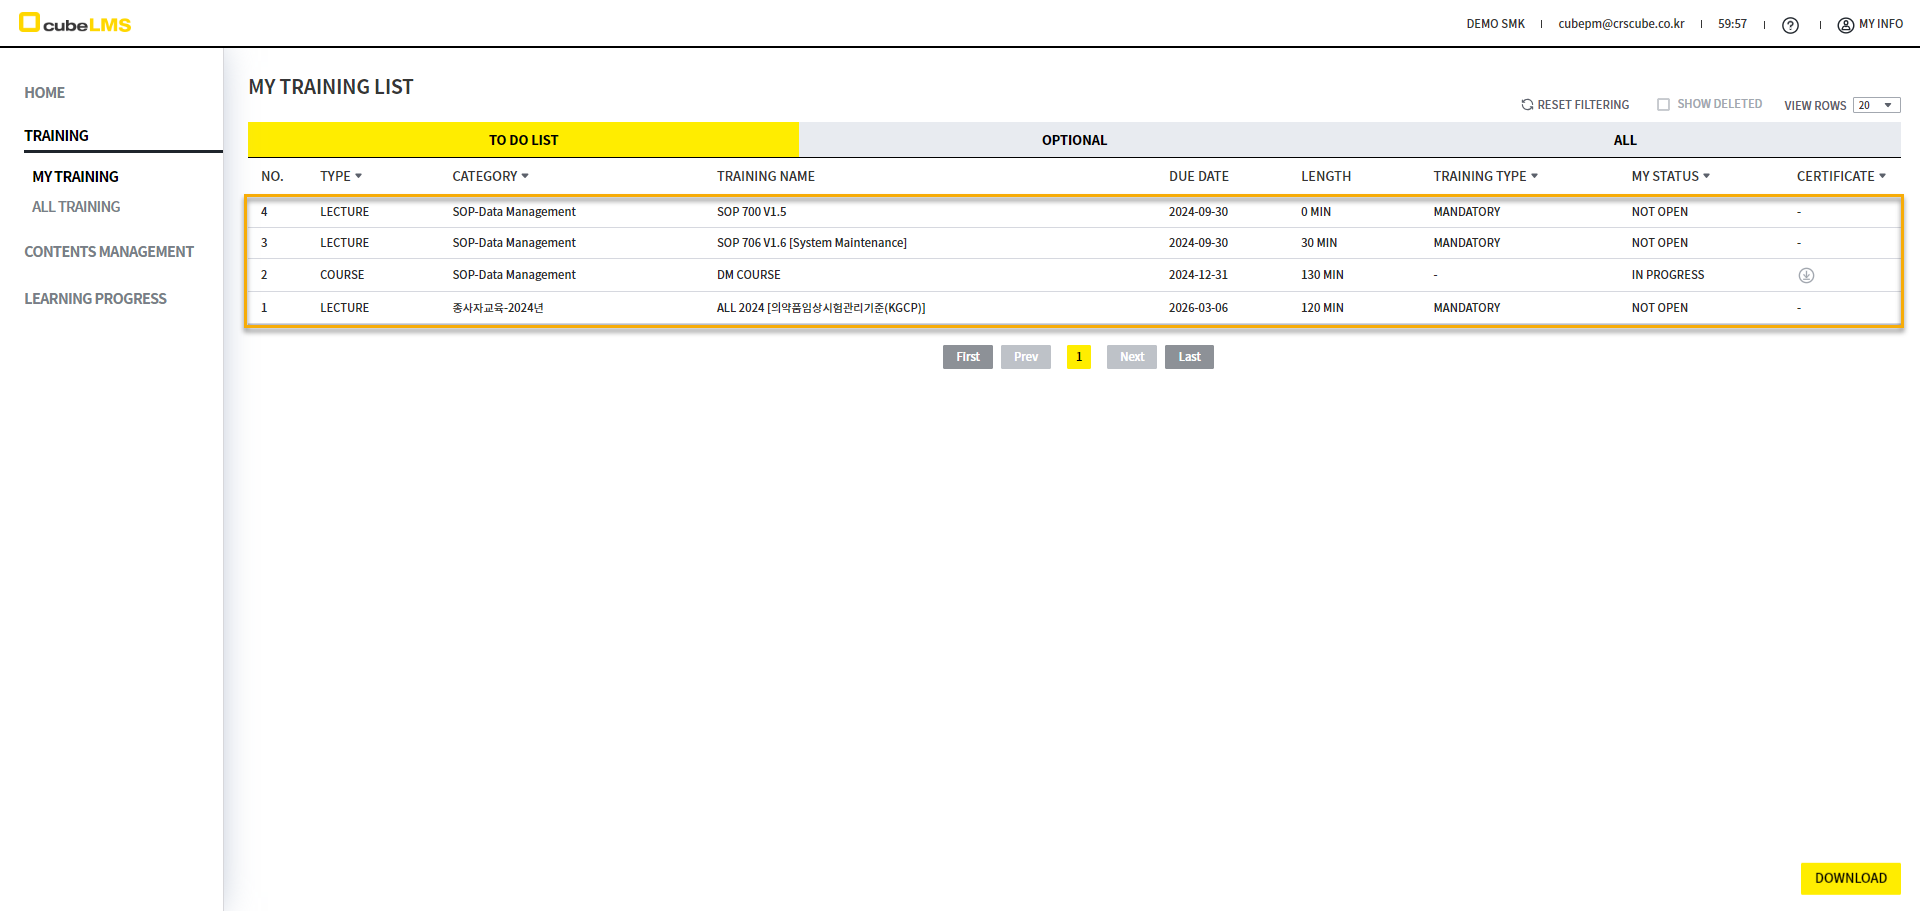
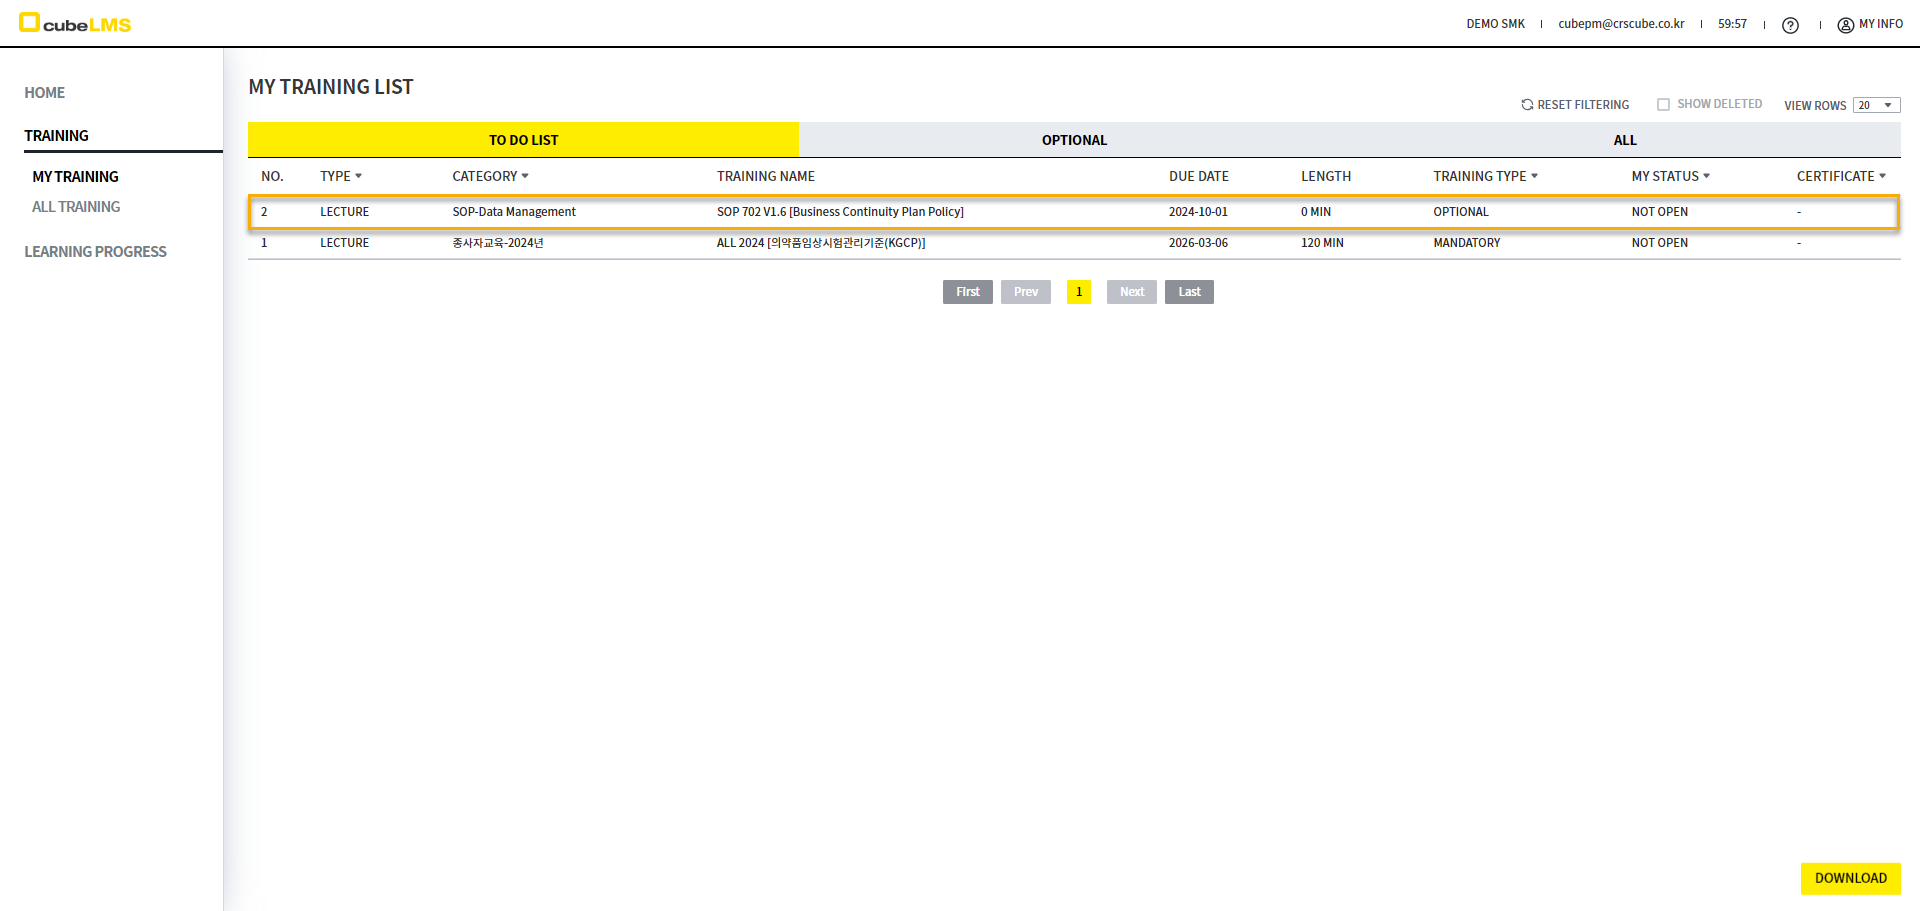
TO DO LIST-LECTURE
Select the Lecture you need to take from TO DO LIST to move to the detail screen.
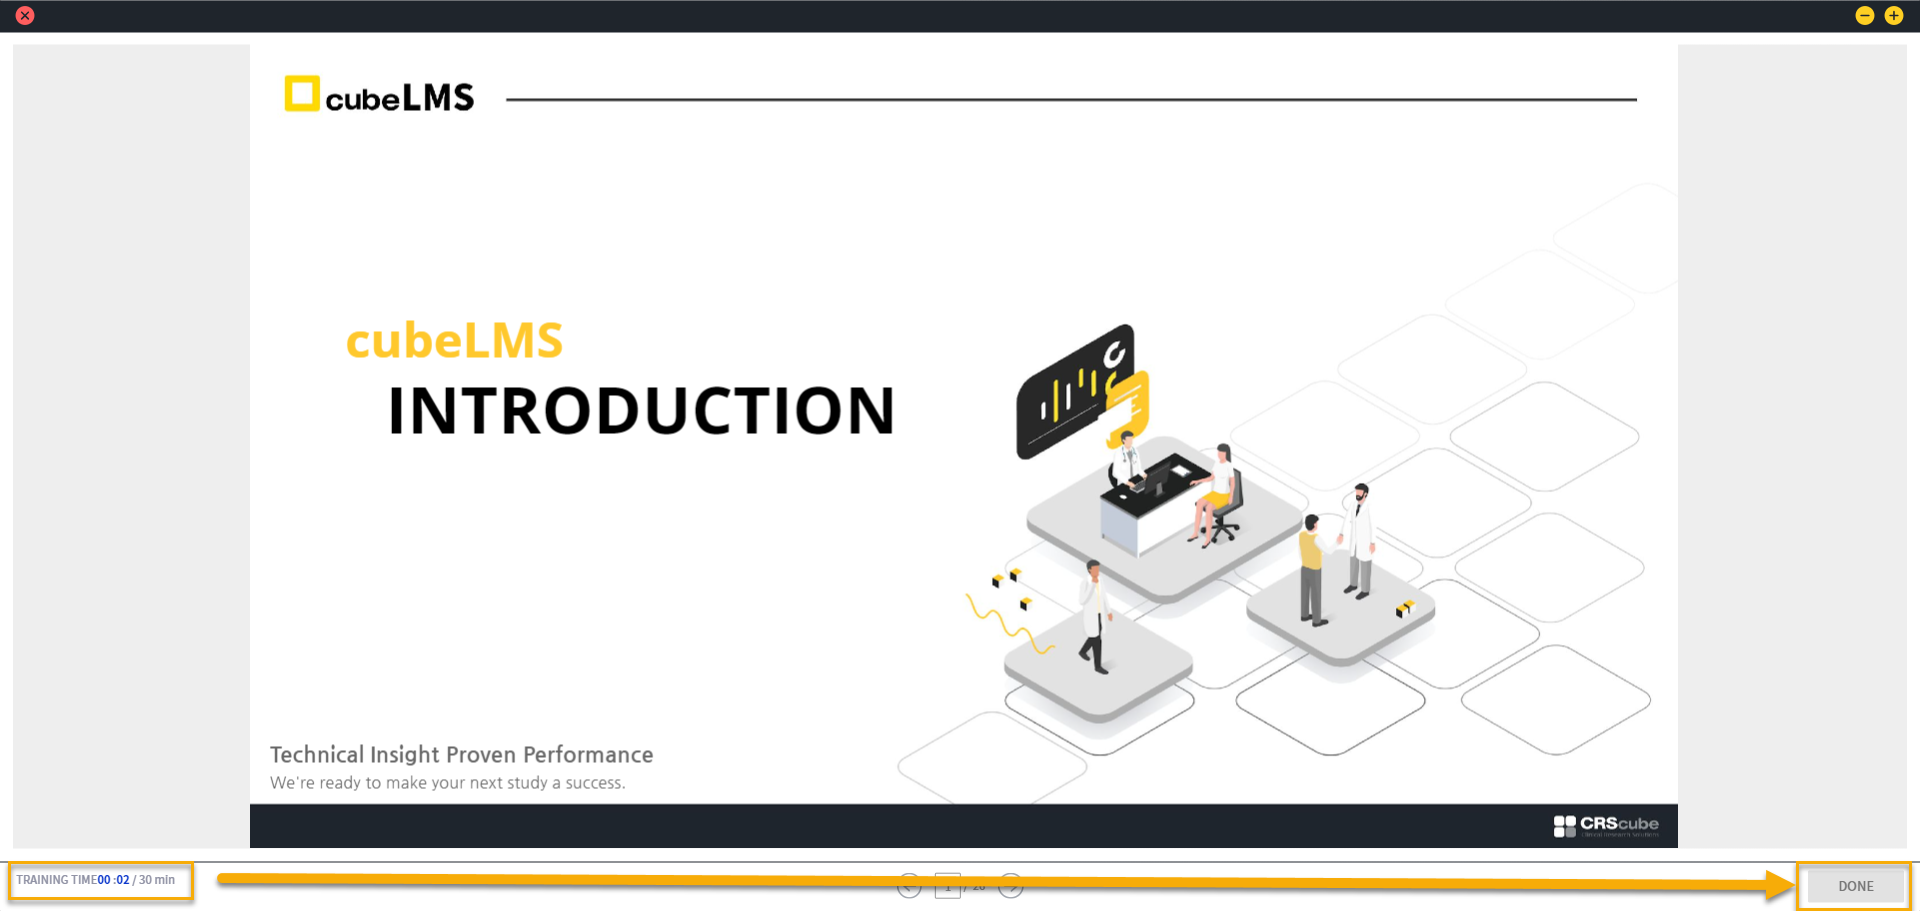
If an ADD-ON FILE is available, you can download additional attachments with the DOWNLOAD ADD-ON button and study Contents with the LECTURE STAR button.
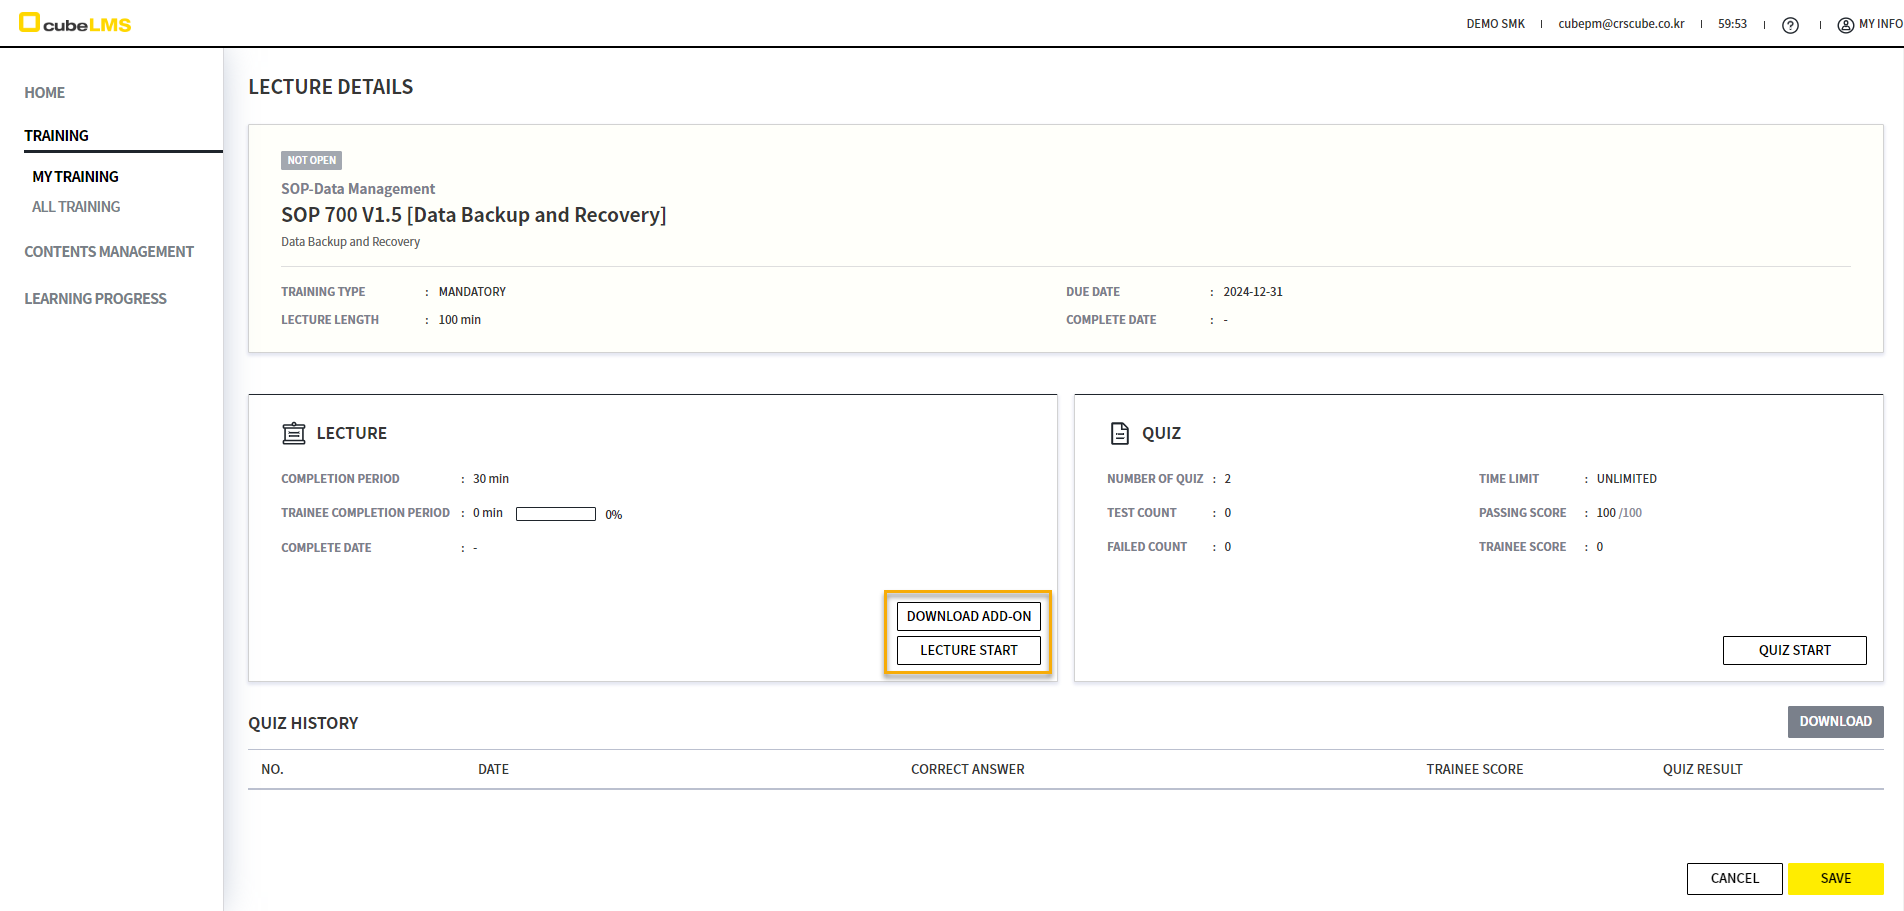
You must activate the Contents window according to the time set in Lecture before the DONE button is enabled, and then you can complete the Contents.
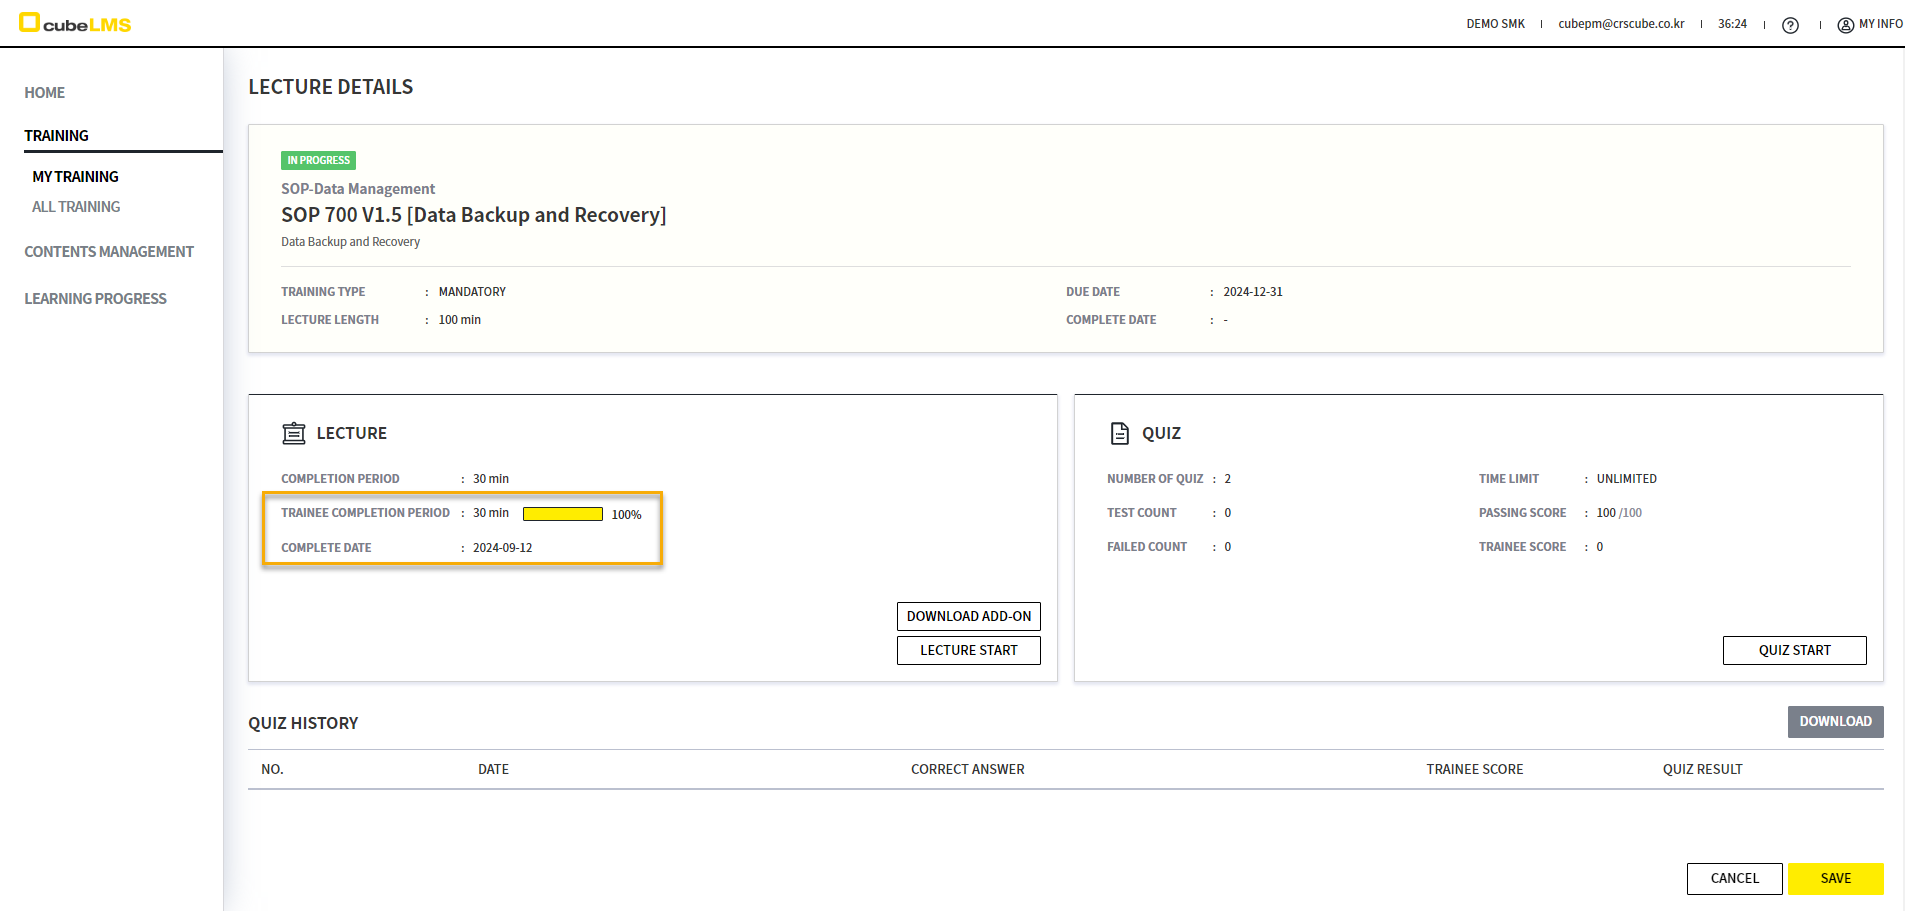
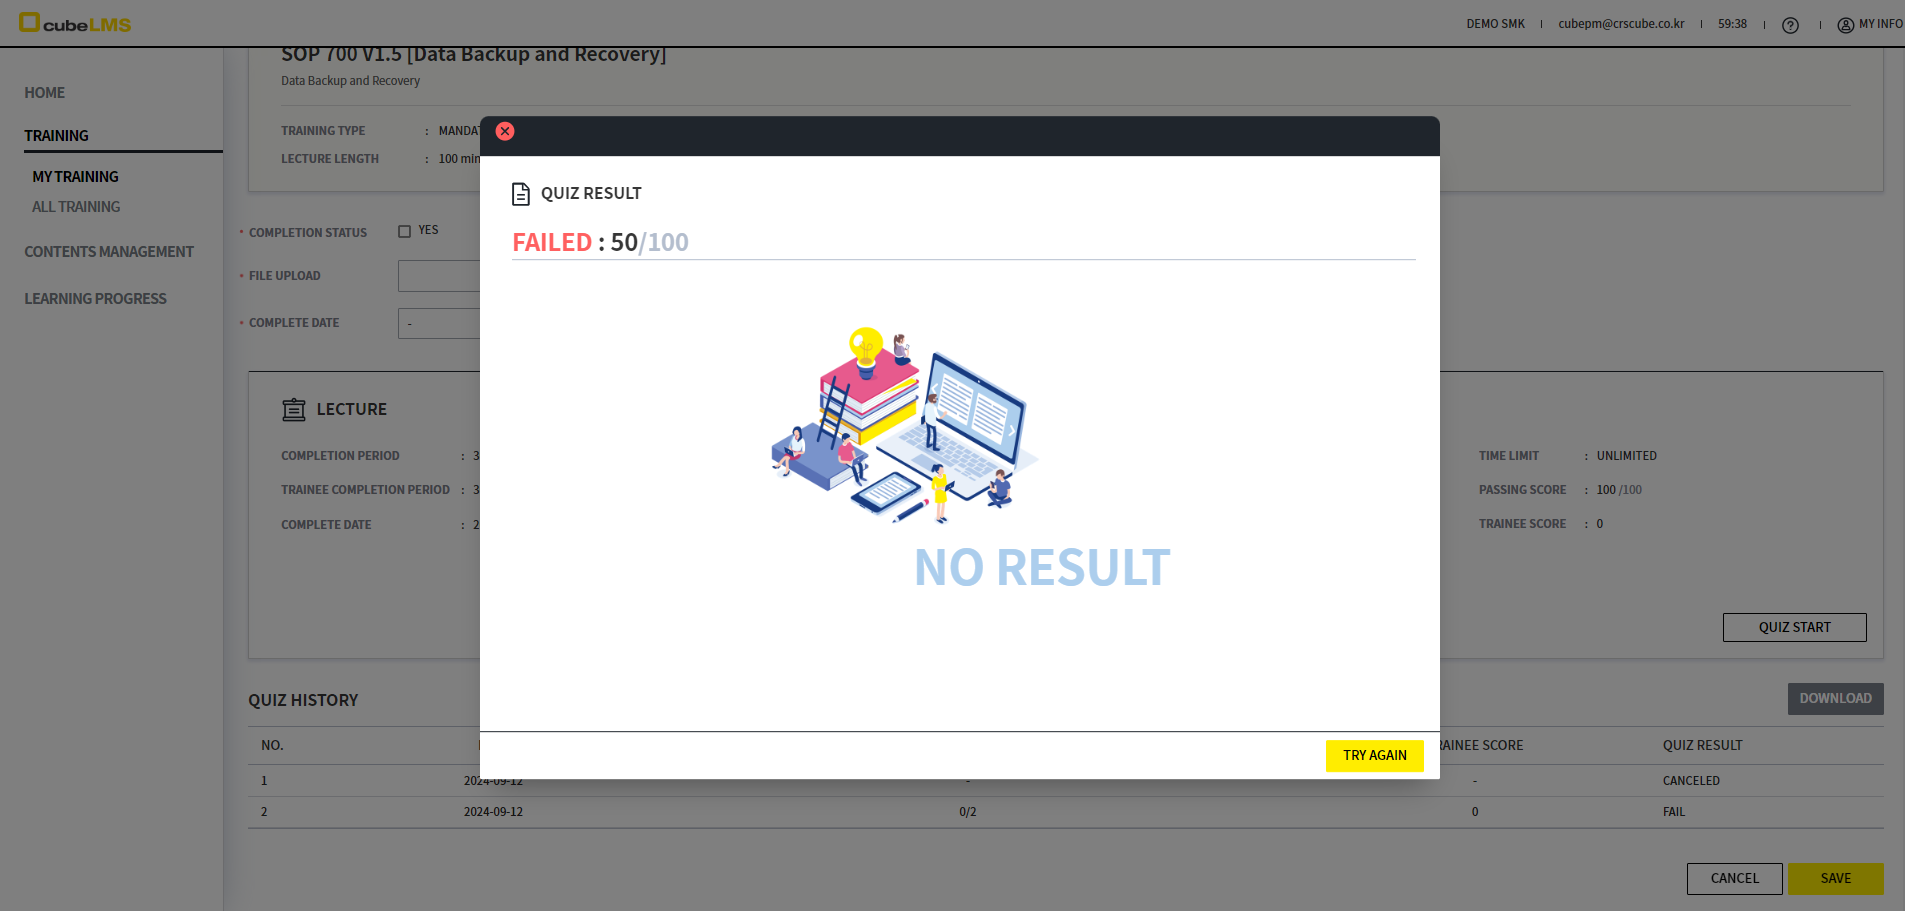
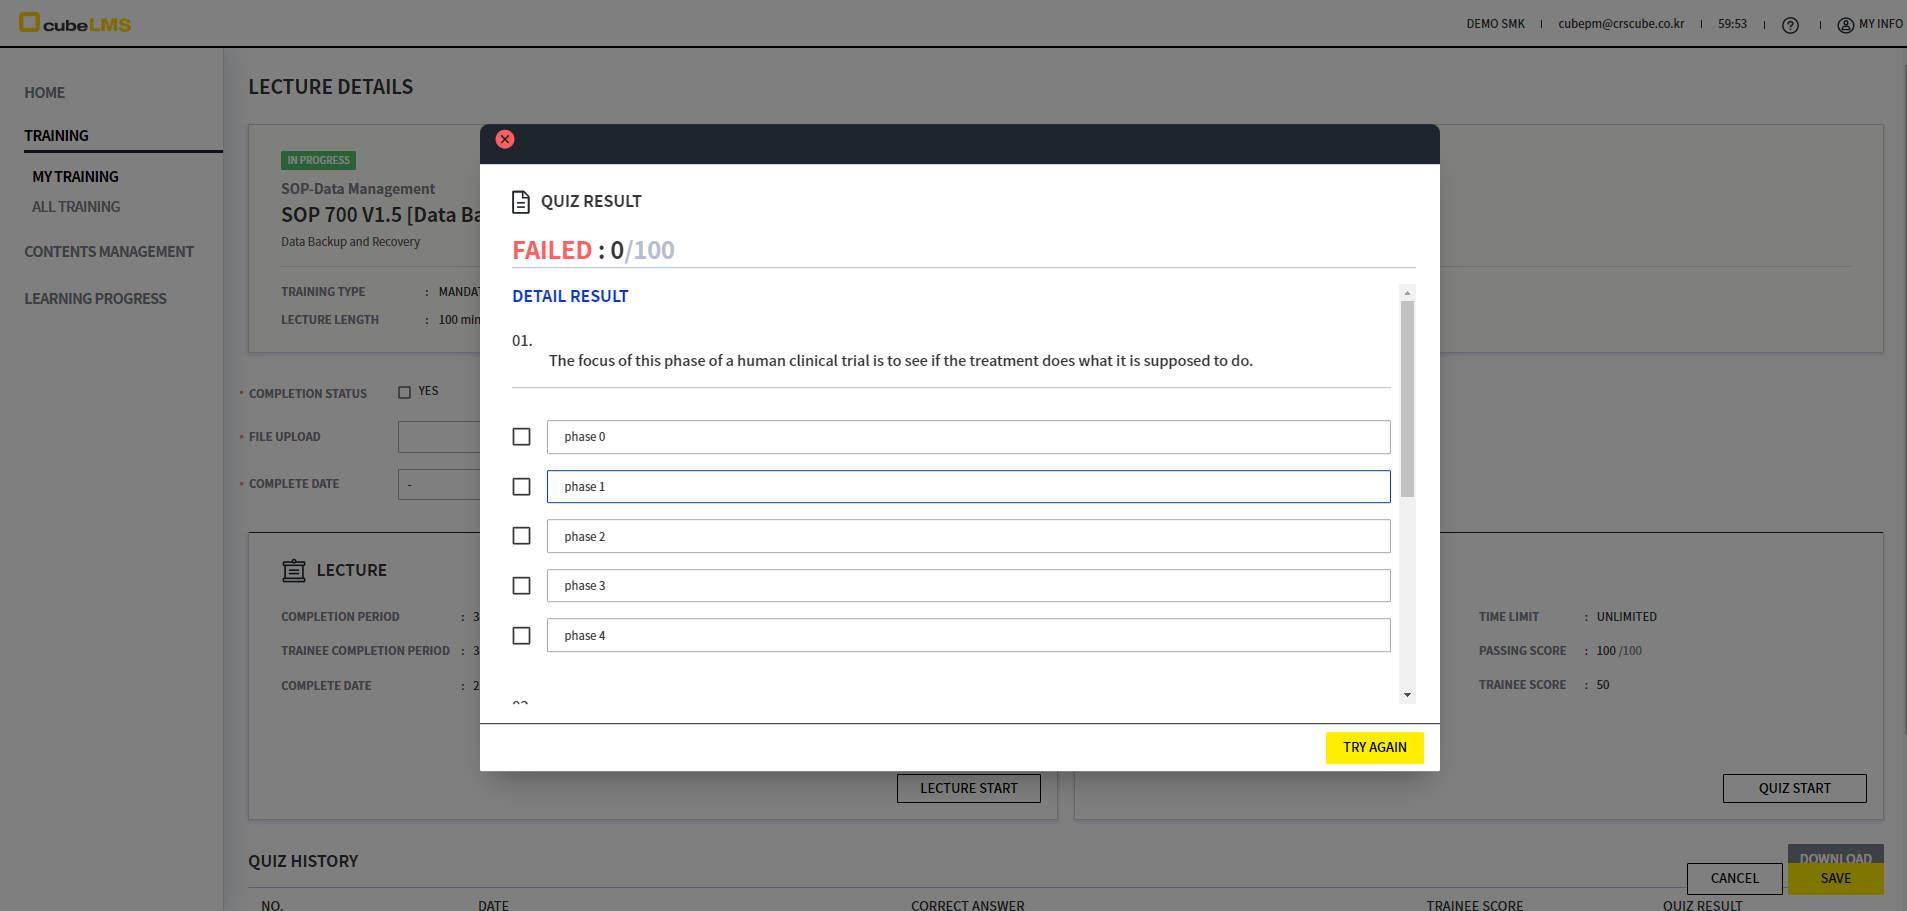
When you click the QUIZ START button, a window for taking the Quiz appears, and you can take the Quiz.
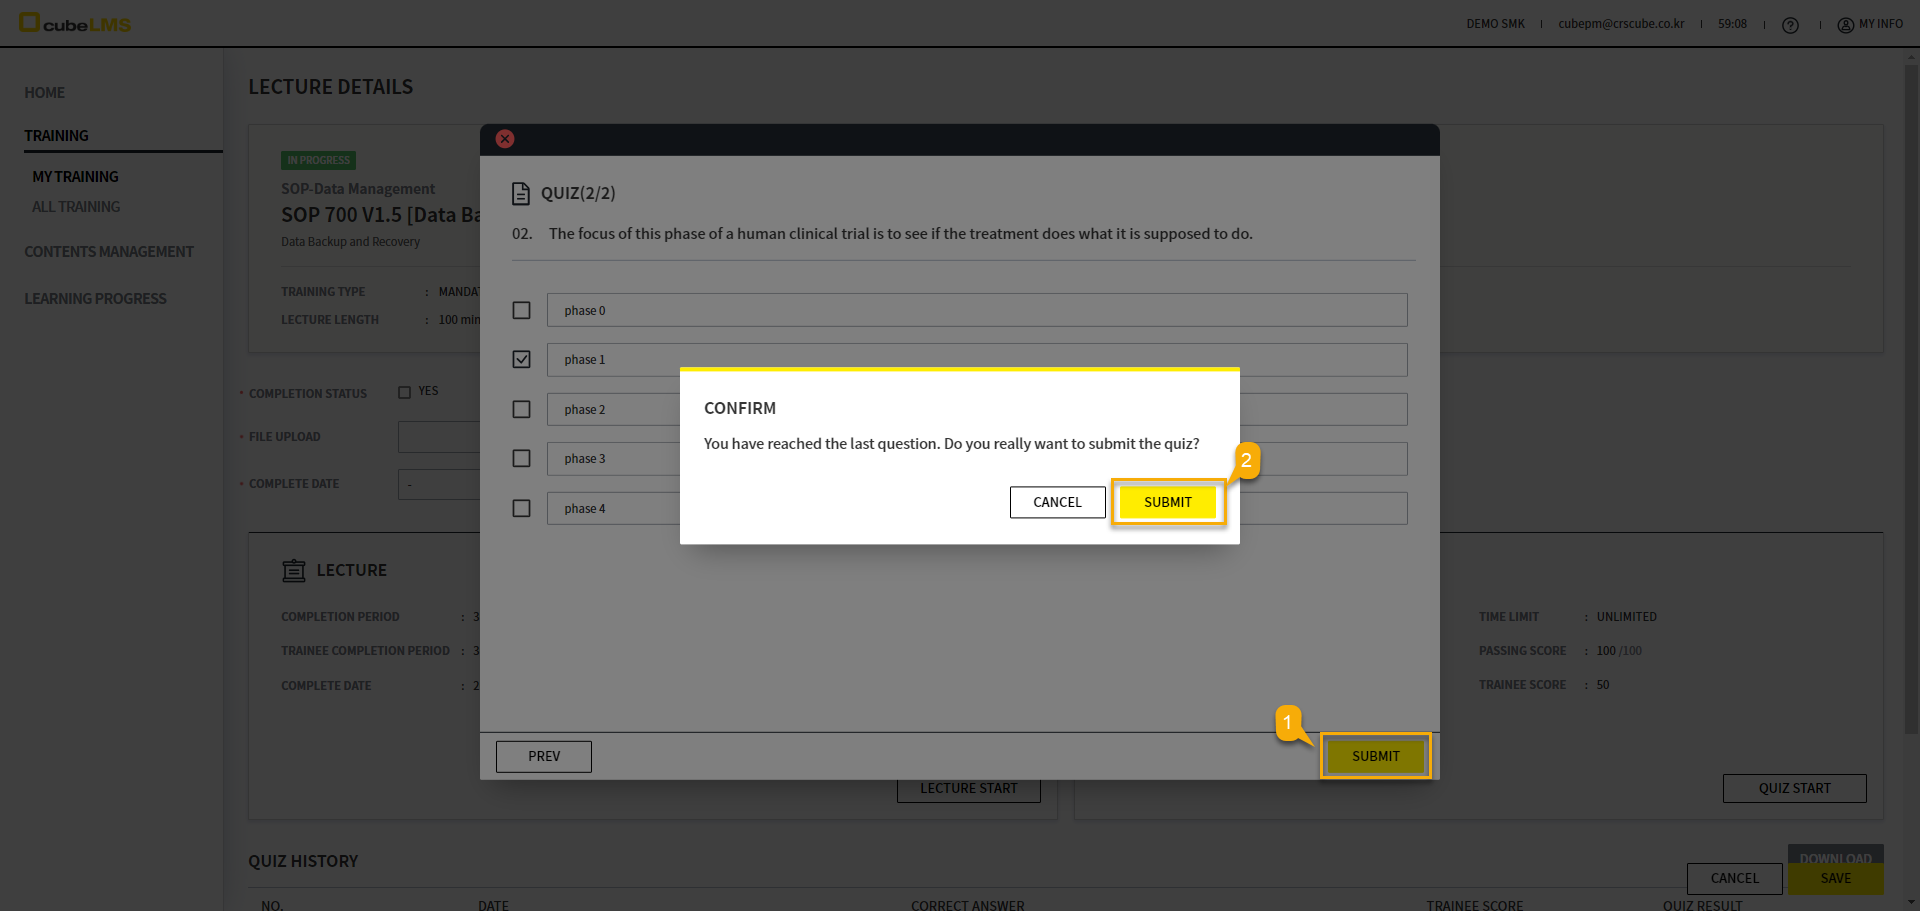
Trainee can check the answer they think is correct and select the NEXT button to move to the next question. However, depending on the Quiz type in the Lecture, whether moving to the next question is allowed after selecting an incorrect answer is determined. The screen below is the Quiz pop-up window displayed when Quiz type 1 is selected, and an instruction message is shown in blue at the top.
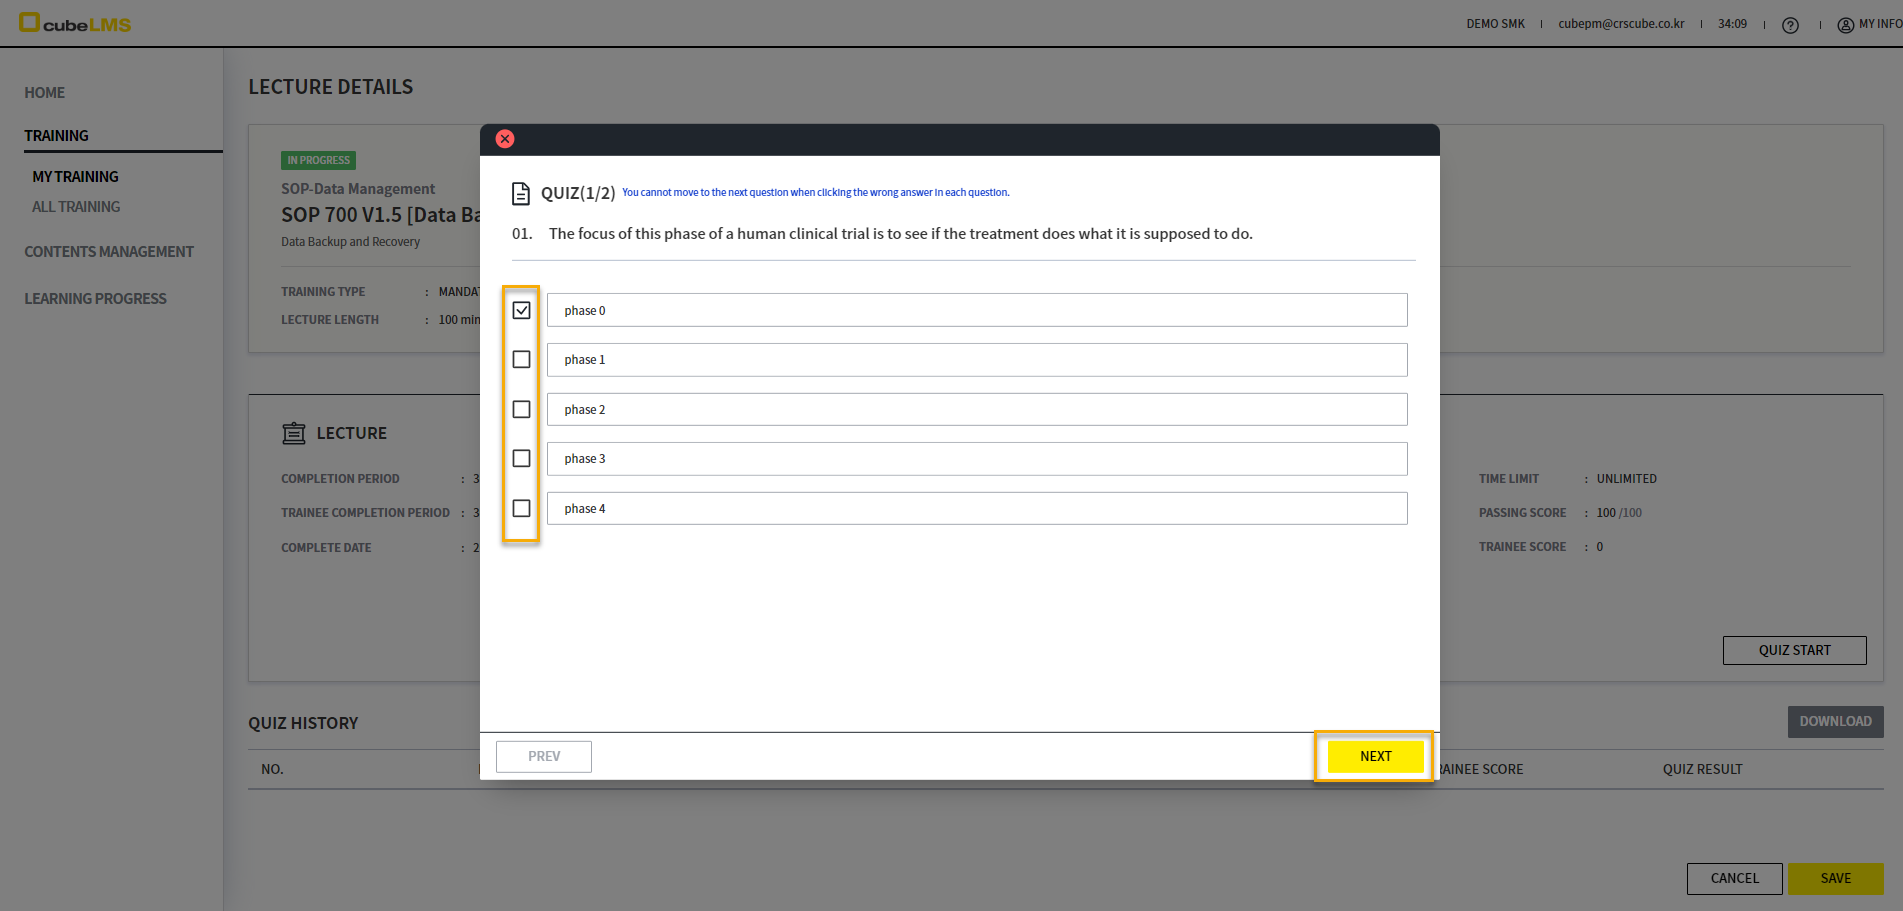
The SUBMIT button appears on the last question. When you select the SUBMIT button, the CONFIRM pop-up window appears, and if you select SUBMIT, the Quiz is completed and the QUIZ RESULT window is displayed.
If you pass all Quiz questions and the Lecture's Complete date is Auto assign, it is automatically marked as Complete.
You can check the Quiz history in QUIZ HISTORY. If Quiz type is 2, you can check how many times you Fail.
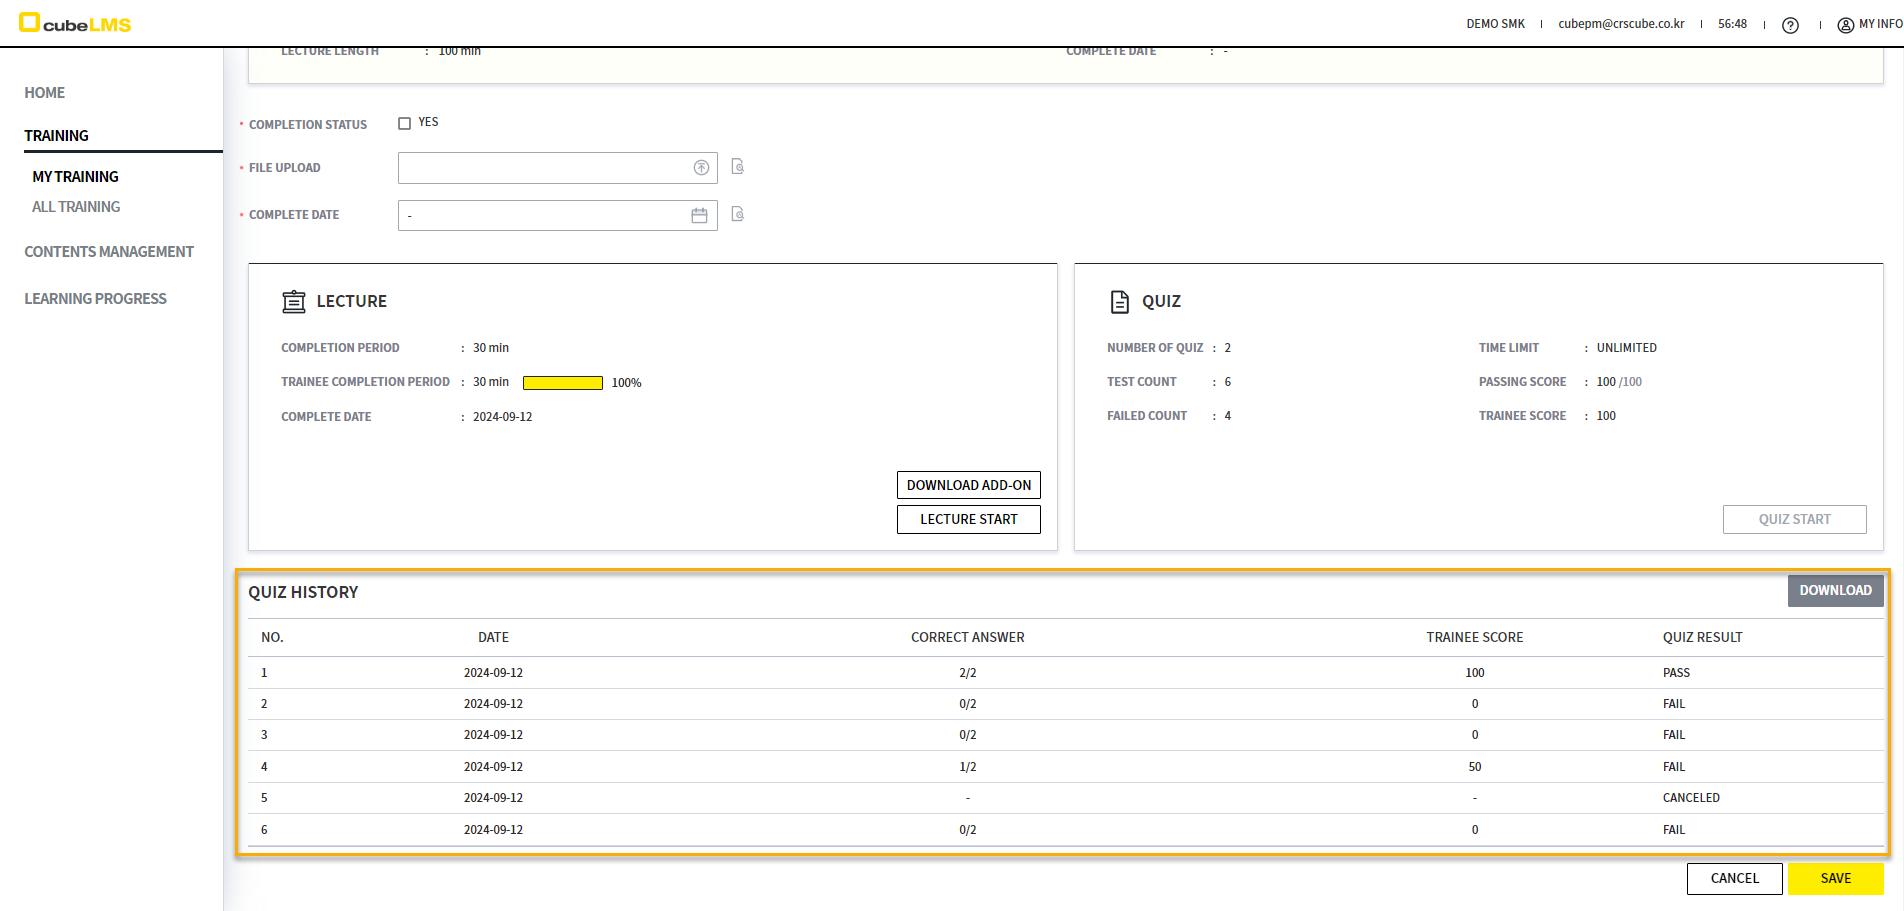
If Attachment is checked when registering a Lecture, the FILE UPLOAD field is displayed and you can Upload a File. If Complete date is set to Trainee assign when registering a Lecture, the COMPLETE DATE field is displayed and the Trainee can enter the completion date. If you complete all items required to finish the Lecture, you can check COMPLETION STATUS to complete it.
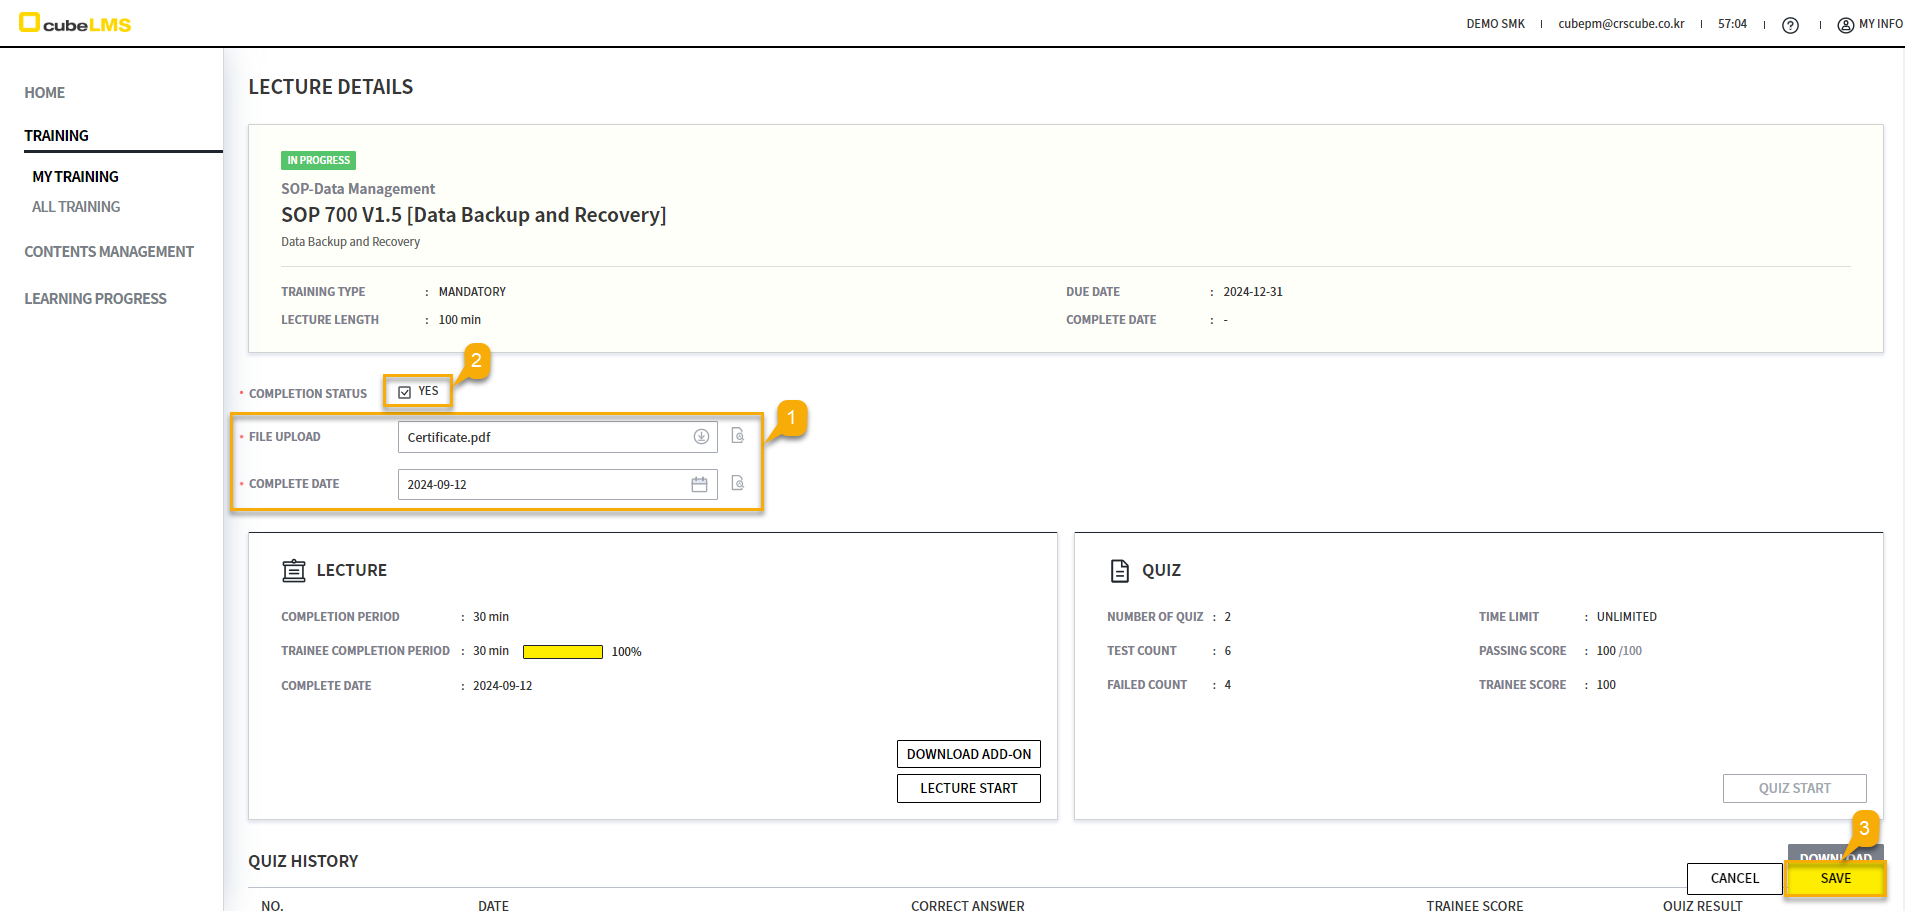
After the Lecture is completed, it moves from the TO DO LIST tab to the ALL tab.
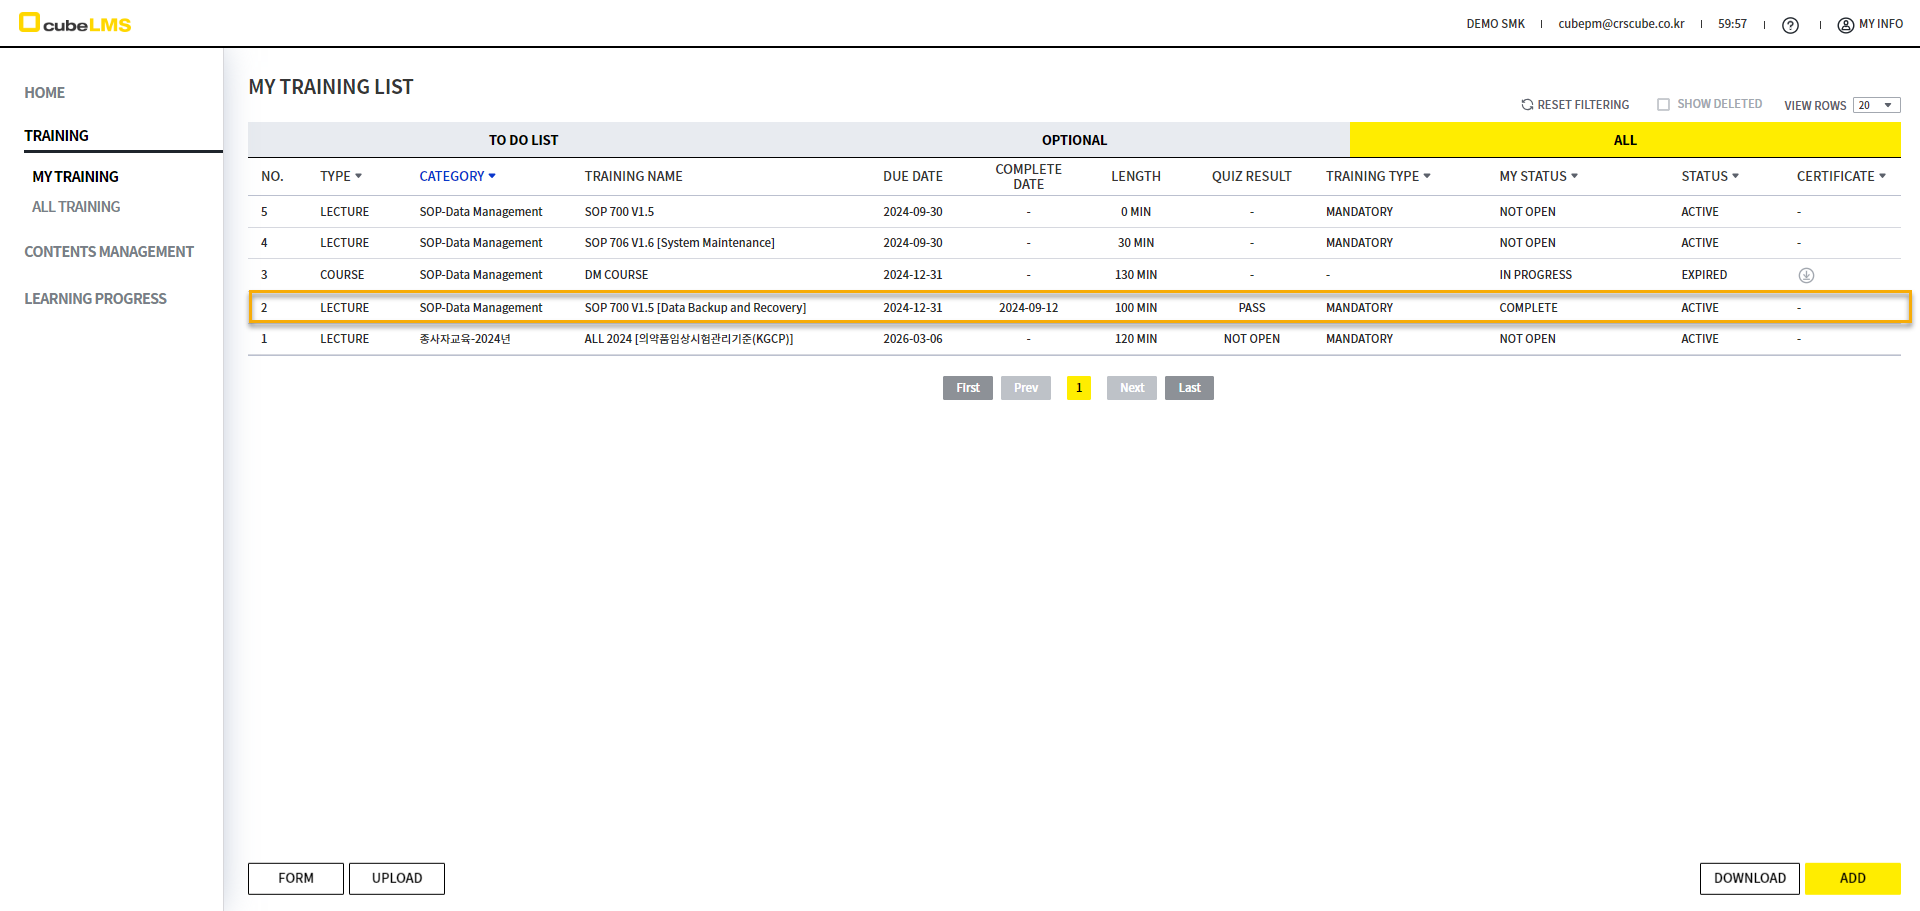
TO DO LIST-COURSE
On the Course details screen, you can view the Lectures included in the Course and their progress. Select each row to go to the Lecture details screen.
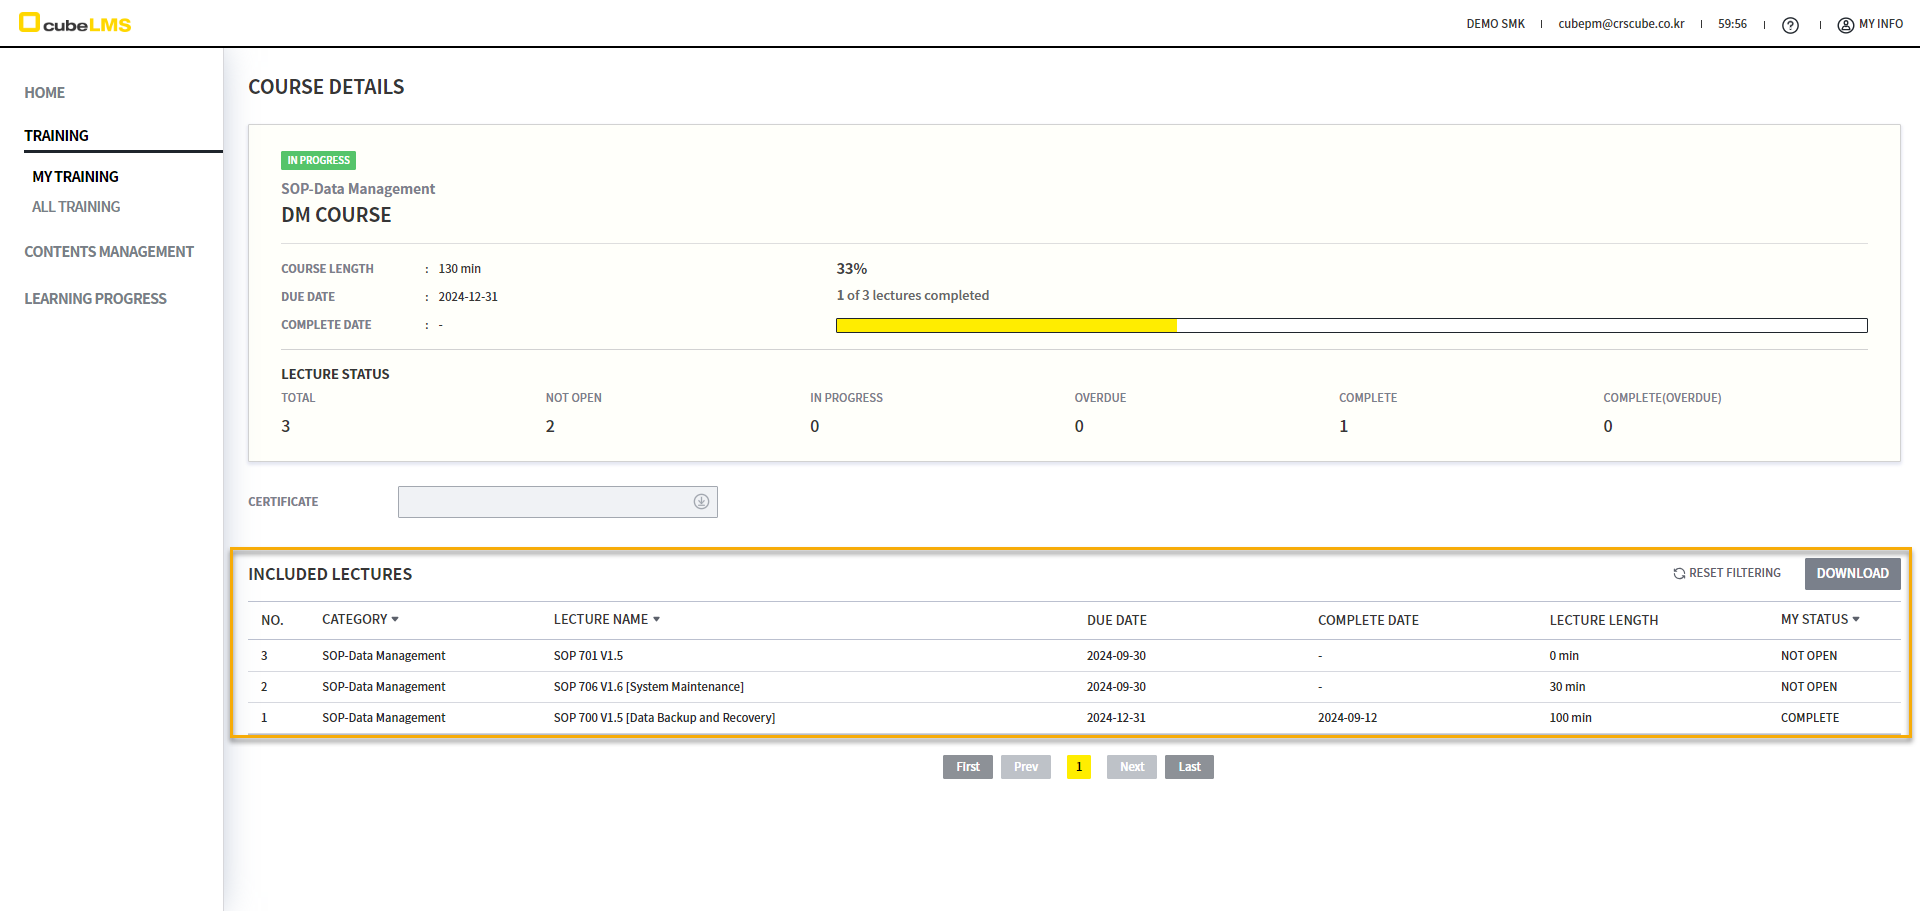
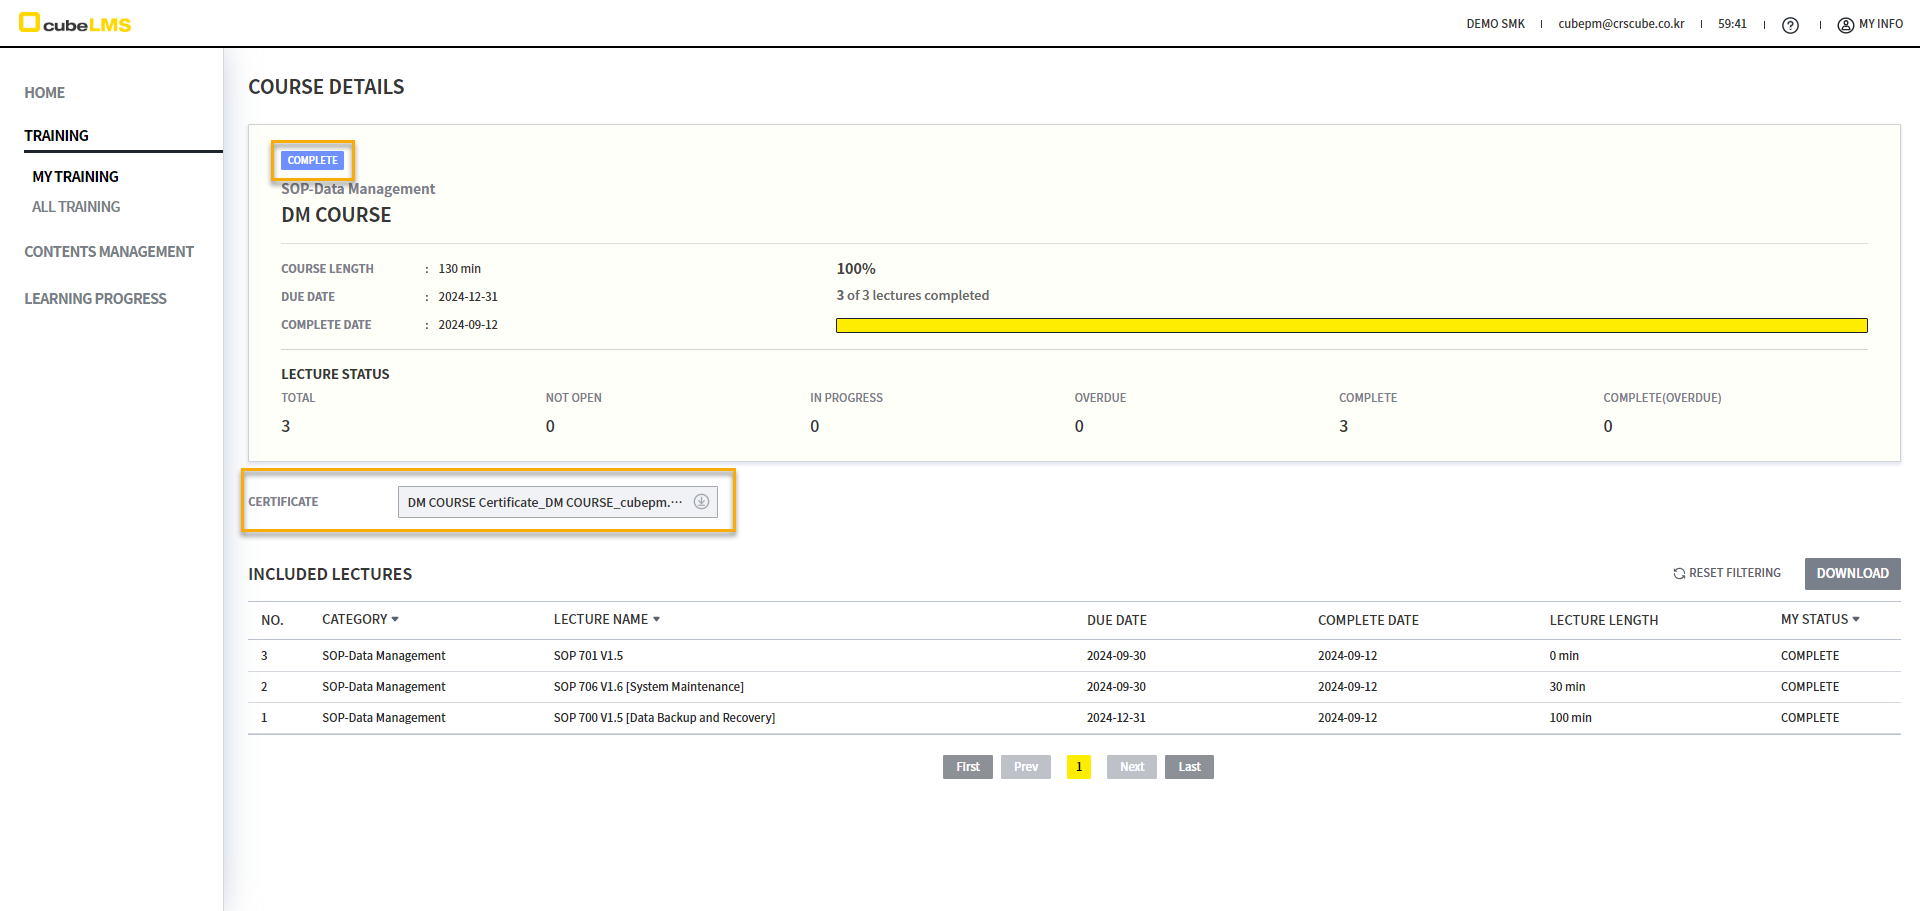
If all Lecture items in the Course are completed and the Course's Completion status is Auto complete, it is automatically marked Complete and the CERTIFICATE can be Downloaded.
If the Completion status of the Course is Contents manager check, the Contents manager can go to the Course details screen for the relevant User in Learning progress and mark it Complete.
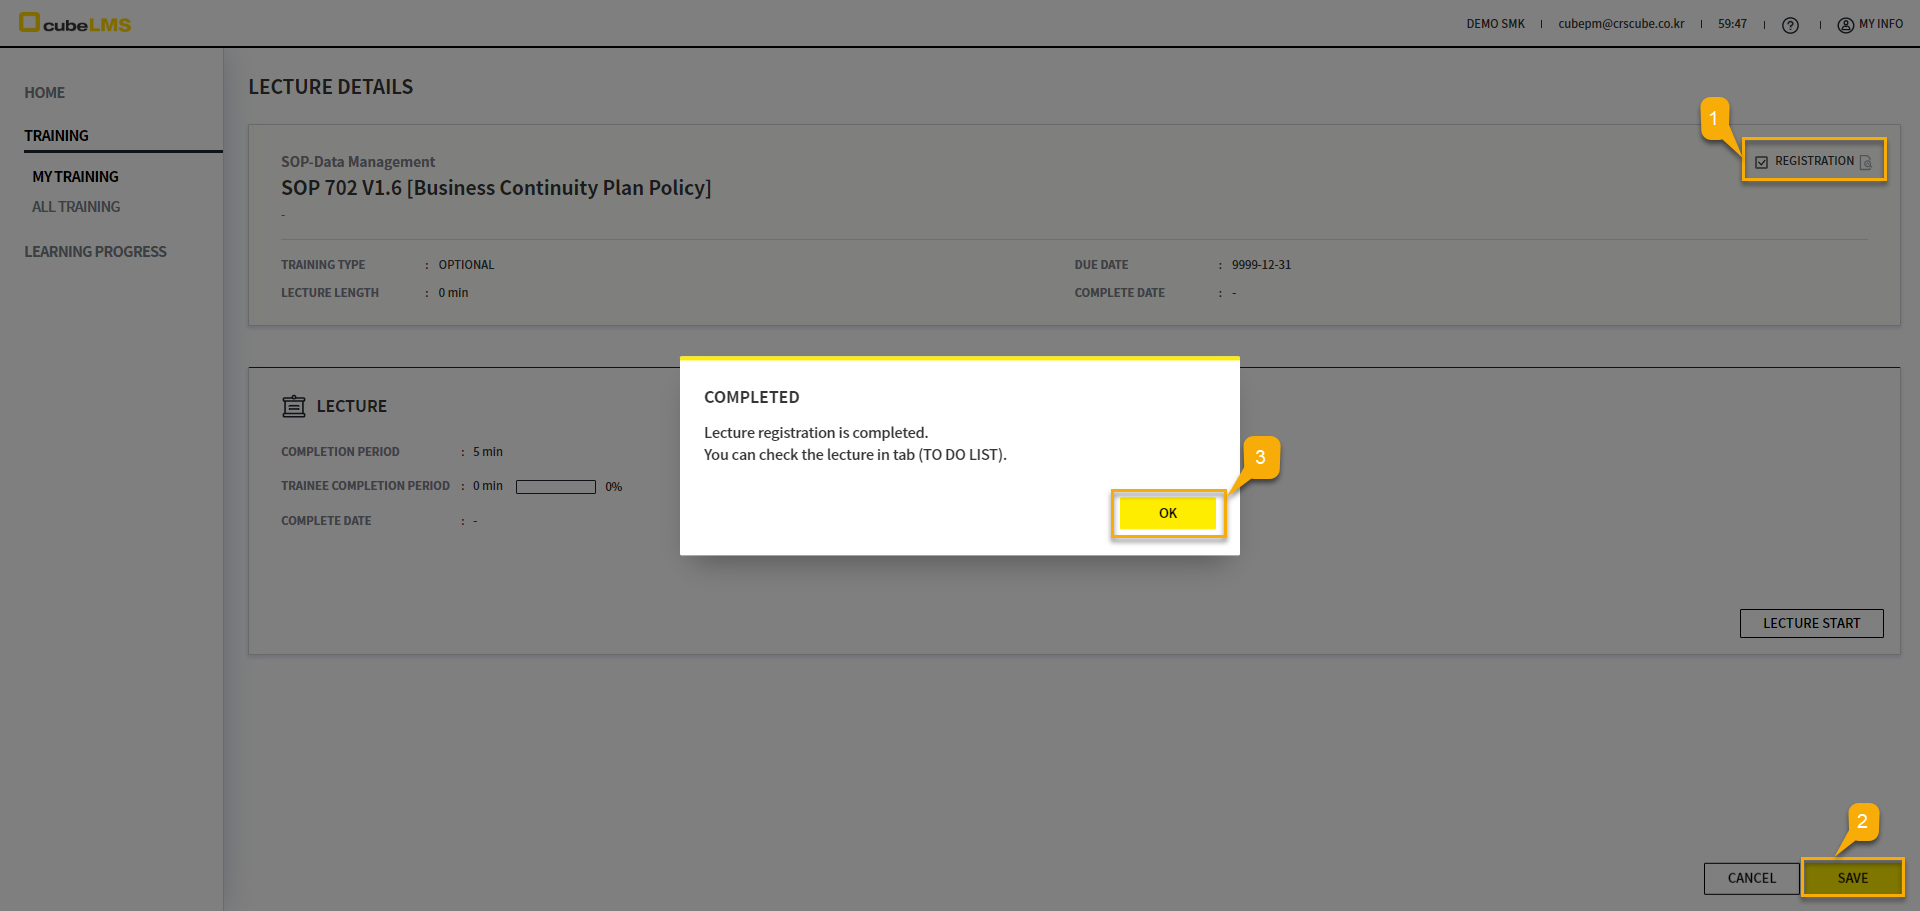
OPTIONAL
If you select the REGISTRATION button on the detail screen, you can go to TO DO LIST and take the Lecture.

ALL-Previous Training
On the ALL tab, select the ADD button to go to the previous training registration screen.
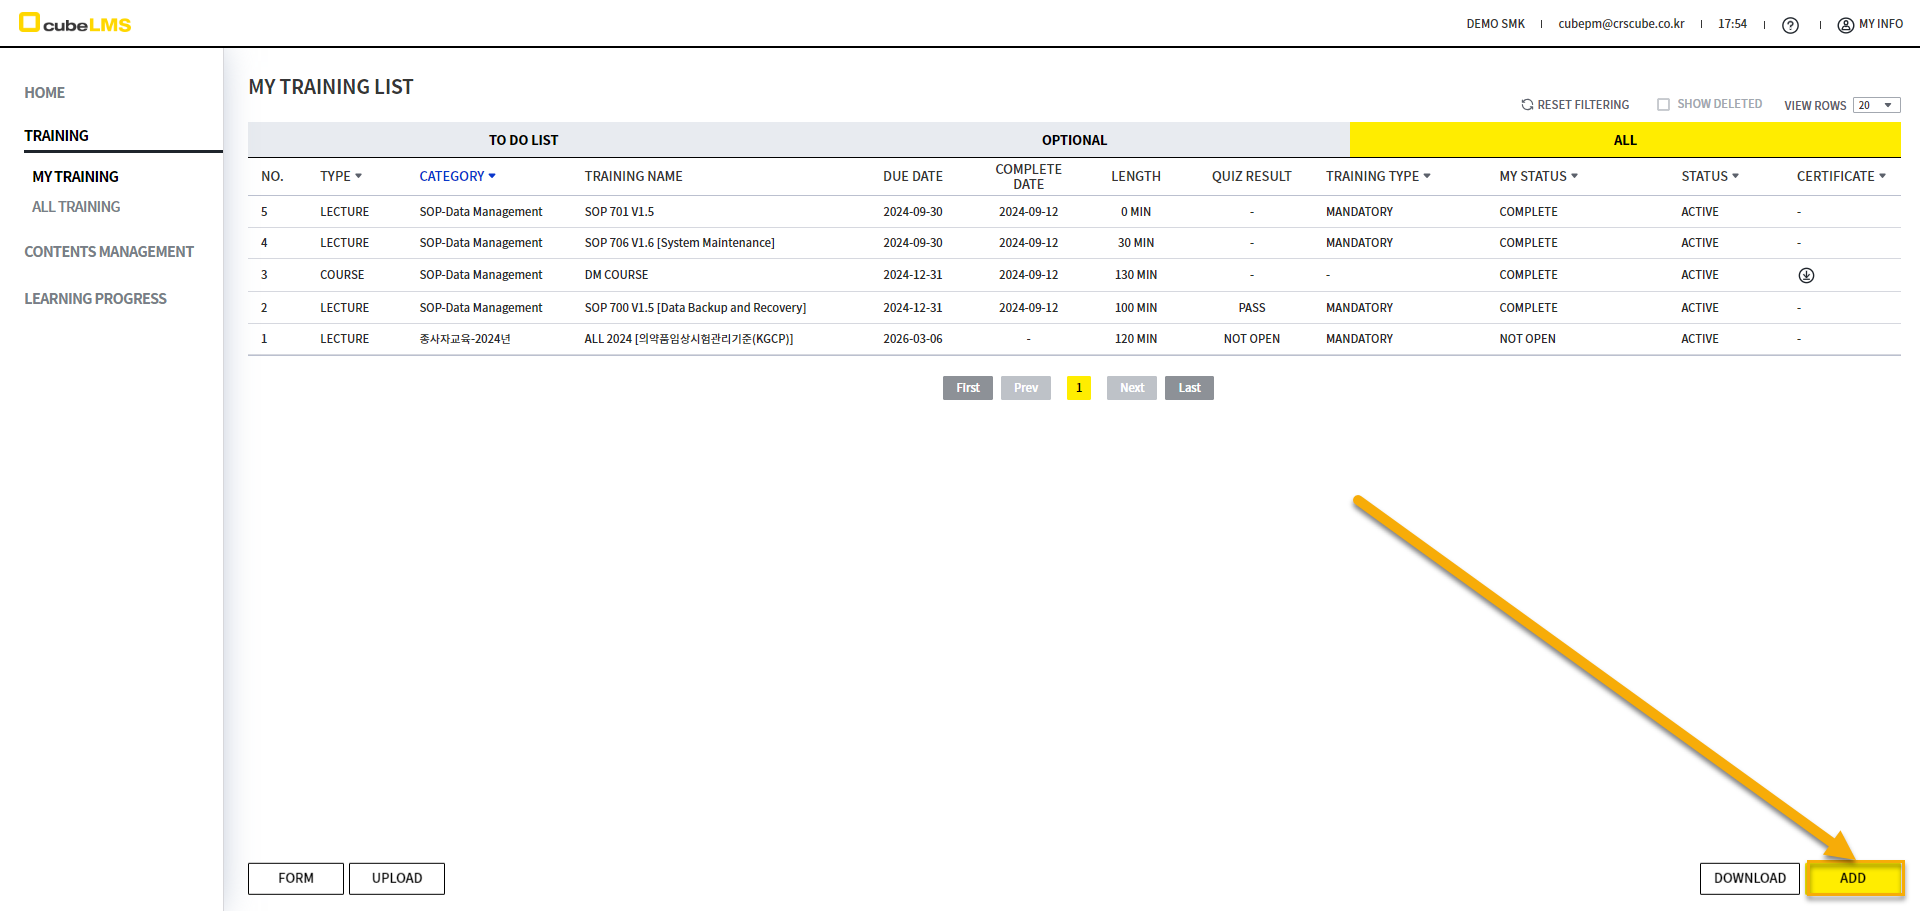
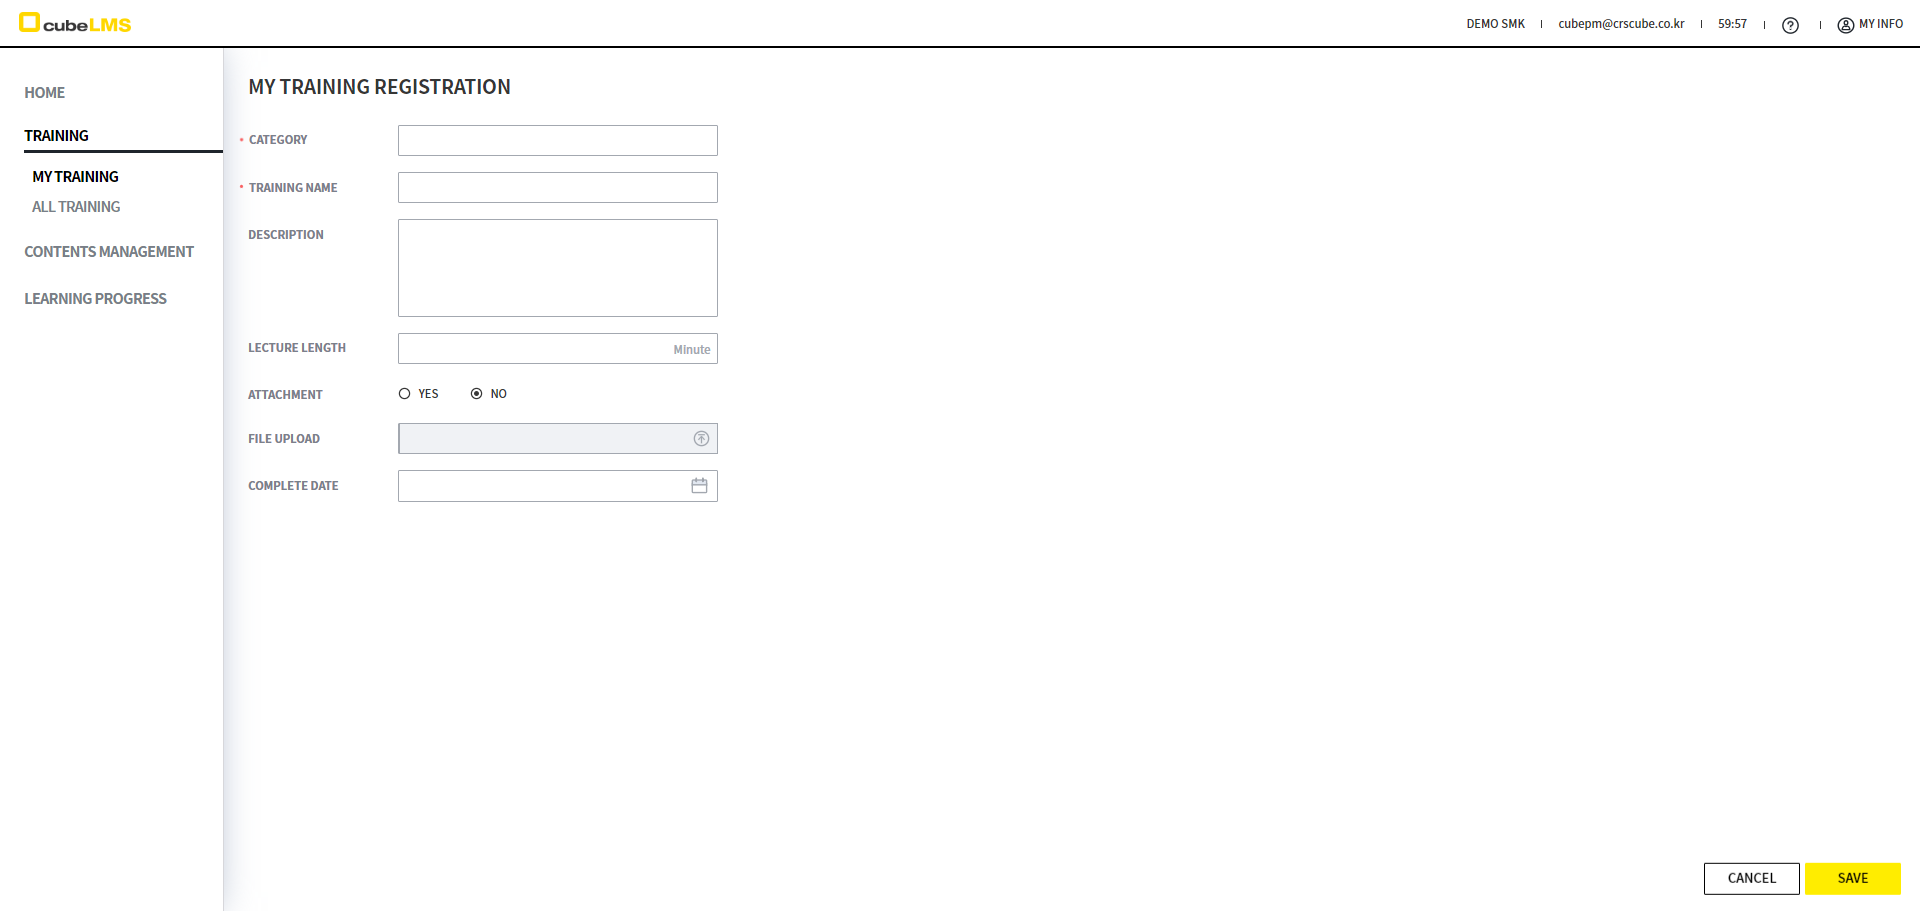
Enter all required information and select the SAVE button.
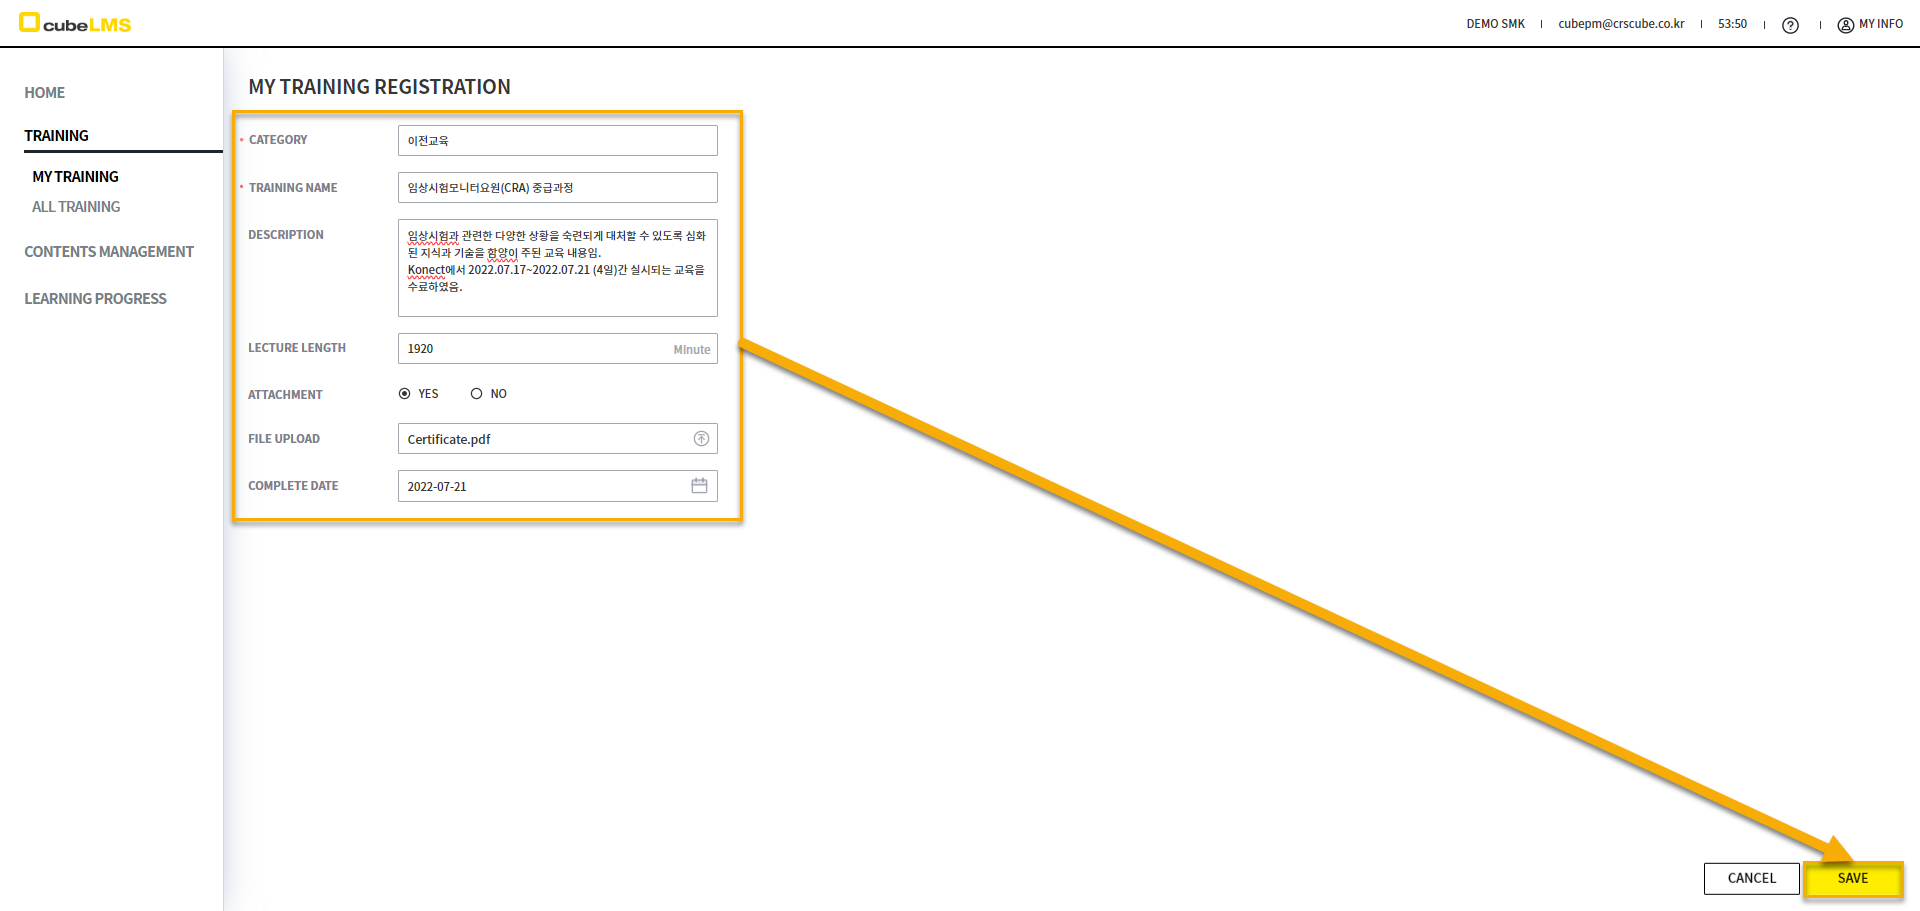
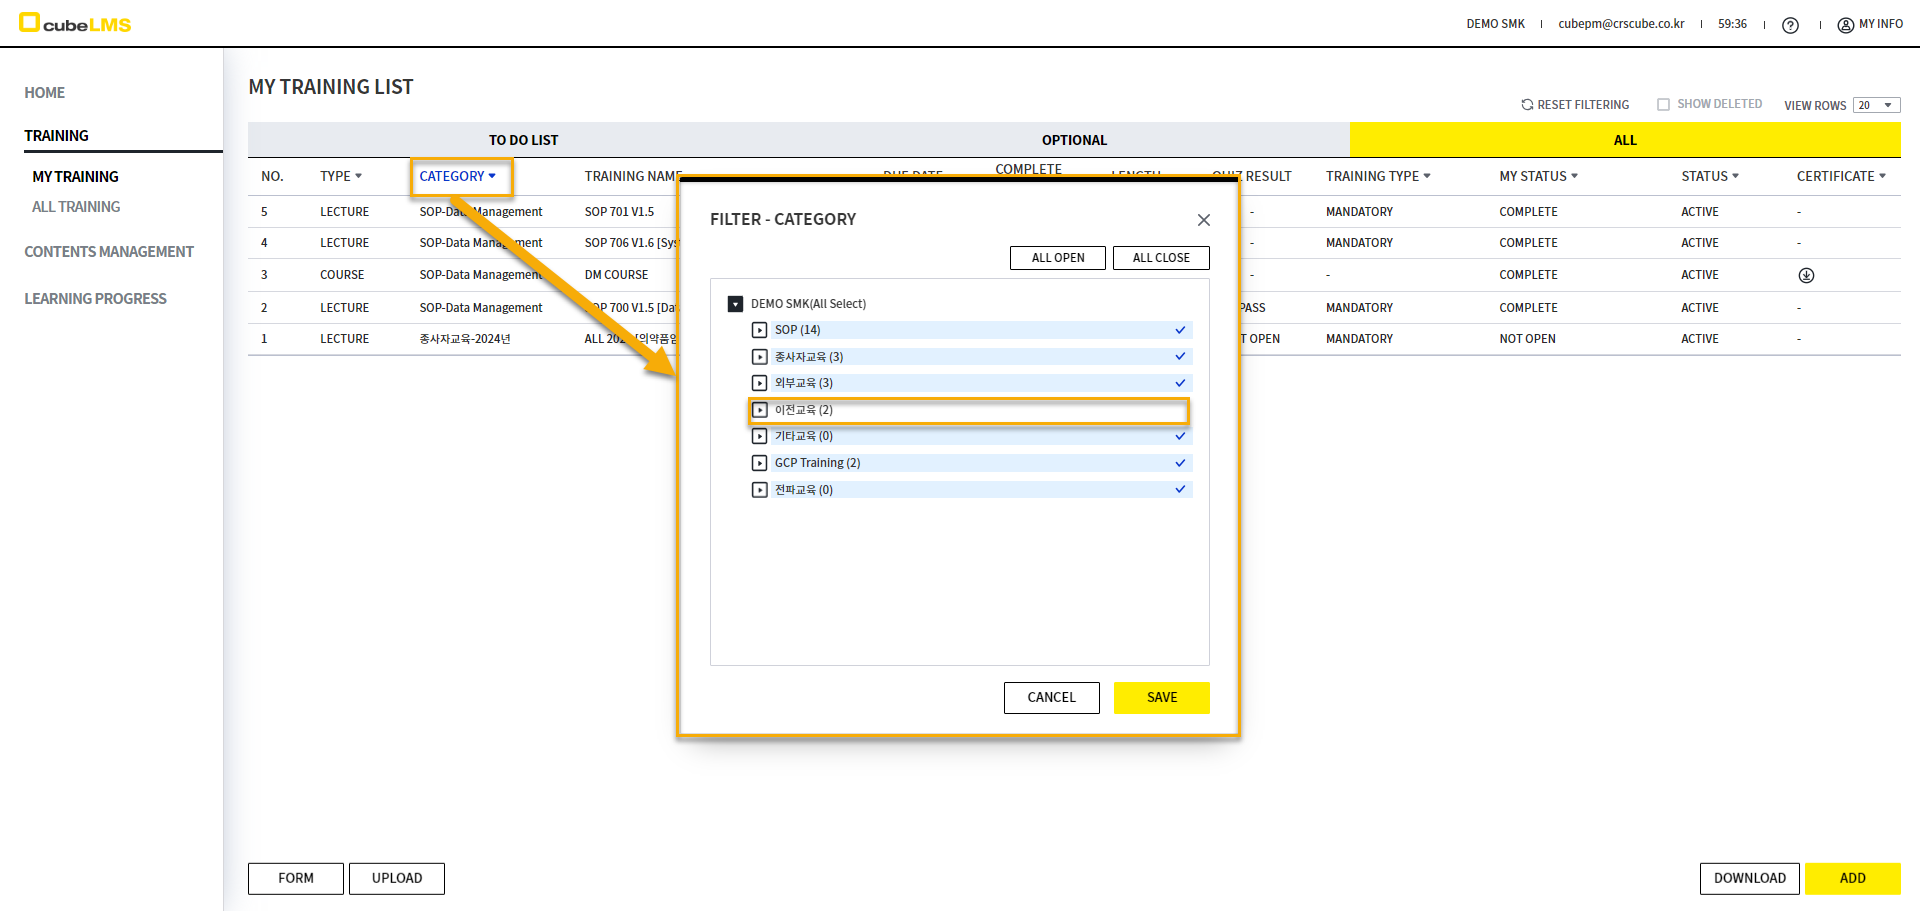
On the ALL tab, previous training items are displayed in the LIST with their checkboxes cleared by default. Check the previous training Category and click the SAVE button to view the registered previous training items.

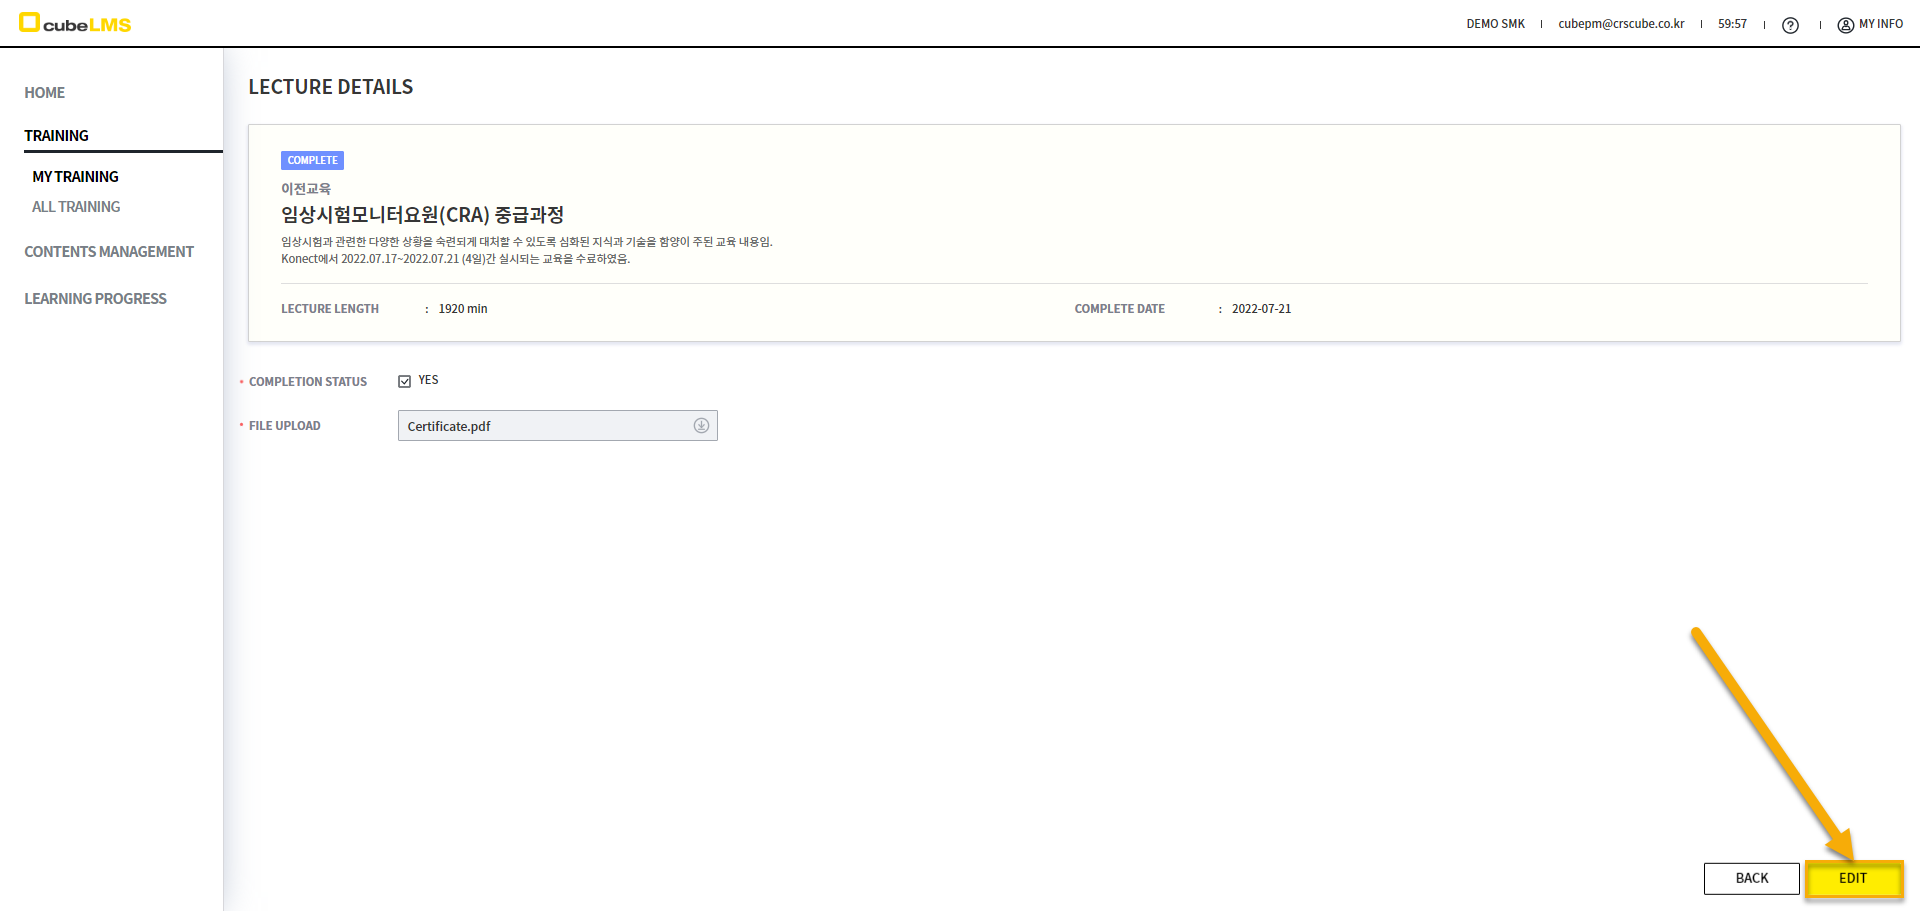
Select the relevant previous training to enter the details screen, and use the EDIT button at the bottom right to move to the edit screen.
[LEARNING PROGRESS]
TRAINING
You can check the progress of your course history by Training. (Please refer to the link for the conditions displayed by R&P. )
USER
You can view additional information such as DUE DATE and COMPLETE DATE along with your training history. Click a specific row to view detailed training history. (Please refer to the link for the conditions displayed by R&P. )