You can create a table of contents by entering Html tags in Description.
Previously, Description in Lecture Details was recognized as plain text, but it has been updated to recognize Html tags.
1. Apply Hyper Link
<a href="URL">Text</a>
It is an a tag that navigates to the URL entered with the text when you click it.
<a href="http://cubelms.crscube.io">Clicking this link will direct you to the LMS login page.</a>
When you hover over the entered 'Go to the LMS login screen.' text in Description, the cursor changes to a pointer.
This is a hyperlink, and clicking it will take you to the specified URL, the LMS login screen (http://cubelms.crscube.io).
*Note : This feature is available only when Contents Type is Video.

2. Move to the specified point in Video
<button onclick="javascript:window.open( 'URL/#/MyLectureVideo?lecture=' + window.location.href.split('/').pop() + '&video=Playback start time (seconds)\' , \'_self\')">Text</button>
-
URL:io, kr, co.krEnter the URL up to io, kr, co.kr. -
The URL addresses for each LMS server domain are as follows.
-
SVC:https://cubelms.crscube.io -
EDU:https://edu-cubelms.crscube.io
-
-
Playback start time (seconds): This indicates the time at which playback starts. Enter the time in seconds. For example, if you want to jump to 3:14, enter 194. -
Text:It specifies the text displayed in Description. Clicking the text opens the Video pop-up and plays it.
<button onclick="javascript:window.open( 'https://cubelms.crscube.io/#/MyLectureVideo?lecture=' + window.location.href.split('/').pop() + '&video=100' , '_self')">Clicking this will start playback from the specified timestamp.</button>
The code entered like this means that when you click the sentence above, 'http://-cubelms.crscube.io'will start playback from the current Lecture's Video of 100 seconds.
*Note : This feature is only available when Lecture's Contents Type is Video.

3. Text formatting
1) Specify the area to apply formatting
<span>Text to apply/span>
Using the Span tag, you can apply formatting to the entered Text between the start tag <span> and the end tag </span>.
Plain text without formatting
<u><span style="color:green">Text with formatting applied</span></u>

2) Change text color
<span style="color:Color name">Text to apply</span>
You can apply it by entering the color name in English for color.
To specify a color, enter the English name of the color or enter a color code.
Common colors include blue, red, yellow, and pink. For other color codes, please refer to the URL below.
https://www.w3schools.com/colors/colors_names.asp
<span style="color:red">Text to be changed to red</span>
<span style="color:blue">Text to be changed to blue</span>

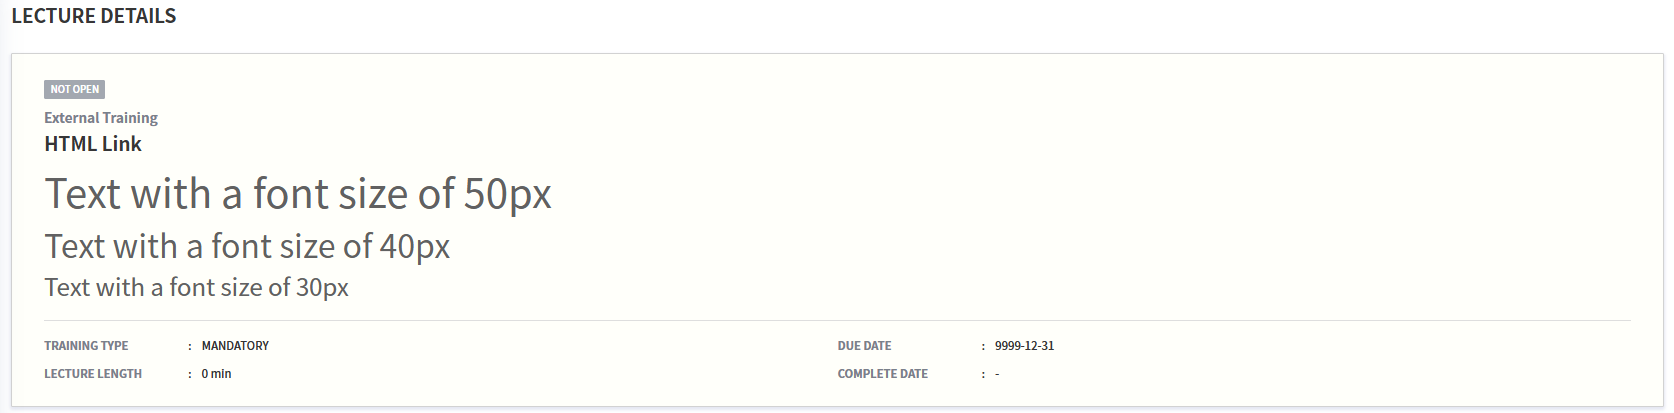
3) Change font size
<span style="font-size:size">Text to apply</span>
You can change the text size by entering the font size specified in the font size tag.
By default, you can enter px to adjust the text size by the specified number.
<span style="font-size:50px">Text with a font size of 50px</span>
<span style="font-size:40px">Text with a font size of 40px</span>
<span style="font-size:30px">Text with a font size of 30px</span>
4) Apply bold
<b>Text to apply</b>
Enter the text to format in bold between the b tags.
Text with normal weight
<b>Bold text</b>

5) Apply underline
<u>Text to apply</u>
Enter the text to underline between the u tags.
Non-underlined Text
<u>Underlined text</u>

6) Apply italic formatting
<i>Text to apply</i>
Enter the text to be italicized between the i tags.
Non-italic text
<i>Italicized text</i>

4. When combining tags
If you want to change both the text color and size together, as follows ;separate them to apply both at once.
Enter the formatting to apply within double quotes, separated by semicolons (;).
<span style="font-size:40px; color:red">Text in red with a font size of 40px</span>

If you nest tags, you can apply multiple formatting options together.
If you enter only the opening and closing tags correctly, the order does not matter, and it will be applied the same way.
<u><b><i><span style="color:red">Enter text using multiple tags</span></i></b>
<i><b><u><span style="color:blue">Enter text using multiple tags</span</u></b></i>

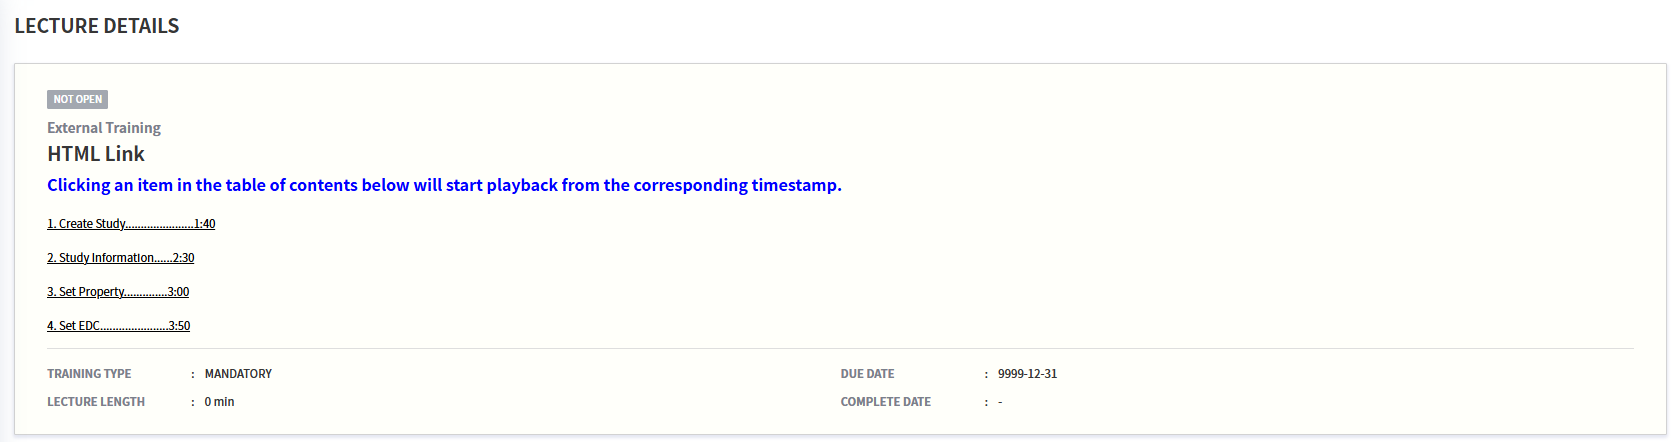
5. Usage
You can use it as follows by applying the code that starts playback from a specified timestamp and the tags that format text.
<b><span style="color:blue; font-size:20px">Clicking an item in the table of contents below will start playback from the corresponding timestamp.</span></b>

<button onclick="javascript:window.open( 'http://cubelms.crscube.io/#/MyLectureVideo?lecture=' +window.location.href.split('/').pop() + '&video=100' , '_self')"><u>1. Create Study......................1:40</u></button>

<button onclick="javascript:window.open( 'http://cubelms.crscube.io/#/MyLectureVideo?lecture=' +window.location.href.split('/').pop() + '&video=150' , '_self')"><u>2. Study Information......2:30</u></button>

<button onclick="javascript:window.open( 'http://cubelms.crscube.io/#/MyLectureVideo?lecture=' +window.location.href.split('/').pop() + '&video=180' , '_self')"><u>3. Set Property..............3:00</u></button>

<button onclick="javascript:window.open( 'http://cubelms.crscube.io/#/MyLectureVideo?lecture=' +window.location.href.split('/').pop() + '&video=230' , '_self')"><u>4. Set EDC......................3:50</u></button>